Installation
Before installing the extension, please make sure to Backup your web directory and store database
You will require to install MageDelight Base Extension first. If it is not installed then please download it from https://www.magedelight.com/pub/extensions/magedelight-base.zip and unzip the package file into the root folder of your Magento 2 installation.
Root Directory is - "app/code/magedelight/#YourExtensionName#"
- Unzip the extension package file into the root folder of your Magento 2 installation.
- Connect to SSH console of your server:
- Navigate to the root folder of your Magento 2 setup
Run command as per below sequence,
php bin/magento setup:upgrade
php bin/magento setup:di:compile
php bin/magento setup:static-content:deploy
php bin/magento cache:clean
- log out from the backend and log in again
If you are using Magento 2.3 or later then you do not need to activate license. Extension will be activated with silent activation mechanism and does not require activation keys to be entered manually.
Installation with Composer
Composer repository using this command:
composer config repositories.magedelight-repo composer https://packages.magedelight.com/
Replace repo public key and private key with your public and private key
composer config http-basic.gitlab.magedelight.com $PUBLIC_KEY $PRIVATE_KEY
composer require mage_delight/bundlediscount_module:*
composer require mage_delight/bundlediscountgraphql_module:*
composer require hyva-themes/hyva-magento2-magedelight-bundlediscount:*
To obtain your public and private keys, please navigate to the "My Account" section. In the "Download Extension Packages" tab, you will find the keys available for your access.
Backend Configuration (Admin side)
Go to Admin Control Panel > Bundle Discount > Configurations > Magedelight > Product Bundle Discount > General Configurations.
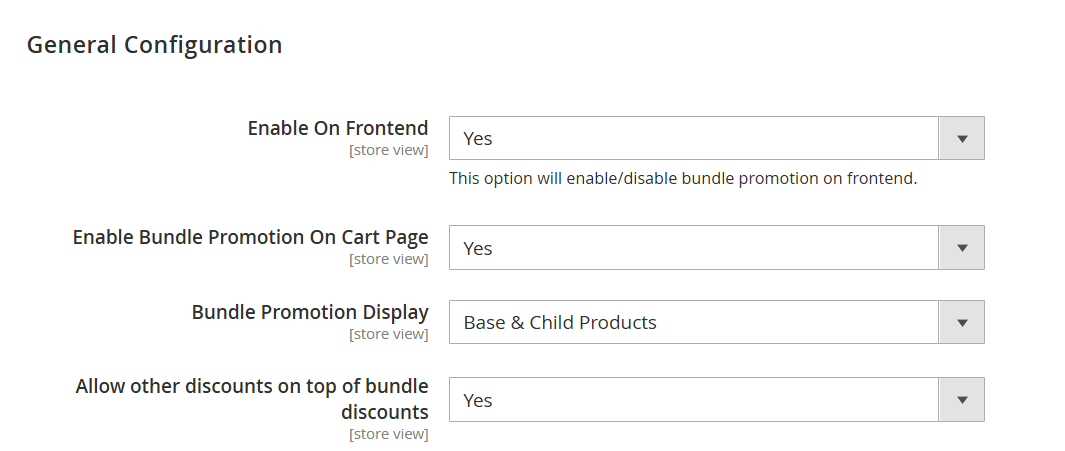
Enable On Frontend: This option will enable/disable the entire bundle promotion functionality on the frontend. The default value is enabled.
Enable Bundle Promotion on Cart Page: This will enable bundle promotions on the cart page. If any product in the cart has a bundle promotion as the main product, the related promos will be listed on the cart page similar to upsell products.
Bundle Promotion Display: It contains two options – Base Products Only and Base & Child Products. This setting manages where to display bundle promotions. If Base Products Only is selected, promotions will be shown only on the base product page. If Base & Child Products is selected, promotions will appear on both base and child product pages.
Allow other discounts on top of bundle discounts: This option allows applying additional discounts (e.g., cart rules or coupon codes) along with bundle promotions. The default value is enabled.
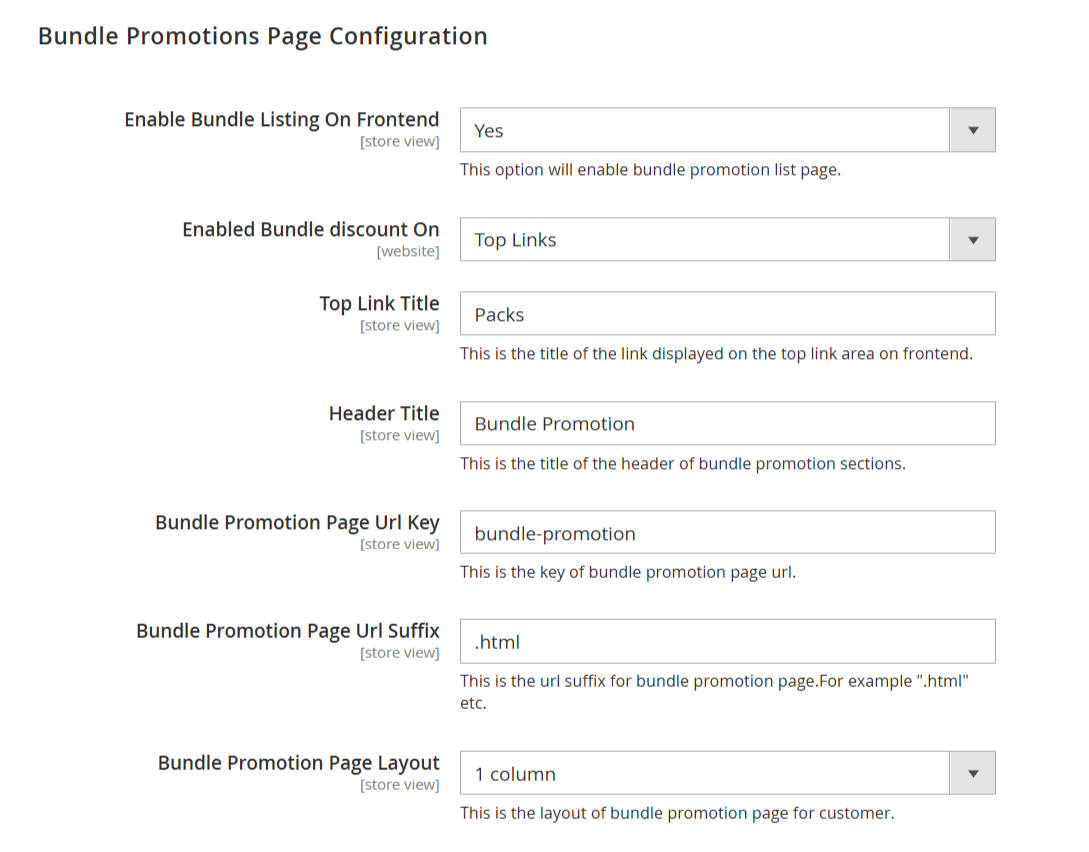
Enable Bundle Listing On Frontend: Enables or disables the bundle promotion listing page on the frontend.
Enabled Bundle Discount On: Selects the location (e.g., Top Links) where the bundle promotion link will be shown on the website.
Top Link Title: Sets the title text displayed for the bundle promotion link in the selected frontend area.
Header Title: Defines the heading title shown at the top of the bundle promotion page.
Bundle Promotion Page URL Key: Sets the custom URL key for the bundle promotion listing page (e.g.,
bundle-promotion).Bundle Promotion Page URL Suffix: Specifies the URL suffix for the promotion page (e.g.,
.html).Bundle Promotion Page Layout: Determines the layout structure (e.g., 1 column) of the bundle promotion page for customers.
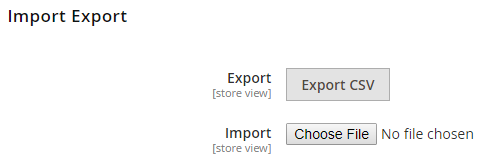
- Export: The Export button will export all the bundled promotions created to a CSV file.
- Import: It allows you to import a CSV file to create bundled promotions. This would help the admin to create promotions in bulk. It includes all options required to create bundled promotions.

Please find attached above a sample screenshot of the CSV file format.
Backend Functionality
Tag Categories
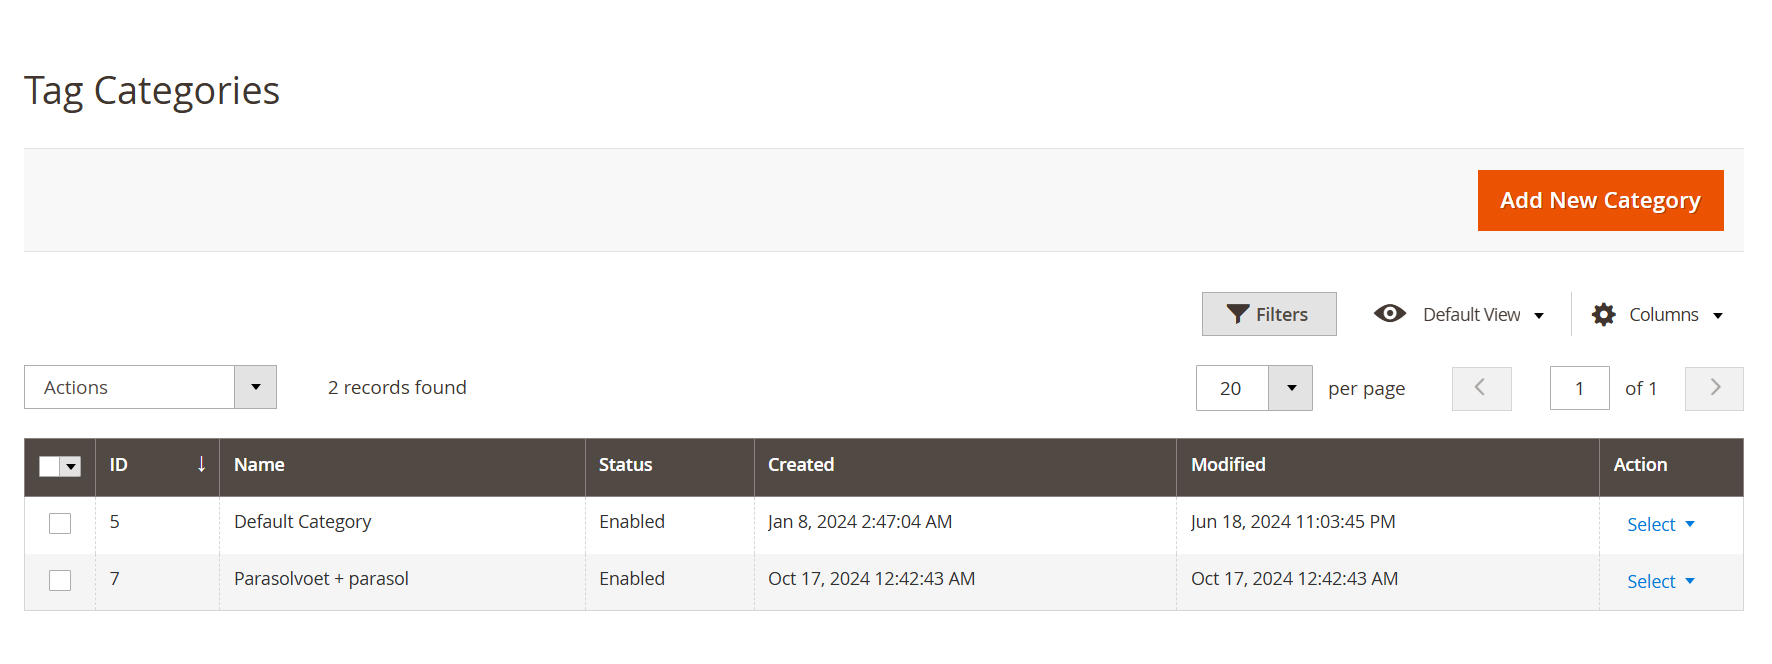
- Displays the list of tag categories with options to view, edit, enable/disable, and manage tag categories in the admin panelTag categories help group different types of promotional labels for better management and display on the frontend. In bundle promotions, these categories enhance the visibility of deals and allow customers to easily identify the nature of bundled offers. The "Add New Category" button allows the admin to create new tag categories used for organising promotional tags.
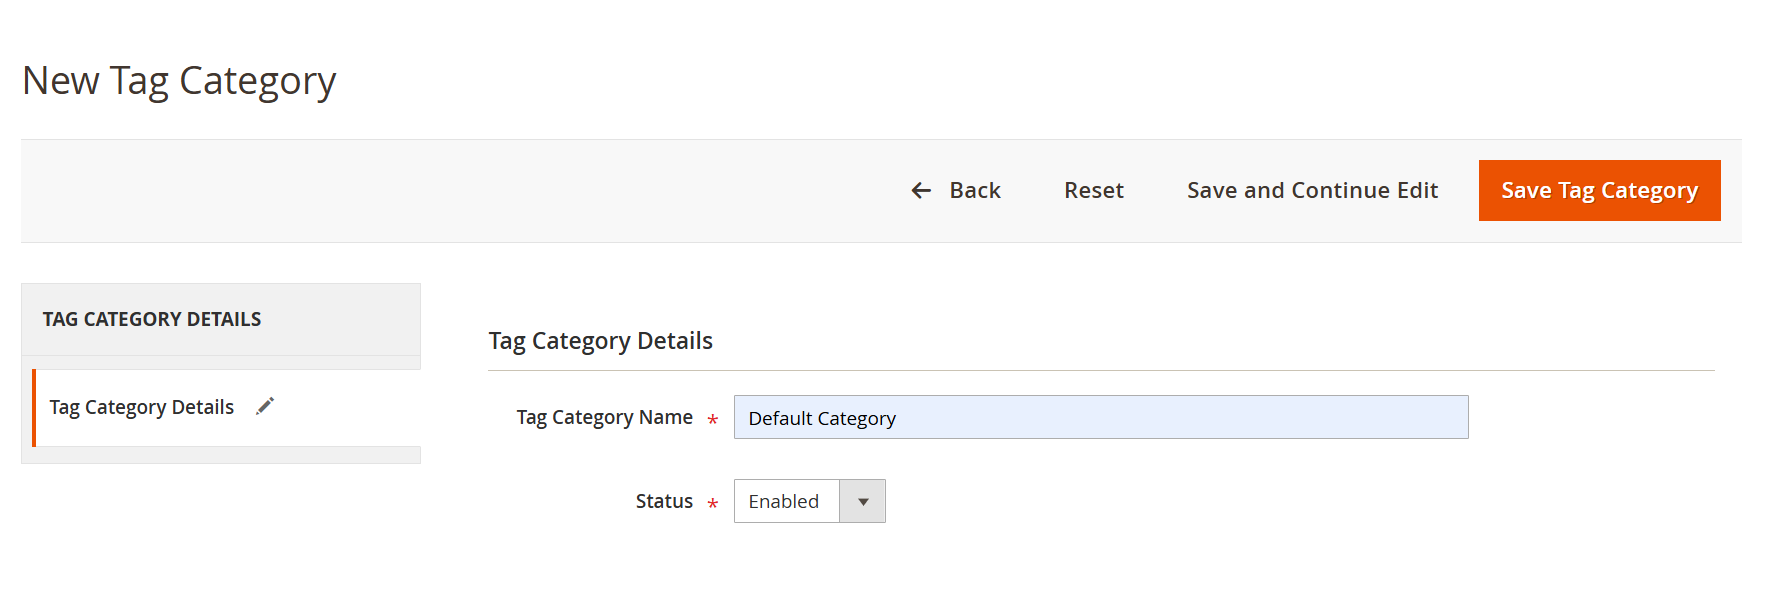
Tag Category Name: Enter the name of the tag category. This name helps group related tags for bundle promotions.
Status (Enable/Disable): Choose whether to make this tag category active (Enabled) or inactive (Disabled).
Reset Button: Click to clear the form and reset all fields to their default values.
Save and Continue Edit Button: Click to save your changes and continue editing the same tag category.
Save Tag Category Button: Click to save the tag category and return to the tag category list page.
Tag
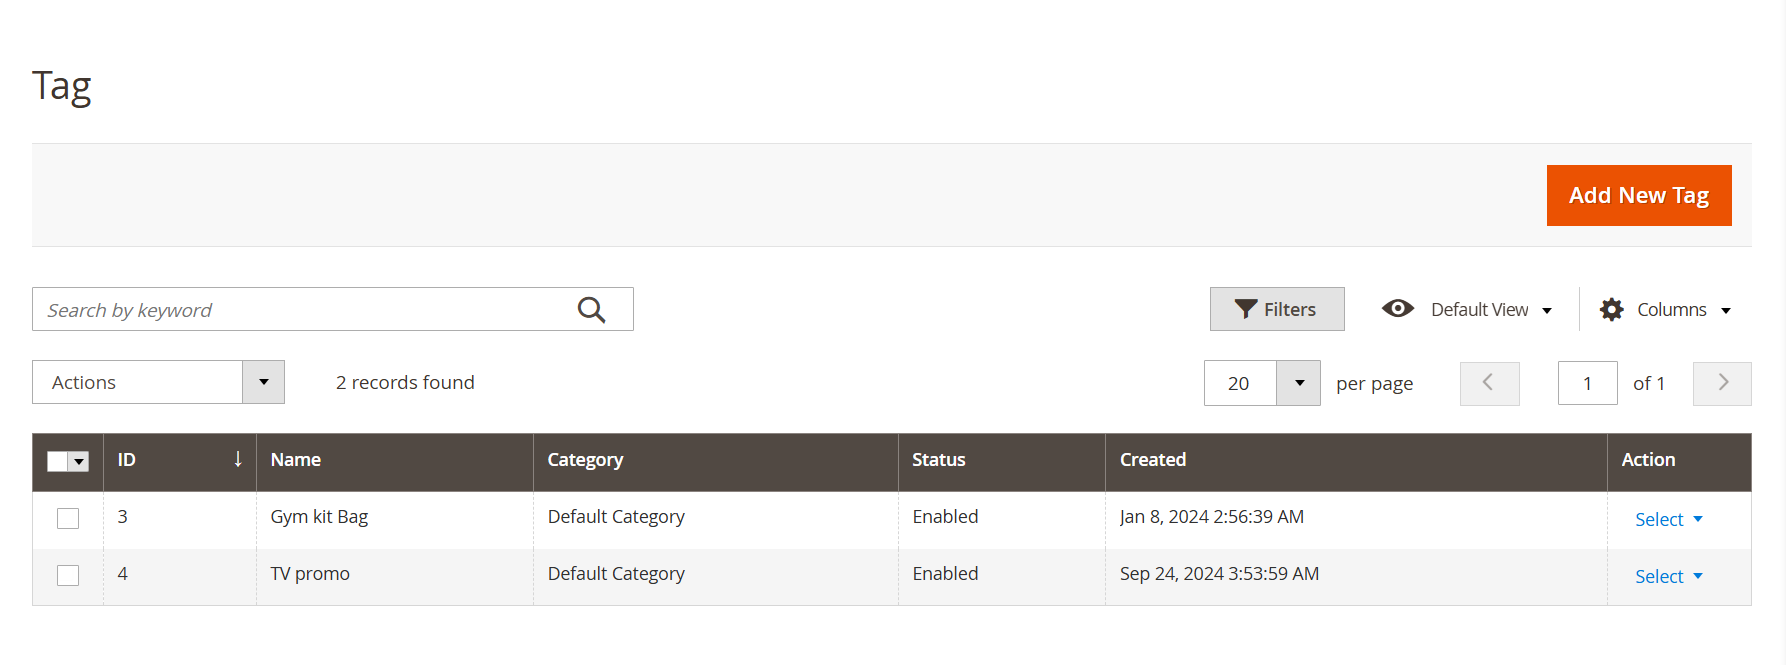
- The Tag section allows you to manage tags used for bundle promotions. You can view, search, filter, and edit tags, along with their category, status, and creation date. Click on the "Add New Tag" button to create a new tag. Tags help organise promotions and make them easier to manage on the storefront.
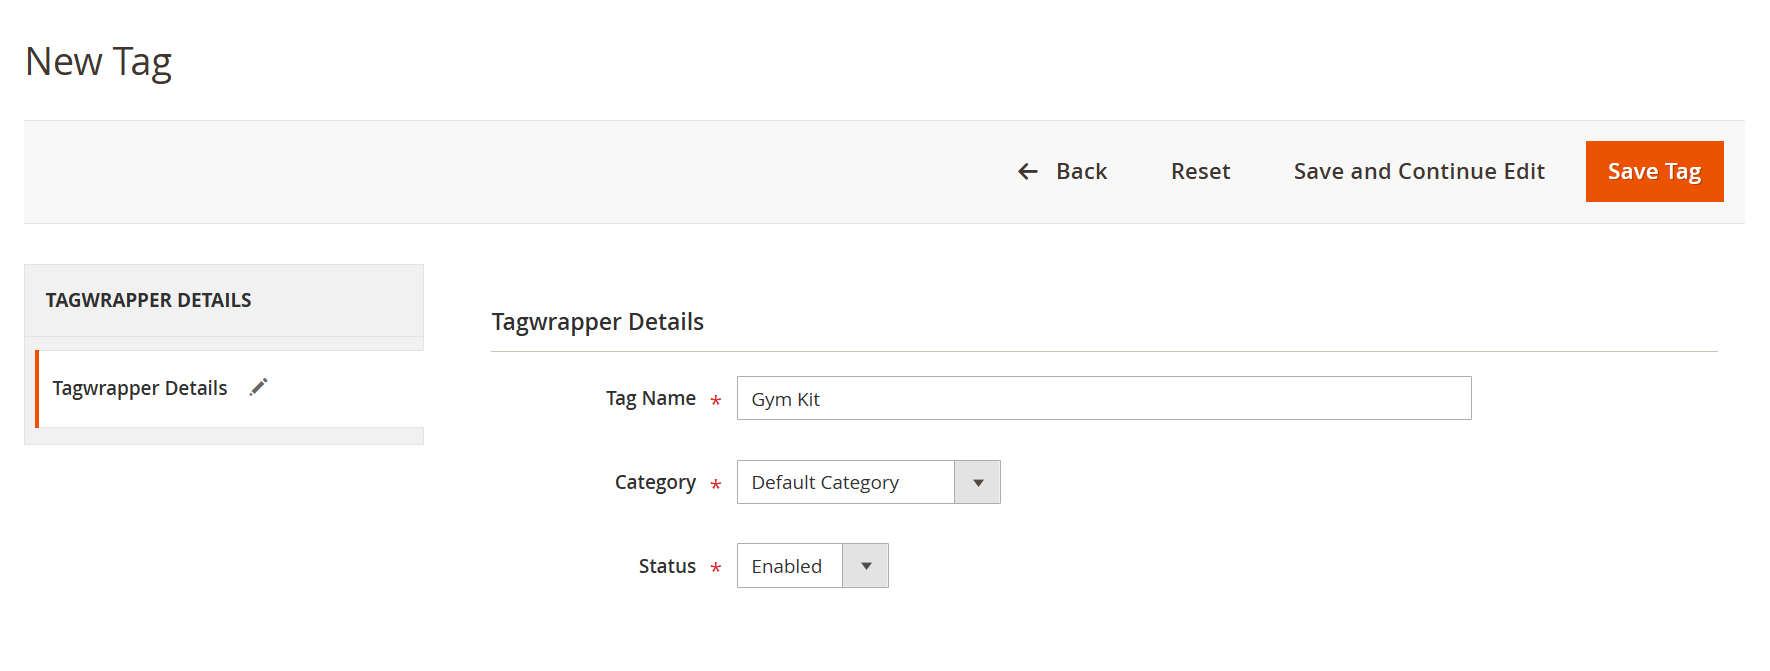
Tag Name: Enter the name for your tag. This will be used to identify the tag (e.g., "Gym Kit").
Category: Choose a category from the dropdown to organise the tag under a specific group.
Status: Set the tag as Enabled to make it active or Disabled to hide it.
Save Tag: Click this to save the tag and go back to the tag list.
Save and Continue Edit: Click this to save the tag and keep editing the same page.
Reset: Clears the form so you can start over.
Back: Takes you back to the tag list without saving changes.
Bundle Promos
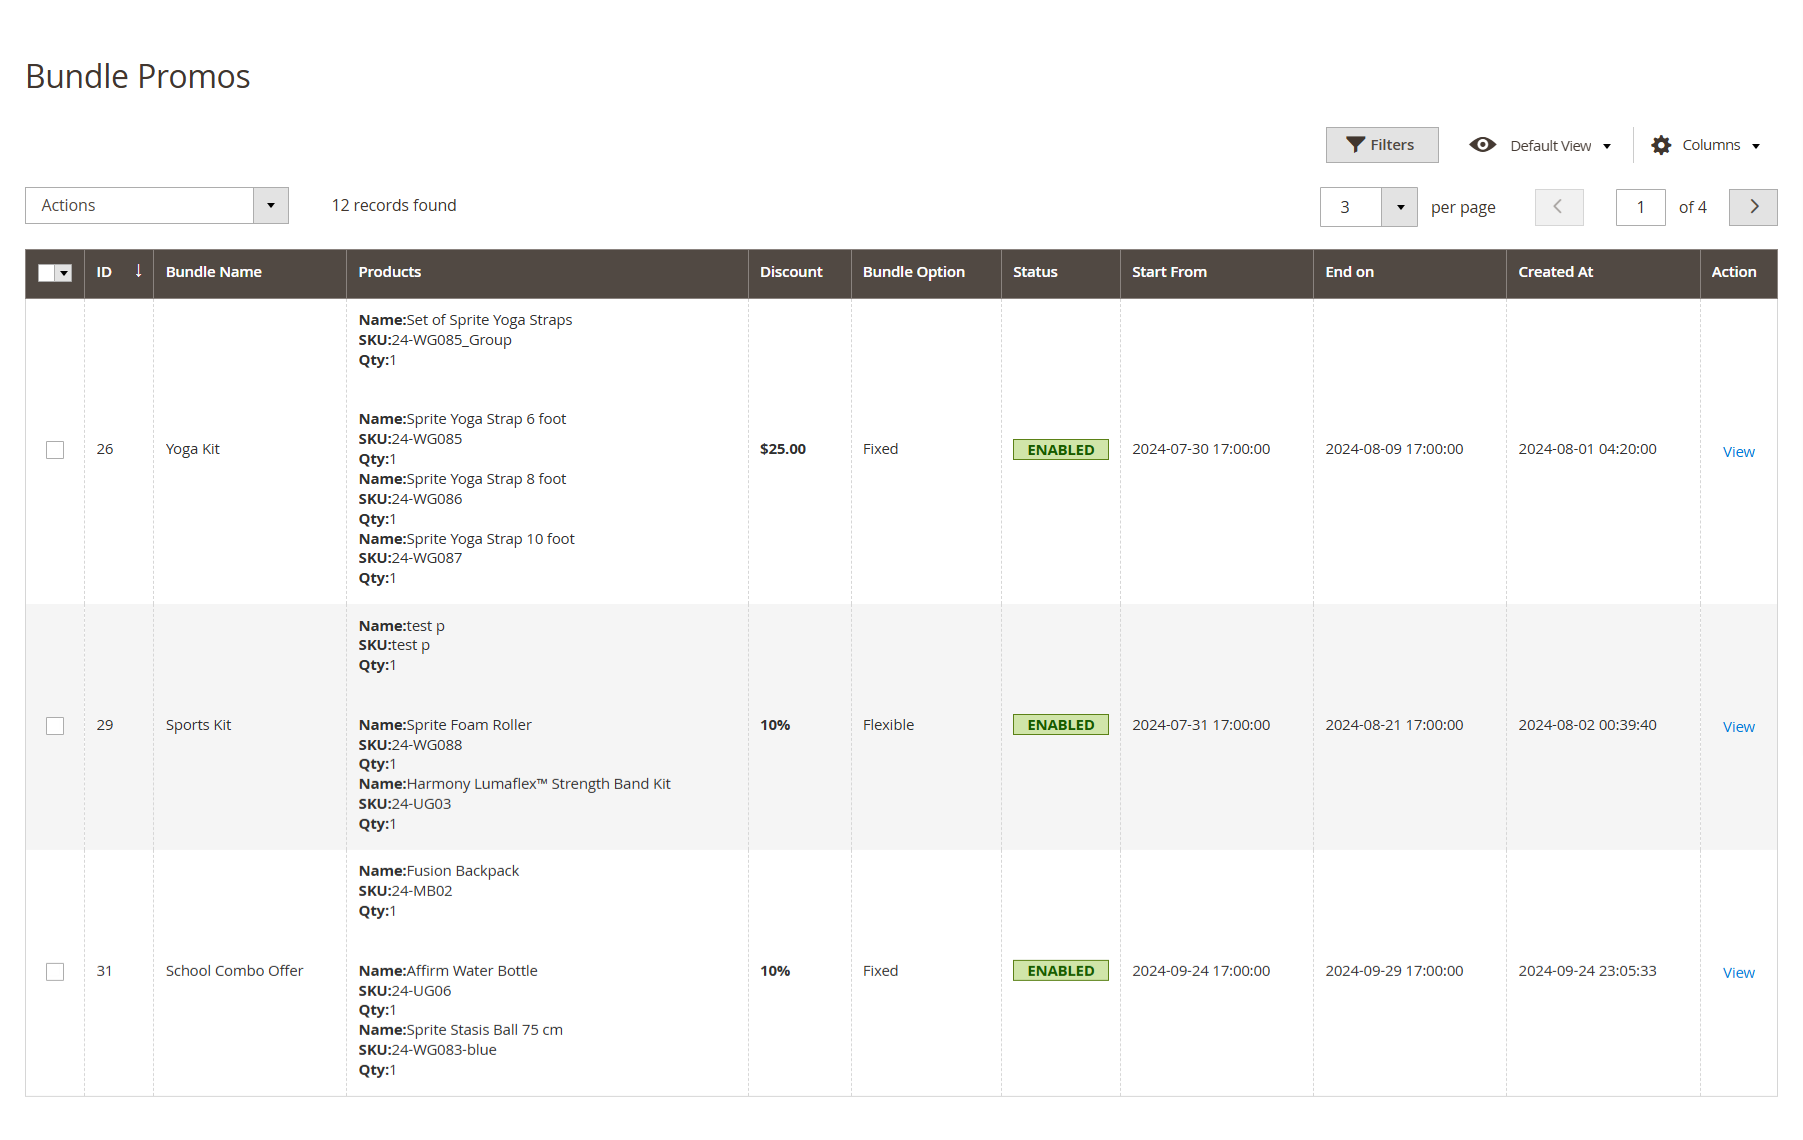
- Admins can easily manage all bundle promotions from a centralised location by navigating to: Admin > Catalog > Bundle Promos This section displays a complete list of bundle promotions with key details such as Bundle Name, Allowed Customer Groups, Allowed Stores, Included Products (with the first listed as the base product), Discount Type, Status, and Active Date Range (Start and End Date). From this screen, admins can perform mass actions like updating the status or deleting selected bundles. Each listed item also includes a link to the base product, which opens the product edit page where the "Bundle Promotion" tab can be managed.
Go to Admin Panel Control > Catalog > Product and then select the product for which bundle promotions are to be added, and then select the Bundle Promotions tab.
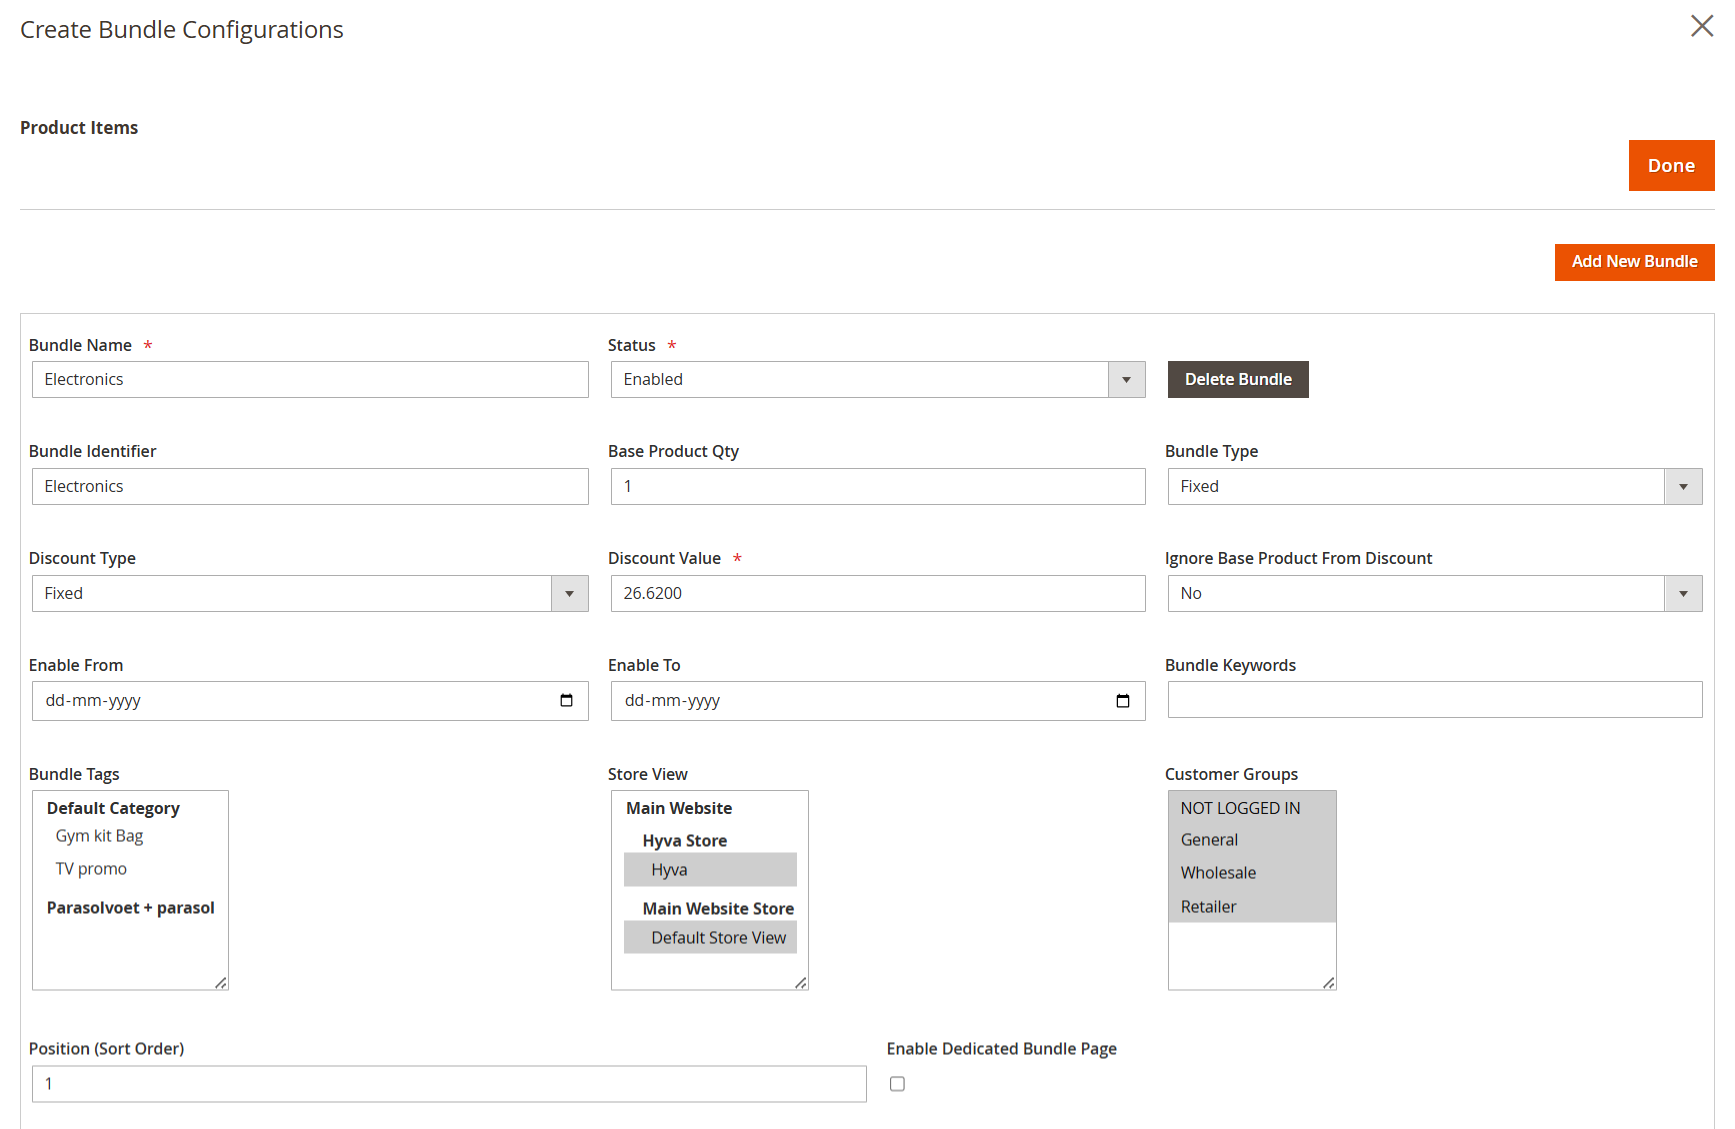
Bundle Name – Enter the name of your bundle. This will be visible on the frontend.
Status – Choose whether the bundle should be enabled or disabled.
Bundle Identifier – This is auto-filled from the name and used internally.
Base Product Qty – Enter how many base products are included in this bundle.
Bundle Type – Select how your discount will work:
Fixed: Fixed amount off
Flexible: Discount spread across products
Discount Type – Choose either:
Fixed – A total fixed discount amount applied to the entire bundle (e.g., $20 off the total price).
Percentage – A percentage discount applied to the total bundle amount (e.g., 10% off).
Item Fixed – A fixed amount discount is applied to each item in the bundle (e.g., $5 off per item).
Item Percentage – A percentage discount applied to each item in the bundle (e.g., 10% off each item).
Discount Value – Add your discount amount or percentage here.
Ignore Base Product From Discount – Select Yes to exclude the base product from the discount.
Enable From / Enable To – Set the start and end dates for the bundle offer.
Bundle Keywords – (Optional) Add search keywords to help identify this bundle.
Bundle Tags – Select tags to group or categorise your bundle for filtering and display.
Store View – Choose which website/store views this bundle will be shown on.
Customer Groups – Select which customer types (e.g., General, Wholesale) can see this bundle.
Position (Sort Order) – Set the order for this bundle in listings. Lower numbers appear first.
Enable Dedicated Bundle Page – Tick this if you want a separate landing page just for this bundle.
Delete Bundle – Click to remove this bundle setup.
Add New Bundle – Use this to add another bundle to the same product.
Done – Save and close the bundle setup.
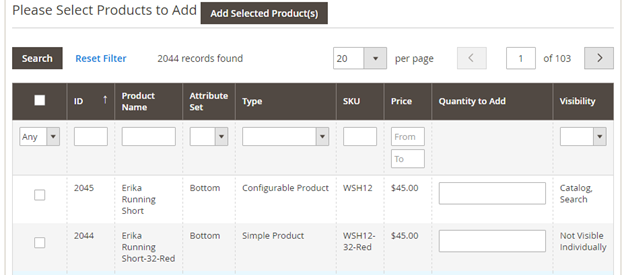
- Add Product: This section allows the admin to select and add products to a bundle promotion. You can search, filter, and choose multiple products at once.
Search & Filter: Use the filters (like ID, Name, Type, Price, and Visibility) to quickly find the products you want to include.
Select Checkbox: Tick the checkbox next to each product you want to add to the bundle.
Quantity to Add: Specify the quantity of each product to be included in the bundle.
Add Selected Product(s): Once your selection is done, click this button to include the chosen products in your bundle configuration.

- The product selection grid displays all product types except grouped products. From this interface, you can select the items you want to include in your bundle promotion. You can define the quantity of each product that should be added to the cart to qualify for the promotion. Additionally, you can set the position of each product to control the order in which they appear within the bundle. Once you have made your selections, click "Add Selected Product(s)" to include them in the bundle setup and create a complete promotional bundle.
Frontend Functionality
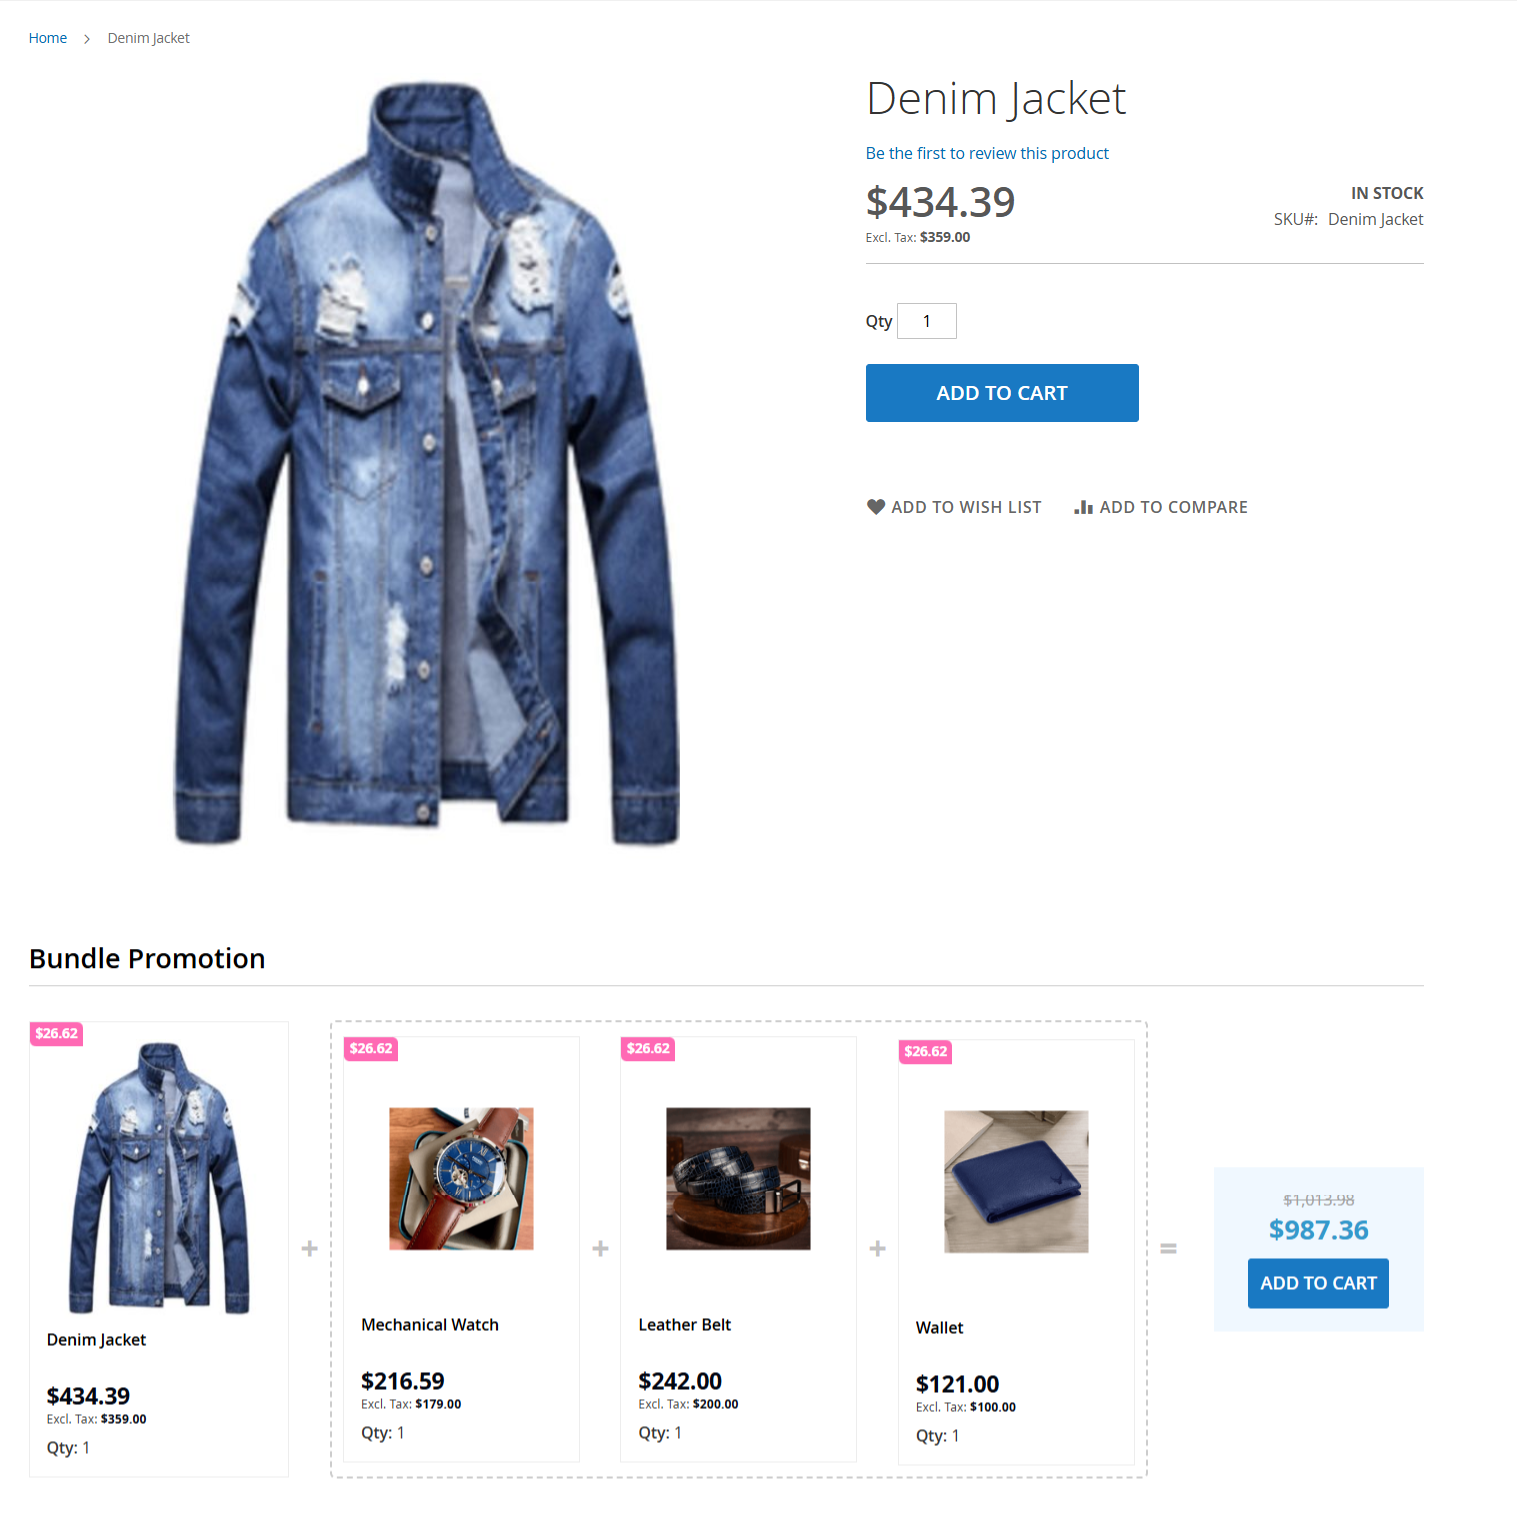
- On the frontend example shown in the images, the "Add to Cart" button is displayed on the PDP page for the Bundle Promotion because none of the products in the bundle require additional configuration (such as size, colour, or custom options). All items in the bundle have a default configuration and fixed quantity, which allows the system to add them directly to the cart in one click without prompting the customer to choose options. This creates a quick and seamless experience for the customer, encouraging faster checkout and increasing chances of upselling through bundles.
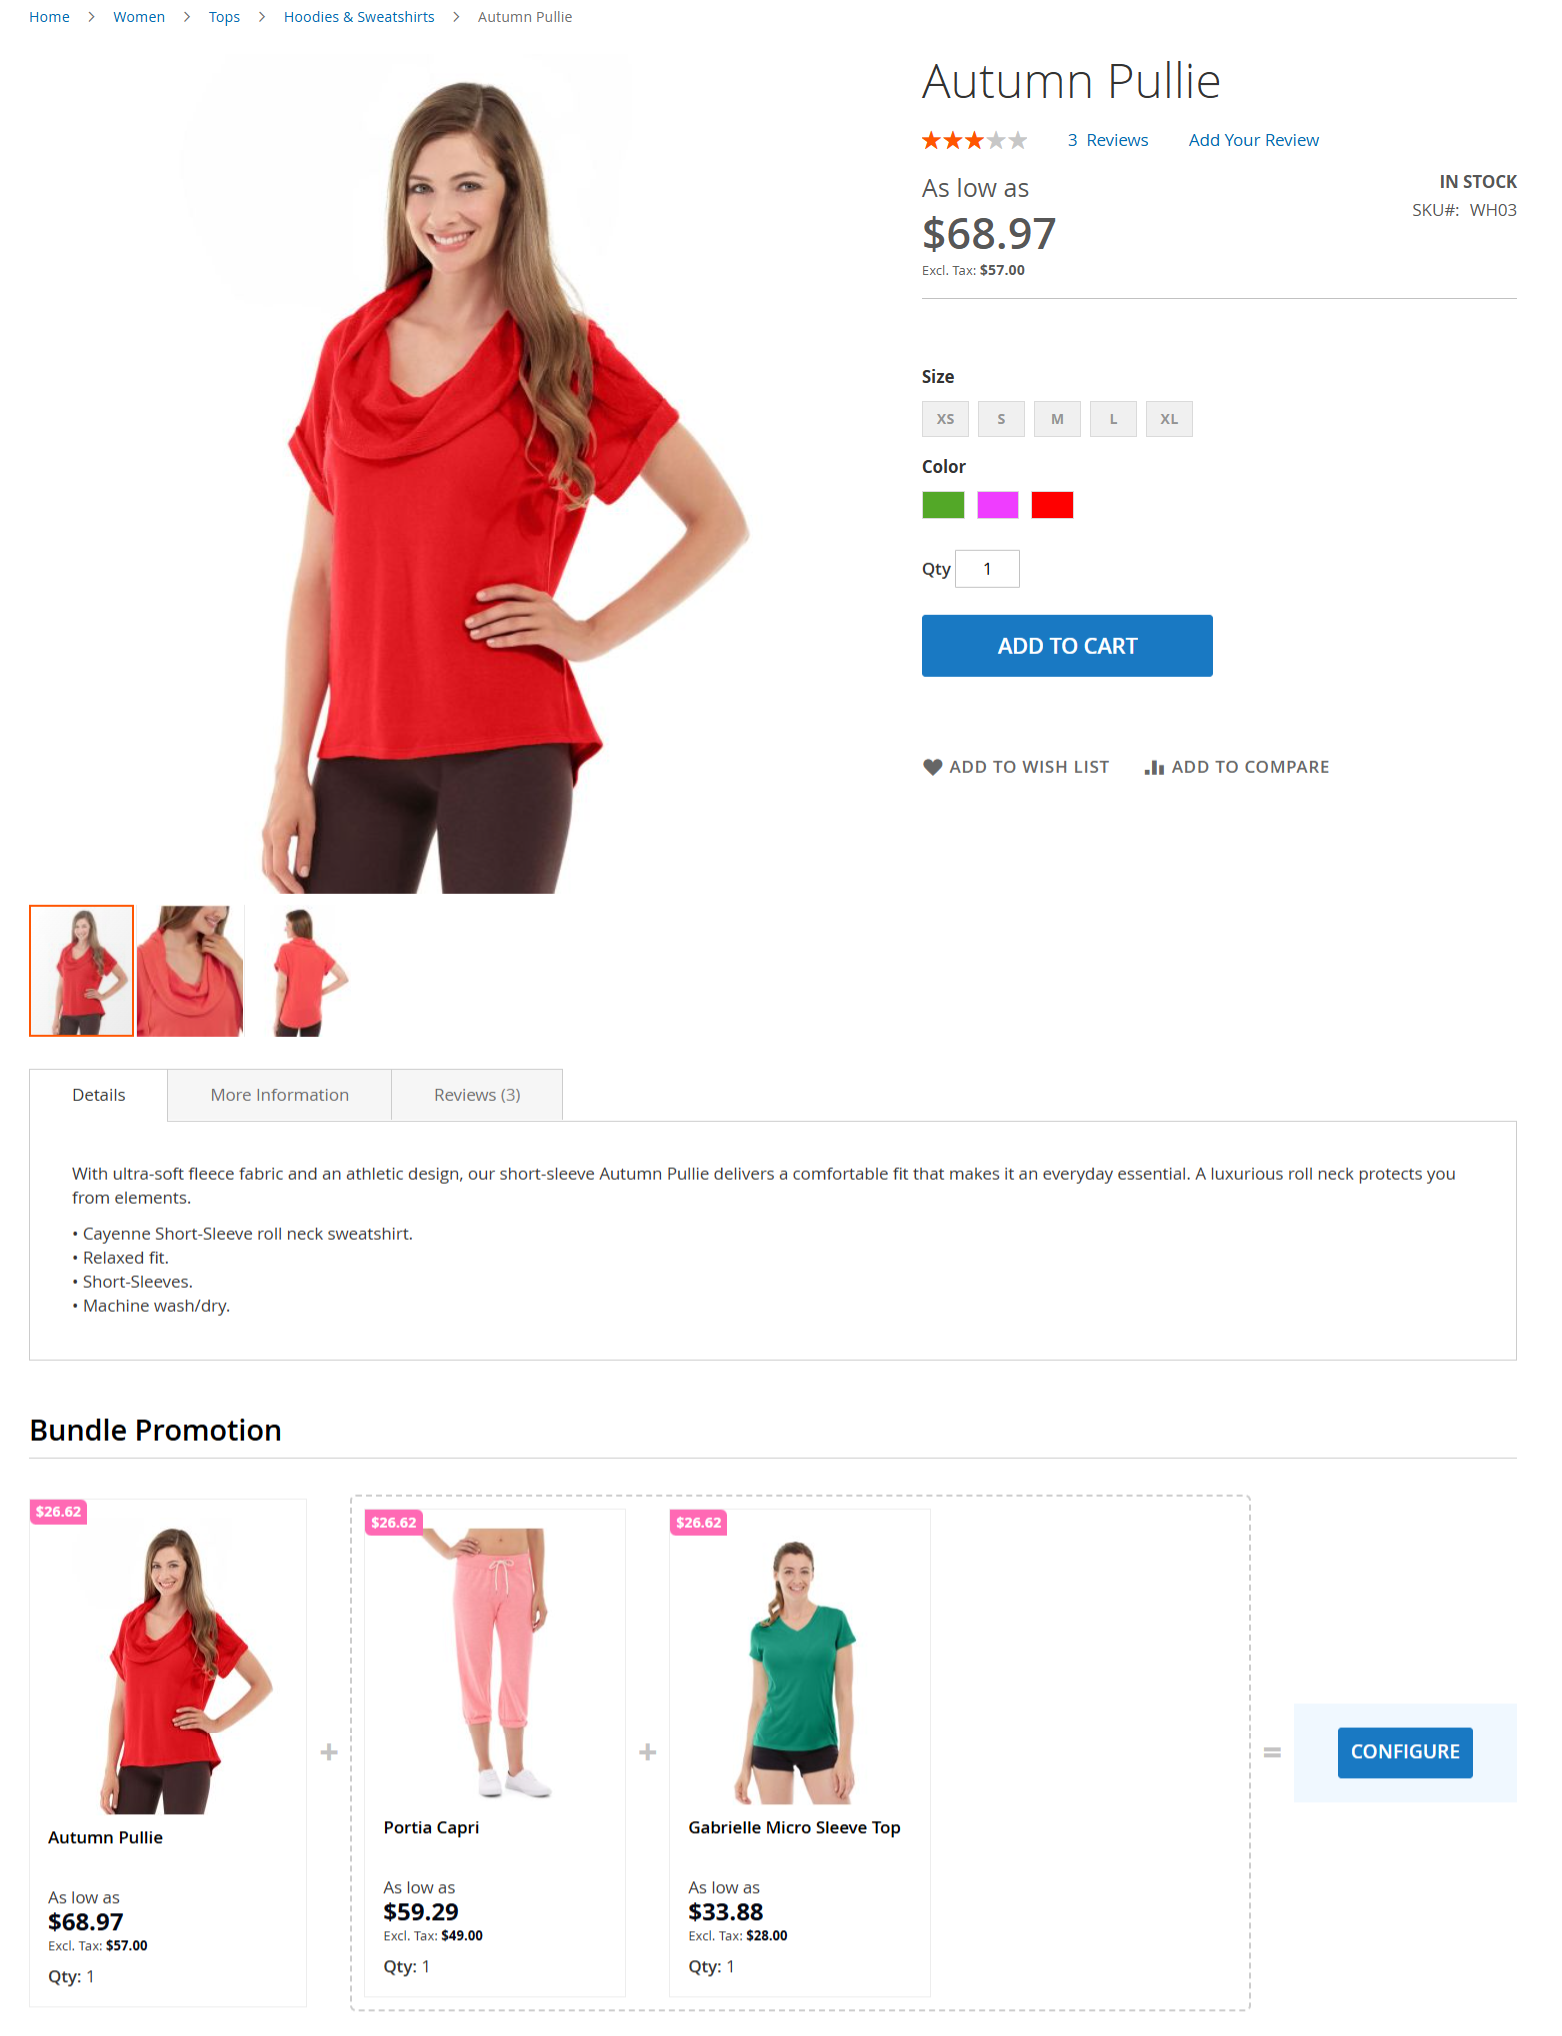
- On the frontend, the Bundle Promotion section appears just below the main product details on the product view page. This section shows a group of related products offered together as a bundle at a discounted price. Customers can see each product in the bundle along with its name, image, price, and discount label. If the products do not require any configuration (like size or colour), an Add to Cart button will be shown. Otherwise, a Configure button appears, allowing the customer to select the required options from a pop-up before adding all products to the cart. This feature helps customers easily purchase related items in a single click while enjoying special bundle discounts.
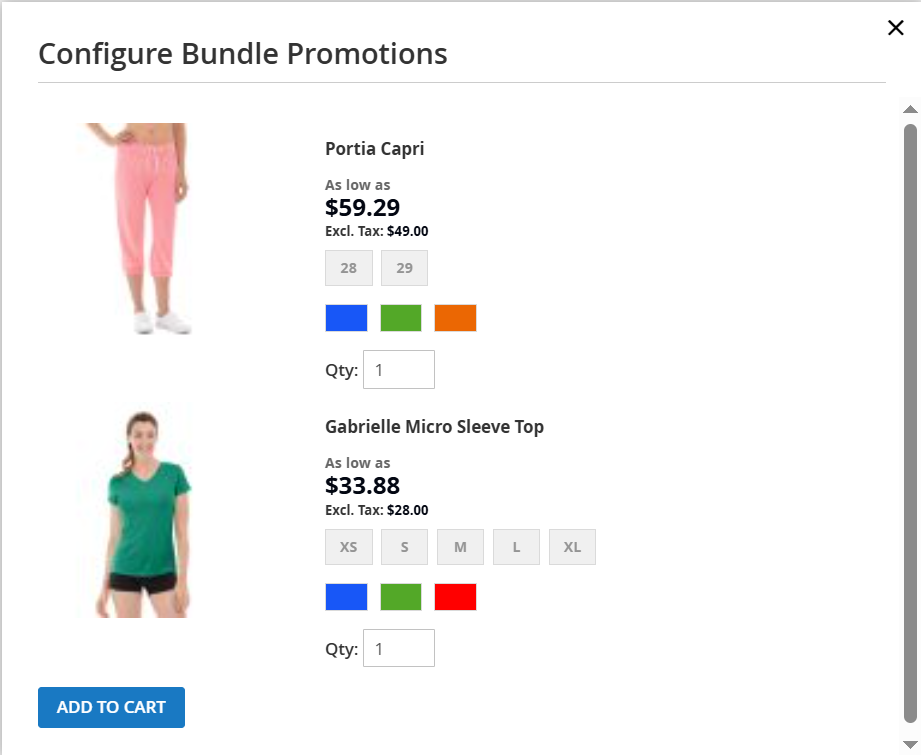
- In this image, the “Configure Bundle Promotions” pop-up is displayed when the bundle includes products that require configuration, such as selecting size, colour, or entering quantity. Instead of directly adding the products to the cart, the system prompts the customer to choose their desired options for each item in the bundle. Once all required selections are made, the “Add to Cart” button at the bottom allows the entire configured bundle to be added in one go. This ensures a personalised shopping experience while still offering the benefits of bundled discounts.
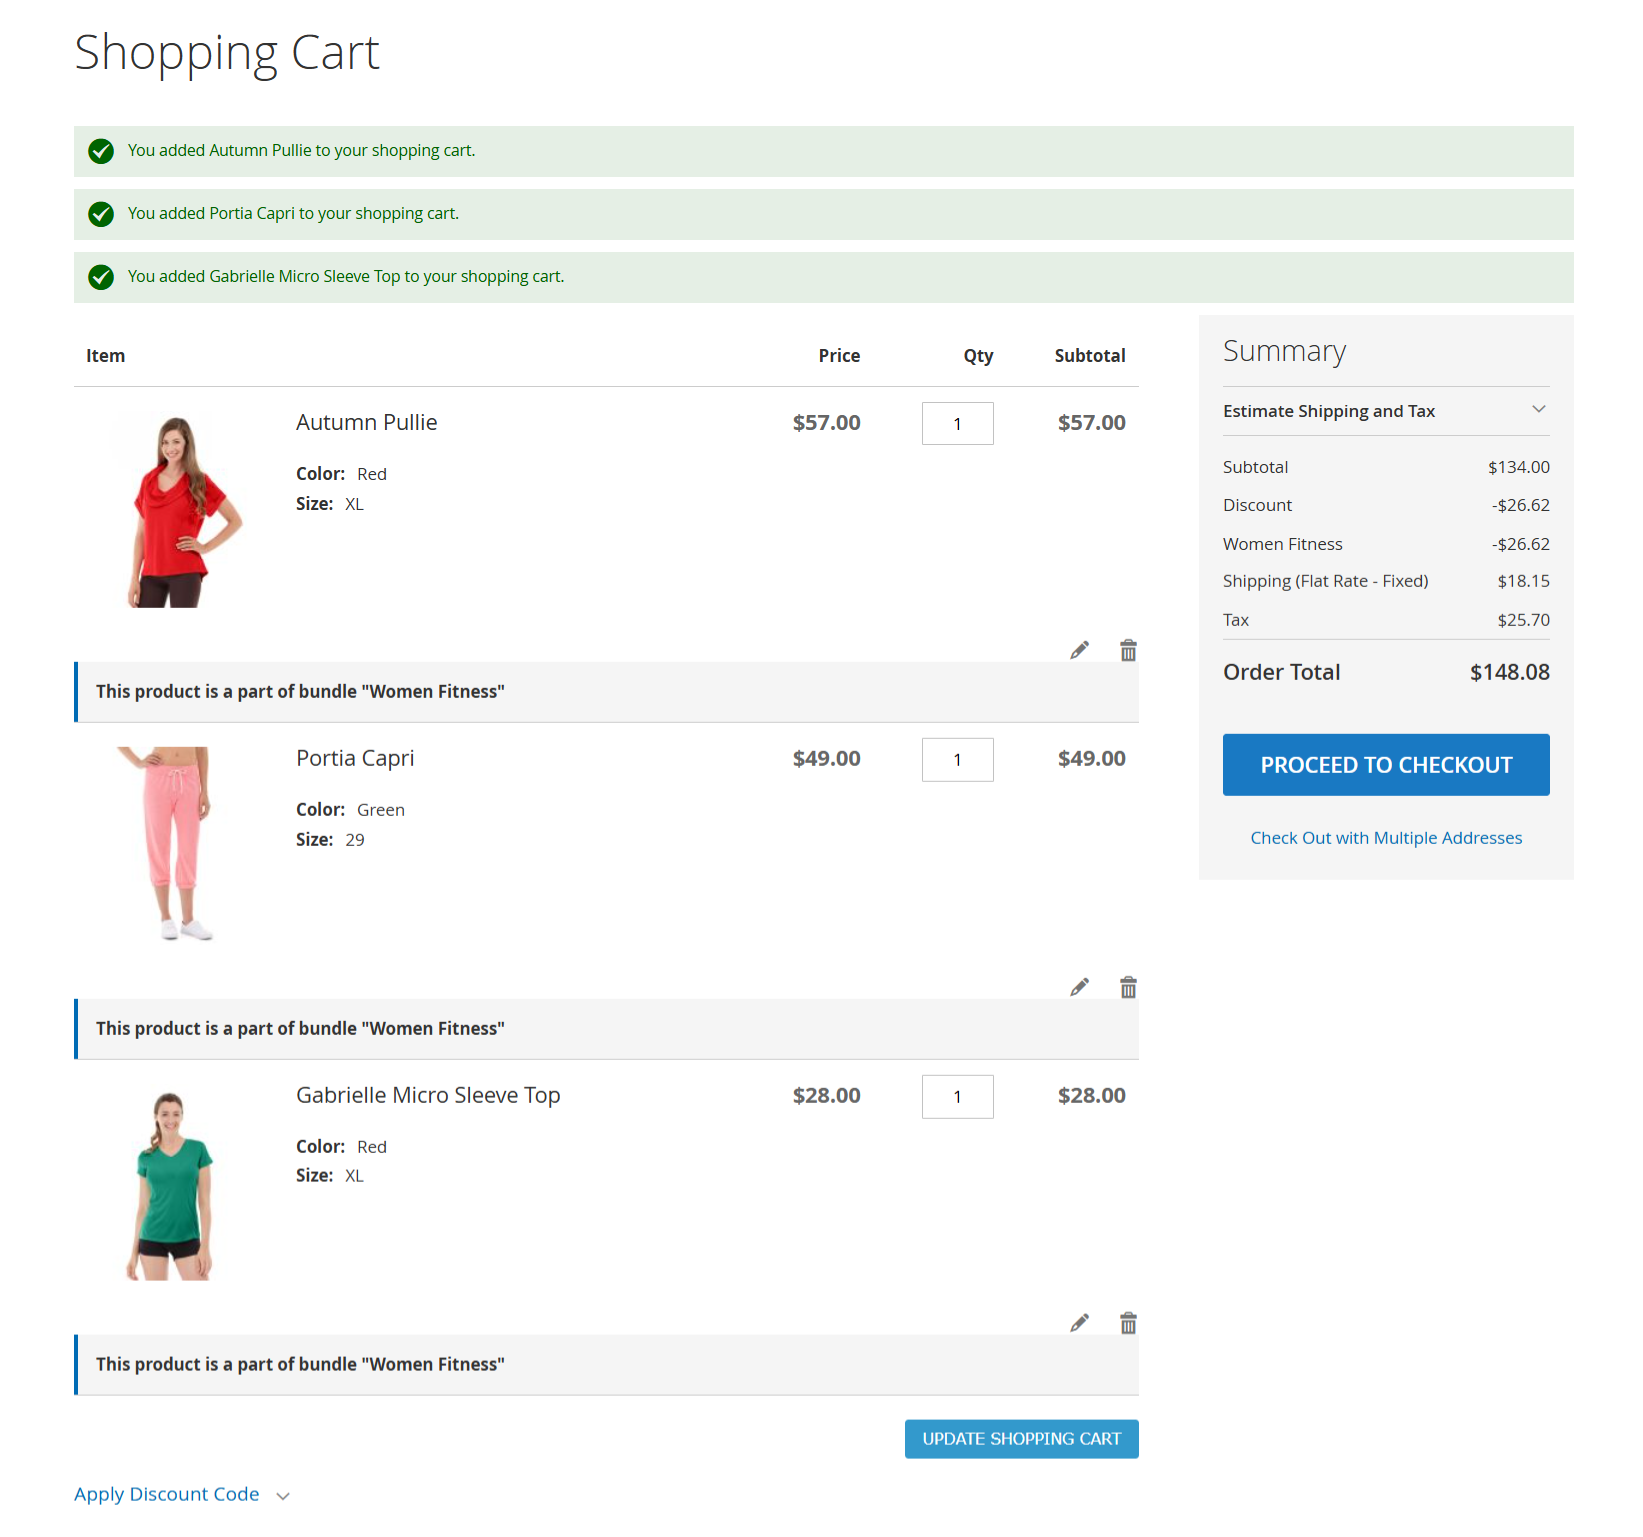
On the shopping cart page, customers can view all the products added through a bundle promotion. The discount is automatically applied based on the promotion settings.
All selected bundle products appear in the cart with their chosen options (e.g., size, colour).
Each product is marked as part of the specific bundle (e.g., "Women Fitness").
The discount is automatically applied and listed as “Bundle Promotions Discount” in the cart summary.
If the discount type was configured fixed for that promotion, it will give you a discount with amount on the total amount of those promo products.
If the discount was configured percentage type, the discount will be calculated based on the percentage of the total price of the promo bundle products and deducted from the total amount.
This helps customers see what they’re buying and how much they’re saving.
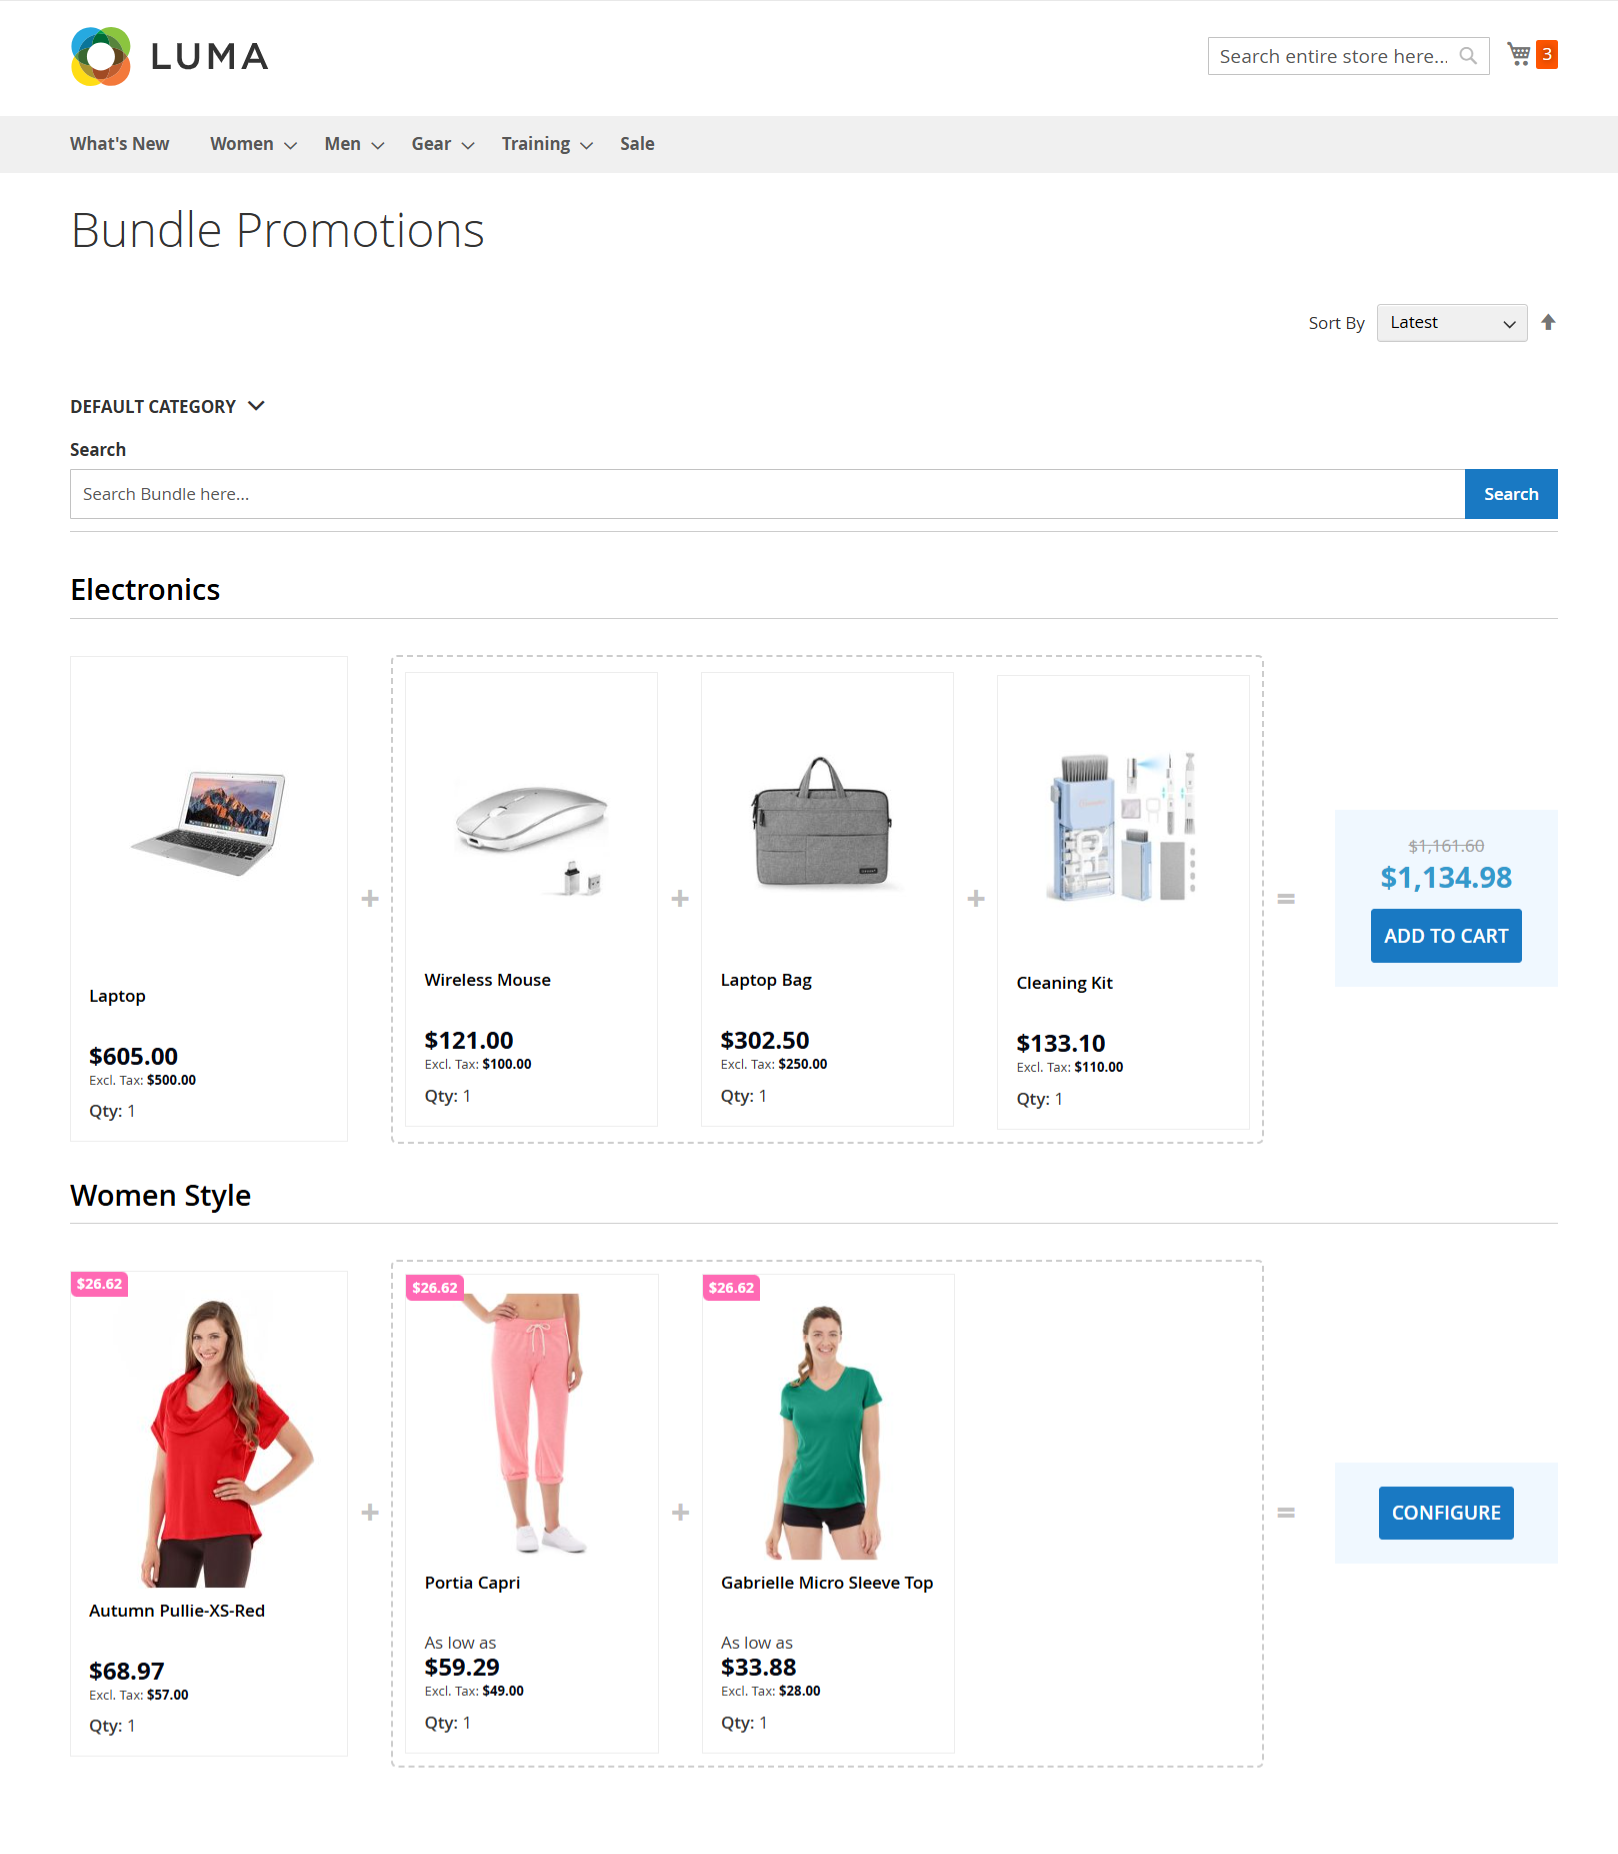
The Bundle Promotions page displays all active bundle offers grouped by categories. This page helps customers easily view and purchase bundle deals available on the store.
Each bundle is shown with its title, products, quantity, and individual prices.
The total bundle price with discount is highlighted on the right side of each bundle block.
If no product configuration (like size or colour) is required, the “Add to Cart” button will be available.
If any product in the bundle requires configuration, a “Configure” button will appear, allowing customers to select the needed options before adding to the cart.
Customers can use the search bar to look up bundles by name and sort them using the drop-down at the top right (e.g., by Latest).
This layout makes it simple for customers to explore and purchase bundle offers quickly and efficiently.
Extension does not support checkout with multiple addresses.
GraphQL
============ GET TAG CATEGORY BY USING CATEGORY ID ==================
## QUERY
{
tagcategories(id: 1) {
name,
is_active,
created_at,
update_time
}
}
## RESPONSE
{
"data": {
"tagcategories": {
"name": "Bag",
"is_active": 1,
"created_at": "2024-12-17 05:56:30",
"update_time": "2024-12-17 05:56:30"
}
}
}
================= GET TAG BY USIG TAG ID =================
## QUERY
{
tagwrapper(id: 1) {
category,
name,
is_active,
created_at,
update_time
}
}
## RESPONSE
{
"data": {
"tagwrapper": {
"category": "1",
"name": "BackPack",
"is_active": 1,
"created_at": "2024-12-17 05:59:20",
"update_time": "2024-12-17 05:59:20"
}
}
}
================== GET BUNDLE OPTIONS BY BUNDLE ID =====================
## QUERY
{
budleoptions(bundle_id: 1) {
name,
status,
qty,
date_from,
date_to,
bundle_option,
discount_type,
discount_price,
exclude_base_product,
bundle_keywords,
bundle_tags,
sort_order,
customer_groups,
store_ids,
products_items {
bundle_id,
name,
qty,
sort_order
}
}
}
## RESPONSE
{
"data": {
"budleoptions": {
"name": "Bag Combo",
"status": 1,
"qty": 1,
"date_from": null,
"date_to": null,
"bundle_option": "Fixed",
"discount_type": 1,
"discount_price": 10,
"exclude_base_product": 0,
"bundle_keywords": "bag",
"bundle_tags": "1",
"sort_order": 0,
"customer_groups": "0,1,2,3",
"store_ids": "2,1",
"products_items": [
{
"bundle_id": 1,
"name": "Crown Summit Backpack",
"qty": 1,
"sort_order": 0
},
{
"bundle_id": 1,
"name": "Wayfarer Messenger Bag",
"qty": 1,
"sort_order": 0
},
{
"bundle_id": 1,
"name": "Driven Backpack",
"qty": 1,
"sort_order": 0
}
]
}
}
}
================ GET BUNDLE BY PRODUCT ID ====================
## QUERY
{
getBundleByProduct(product_id: 4) {
bundle_id,
name,
discount_price,
status,
product_items {
bundle_id,
name,
qty,
sort_order
}
}
}
## RESPONSE
{
"data": {
"getBundleByProduct": {
"bundle_id": 1,
"name": "Bag Combo",
"discount_price": 10,
"status": true,
"product_items": [
{
"bundle_id": 1,
"name": "Crown Summit Backpack",
"qty": 1,
"sort_order": 0
},
{
"bundle_id": 1,
"name": "Wayfarer Messenger Bag",
"qty": 1,
"sort_order": 0
},
{
"bundle_id": 1,
"name": "Driven Backpack",
"qty": 1,
"sort_order": 0
}
]
}
}
}
====================== CREATE TAG CATEGORY USING GRAPH API =============================
## MUTATION
mutation {
createTagCategories (
input: {
name: "Clothing",
is_active: 1
}
) {
tag_categories {
id,
name,
is_active,
created_at,
update_time
}
}
}
## RESPONSE
{
"data": {
"createTagCategories": {
"tag_categories": {
"id": 2,
"name": "Clothing",
"is_active": 1,
"created_at": "2024-12-17 00:41:10",
"update_time": "2024-12-17 00:41:10"
}
}
}
}
=================== UPDATE TAG CATEGORY USING GRAPH API ================================
## MUTATION
mutation {
updateTagCategories (
input: {
id: 2
name: "Clothing",
is_active: 2
}
) {
tag_categories {
id,
name,
is_active,
created_at,
update_time
}
}
}
## RESPONSE
{
"data": {
"updateTagCategories": {
"tag_categories": {
"id": 2,
"name": "Clothing",
"is_active": 2,
"created_at": "2024-12-17 06:41:10",
"update_time": "2024-12-17 00:47:47"
}
}
}
}
=============== DELETE TAG CATEGORY USING CATEGORY ID GRAPH API ========================
## MUTATION
mutation {
deleteTagCategories (
id: 2
)
}
## RESPONSE
{
"data": {
"deleteTagCategories": true
}
}
=============== CREATE TAG USING GRAPH API =============================
## MUTATION
mutation {
createTag (
input : {
name: "Sports"
category: "Bag"
is_active: 1
}
) {
tag_list {
id,
category,
name,
is_active,
created_at,
update_time
}
}
}
## RESPONSE
{
"data": {
"createTag": {
"tag_list": {
"id": 2,
"category": "1",
"name": "Sports",
"is_active": 1,
"created_at": "2024-12-17 00:59:09",
"update_time": "2024-12-17 00:59:09"
}
}
}
}
================= UPDATE TAG USING GRAPH API =======================
## MUTATION
mutation {
updateTag (
input : {
id: 2,
name: "Sports Updated"
category: "Bag"
is_active: 2
}
) {
tag_list {
id,
category,
name,
is_active,
created_at,
update_time
}
}
}
## RESPONSE
{
"data": {
"updateTag": {
"tag_list": {
"id": 2,
"category": "1",
"name": "Sports Updated",
"is_active": 2,
"created_at": "2024-12-17 06:59:09",
"update_time": "2024-12-17 01:02:50"
}
}
}
}
=================== DELETE TAG USIN TAG ID GRAPH API =======================
## MUTATION
mutation {
deleteTag (
id: 2
)
}
## RESPONSE
{
"data": {
"deleteTag": true
}
}
================== DELETE BUNDLE OPTIONS USING BUNDLE ID GRAPH API ===========================
## MUTATION
mutation {
deleteBundleOptions (
bundle_id: 1
)
}
## RESPONSE
{
"data": {
"deleteBundleOptions": true
}
}
API
1. Create Bundle Tag Category
Creates a new bundle tag category in the system.
Endpoint Details
●URL: /V1/bundlediscount/create/tagcategory
●Method: PUT
●Authentication: Admin access required
●Content-Type: application/json
Request Examples
Successful Request
json
{
"tag_categories": {
"name": "Electronics Bundle",
"is_active": 1
}
}
Response Examples
Success Response
json
[
{
"message": "Record Created Successfully"
}
]
2.Get Bundle Tag Category
Retrieves a specific bundle tag category by its ID.
Endpoint Details
●URL: /V1/bundlediscount/gettagcategory/{tagcategoryid}
●Method: GET
●Authentication: Admin access required
●Content-Type: application/json
Request Examples
Get Tag Category by ID
GET /V1/bundlediscount/gettagcategory/123
Response Examples
Success Response
json
[
{
"id": 123,
"name": "Electronics Bundle",
"is_active": 1,
"created_at": "2024-01-15 10:30:00",
"update_time": "2024-01-20 14:45:00"
}
]
Error Response
Record Not Found:
json
[
{
"message": "Record is not exist"
}
]
3.Update Bundle Tag Category
Updates an existing bundle tag category by its ID.
Endpoint Details
●URL: /V1/bundlediscount/updatetagcategory/{tagcategoryid}
●Method: PUT
●Authentication: Admin access required
●Content-Type: application/json
Request Examples
Update Tag Category Status
json
{
"tag_categories": {
"is_active": 2
}
}
Update Both Name and Status
json
{
"tag_categories": {
"name": "Updated Electronics Bundle",
"is_active": 1
}
}
Response Examples
Success Response
json
[
{
"message": "Record Update Successfully"
}
]
4.Delete Bundle Tag Category
Deletes an existing bundle tag category by its ID.
Endpoint Details
●URL: /V1/bundlediscount/deletetagcategory/{tagcategoryid}
●Method: DELETE
●Authentication: Admin access required
●Content-Type: application/json
Request Example
Delete Tag Category by ID
json
CopyEdit
DELETE /V1/bundlediscount/deletetagcategory/7
Authorization: Bearer <admin-access-token>
Response Examples
Success Response
json
CopyEdit
[
{
"message": "Record deleted Successfully"
}
]
5.Search Bundle Tag Categories
Retrieves a list of bundle tag categories using optional filters, sorting, and pagination.
Endpoint Details
●URL: /V1/bundlediscount/tagcategory/search
●Method: GET
●Authentication: Admin access required
●Content-Type: application/json
Request Examples
Search by Name (Contains "Electronics")
http
CopyEdit
GET /V1/bundlediscount/tagcategory/search?searchCriteria[filter_groups][0][filters][0][field]=name&searchCriteria[filter_groups][0][filters][0][value]=%Electronics%&searchCriteria[filter_groups][0][filters][0][condition_type]=like
Paginate and Sort by ID (Descending)
http
CopyEdit
GET /V1/bundlediscount/tagcategory/search?searchCriteria[sortOrders][0][field]=entity_id&searchCriteria[sortOrders][0][direction]=DESC&searchCriteria[pageSize]=10&searchCriteria[currentPage]=1
Response Example
json
CopyEdit
{
"items": [
{
"entity_id": 5,
"name": "Summer Deals",
"is_active": 1,
...
},
{
"entity_id": 4,
"name": "Electronics Bundle",
"is_active": 1,
...
}
],
"search_criteria": {
"filter_groups": [...],
"sort_orders": [...],
"page_size": 10,
"current_page": 1
},
"total_count": 2
}
6.Create Bundle Tag
Creates a new bundle tag with category, name, and status.
Endpoint Details
●URL: /V1/bundlediscount/create/tag
●Method: PUT
●Authentication: Admin access required
●Content-Type: application/json
Request Examples
Create New Tag
json
CopyEdit
{
"tag": {
"category": "Electronics",
"name": "Smart Devices",
"is_active": 1
}
}
Response Examples
Success Response
json
CopyEdit
[
{
"message": "Record Created Successfully"
}
]
Failure Response (Invalid Category)
json
CopyEdit
[
{
"message": "ElectronicsX Tag Category is not exist."
}
]
7.Get Bundle Tag
Fetches a bundle tag record by its ID.
Endpoint Details
●URL: /V1/bundlediscount/gettag/{tagid}
●Method: GET
●Authentication: Admin access required
●Content-Type: application/json
Response Example
json
CopyEdit
[
{
"id": 10,
"category": 3,
"name": "Smart Devices",
"is_active": 1
}
]
If Record Not Found
json
CopyEdit
[
{
"message": "Record is not exist"
}
]
8.Update Bundle Tag
Updates an existing bundle tag by its ID.
Endpoint Details
●URL: /V1/bundlediscount/updatetag/{tagid}
●Method: PUT
●Authentication: Admin access required
●Content-Type: application/json
Request Examples
Update Tag Status
json
CopyEdit
{
"tag": {
"is_active": 2
}
}
Update Name and Category
json
CopyEdit
{
"tag": {
"category": "Accessories",
"name": "Wireless Devices"
}
}
Response Example
Success Response
json
CopyEdit
[
{
"message": "Record Update Successfully"
}
]
Invalid Status Value
json
CopyEdit
[
{
"message": "Please enter value of status from 1 or 2. 1 is for Enabled and 2 is for Disabled."
}
]
9.Delete Bundle Tag
Deletes a bundle tag by its ID.
Endpoint Details
●URL: /V1/bundlediscount/deletetag/{tagid}
●Method: DELETE
●Authentication: Admin access required
●Content-Type: application/json
Response Examples
Success Response
json
CopyEdit
[
{
"message": "Record deleted Successfully"
}
]
Failure Response
json
CopyEdit
[
{
"message": "Record is not exist"
}
]
10.Search Bundle Tags
Retrieves a list of bundle tags with optional filters, sorting, and pagination.
Endpoint Details
●URL: /V1/bundlediscount/tag/search
●Method: GET
●Authentication: Admin access required
●Content-Type: application/json
Request Example
Filter by Active Tags
http
CopyEdit
GET /V1/bundlediscount/tag/search?searchCriteria[filter_groups][0][filters][0][field]=is_active&searchCriteria[filter_groups][0][filters][0][value]=1
Response Example
json
CopyEdit
{
"items": [
{
"id": 3,
"category": 2,
"name": "Fitness Gadgets",
"is_active": 1
},
{
"id": 2,
"category": 1,
"name": "Laptops",
"is_active": 1
}
],
"search_criteria": {
...
},
"total_count": 2
}
11.Create Bundle Options
Endpoint:
bash
CopyEdit
PUT /V1/bundlediscount/createbundleoptions
Description:
Creates a new bundle discount with the specified options.
Headers:
●Authorization: Bearer <admin_token>
Request Body:
json
CopyEdit
{
"bundle_options": {
"product_name": "Main Product",
"name": "Holiday Bundle",
"status": 1,
"date_from": "2025-06-01",
"date_to": "2025-07-01",
"bundle_option": "Option Text",
"discount_type": "fixed|percentage",
"discount_price": 25,
"exclude_base_product": true,
"bundle_keywords": "holiday,sale",
"bundle_tags": "tag1,tag2",
"sort_order": 10,
"customer_groups": "General,Wholesale",
"store_ids": "Default Store View",
"products_collection": [
{
"name": "Product B",
"qty": 2,
"sort_order": 1
},
{
"name": "Product C",
"qty": 1,
"sort_order": 2
}
]
}
}
Response:
json
CopyEdit
[
{
"message": "Record Created Successfully"
}
]
12.Get Bundle Options
Endpoint:
swift
CopyEdit
GET /V1/bundlediscount/getbundleoptions/:bundleid
Description:
Retrieves the bundle options and associated products for a given bundle ID.
Path Parameter:
●bundleid (int): ID of the bundle option.
Response:
json
CopyEdit
{
"items": {
"name": "Holiday Bundle",
"status": 1,
"date_from": "2025-06-01",
"date_to": "2025-07-01",
"bundle_option": "Option Text",
"discount_type": "fixed",
"discount_price": 25,
"exclude_base_product": true,
"bundle_keywords": "holiday,sale",
"bundle_tags": "1,2",
"sort_order": 10,
"customer_groups": "General,Wholesale",
"store_ids": "Default Store View"
},
"products": [
{
"bundle_id": 123,
"name": "Product B",
"qty": 2,
"sort_order": 1
},
{
"bundle_id": 123,
"name": "Product C",
"qty": 1,
"sort_order": 2
}
]
}
Error Response:
json
CopyEdit
[
{
"message": "Record is not exist"
}
]
13.Update Bundle Options
Endpoint:
swift
CopyEdit
PUT /V1/bundlediscount/updatebundleoptions/:bundleid
Description:
Updates an existing bundle discount based on the bundle ID.
Path Parameter:
●bundleid (int): ID of the bundle option to update.
Request Body:
Same structure as the Create API. Only include fields to be updated.
Response:
json
CopyEdit
[
{
"message": "Record Updated Successfully"
}
]
14.Delete Bundle Options
Endpoint: DELETE /V1/bundlediscount/deletebundleoptions/:bundleid
Description: Deletes a bundle option and all associated bundle items by the bundle ID.
Request Parameters:
Parameter Type Description Required
bundleid int The ID of the bundle option to delete Yes
Response:
●Success:
json
CopyEdit
[
{
"message": "Record deleted Successfully"
}
]
●Failure (Bundle not found):
json
CopyEdit
[
{
"message": "Record is not exist"
}
]
15.Get Bundle List
Endpoint: GET /V1/bundlediscount/bundleoptions/search
Description: Returns a paginated, filtered, and sorted list of bundle options based on the provided search criteria.
Request Parameters:
Search criteria parameters are passed as query parameters to filter, sort, and paginate the results. This follows Magento's standard search criteria approach.
Common parameters include:
●searchCriteria[filterGroups][0][filters][0][field] — field name to filter by
●searchCriteria[filterGroups][0][filters][0][value] — filter value
●searchCriteria[filterGroups][0][filters][0][conditionType] — condition type (e.g. eq, like)
●searchCriteria[sortOrders][0][field] — field name to sort by
●searchCriteria[sortOrders][0][direction] — sorting direction (ASC or DESC)
●searchCriteria[currentPage] — current page number
●searchCriteria[pageSize] — number of items per page
Response:
Returns a paginated list of bundle options with their details.
json
CopyEdit
{
"items": [
{
"bundle_id": 1,
"name": "Bundle 1",
"discount_price": 100.00,
"status": 1,
...
},
...
],
"total_count": 10,
"search_criteria": {...}
}
16.Get Bundle by Product ID
Endpoint: GET /V1/bundlediscount/bundlebyproduct/:productid
Description: Retrieves bundle details along with associated product items for a given product ID.
Response:
●Success: Returns bundle details including associated product items.
json
CopyEdit
{
"items": {
"bundle_id": 1,
"name": "Bundle 1",
"discount_price": 100.00,
"status": 1,
"product_items": [
{
"bundle_id": 1,
"name": "Product A",
"qty": 2,
"sort_order": 1
},
{
"bundle_id": 1,
"name": "Product B",
"qty": 1,
"sort_order": 2
}
]
}
}
17.Get Bundle Details Using Cart ID
Endpoint: GET /V1/bundlediscount/bundlebycart/:cartId
Description: Retrieves all bundle promotions related to the products currently in the specified cart, along with the associated product details.
Request Parameters:
Parameter Type Description Required
cartId int The ID of the cart (quote ID) Yes
Response:
Returns a nested object containing bundle details and all related products for bundles linked to the products in the cart.
json
CopyEdit
{
"bundle_id_1": {
"items": [
{
"bundle_id": 1,
"name": "Bundle Name",
"discount": 50.0,
"status": 1,
"product_items": [
{
"product_id": 101,
"name": "Product A",
"qty": 2,
"sort_order": 1
},
{
"product_id": 102,
"name": "Product B",
"qty": 1,
"sort_order": 2
}
]
}
]
},
"bundle_id_2": {
"items": [
{
"bundle_id": 2,
"name": "Another Bundle",
"discount": 30.0,
"status": 1,
"product_items": [
{
"product_id": 201,
"name": "Product C",
"qty": 1,
"sort_order": 1
}
]
}
]
}
}
18.Add Bundle Promotion to Cart
Endpoint: POST /V1/bundlediscount/bundlepromosadd
Description: Adds the products of a specific bundle promotion to the customer's cart.
Request Body (JSON):
Field Type Description Required
bundleId int The ID of the bundle promotion to add Yes
storeId int Store view ID to add the products in Yes
customerId int Customer ID for whom the cart belongs Yes
Response:
●Success:
arduino
CopyEdit
"You have successfully added bundle product to the cart."
Thank you for choosing MageDelight!