
Installation
To use this extension, you will require to install MageDelight Base Extension first. If it is not installed then please download it from https://www.magedelight.com/extensions/magedelight-base-extension.zip and unzip the package file into the root folder of your Magento 2 installation.
Before installing the extension, please make sure to Backup your web directory and store database
You will require to install MageDelight Base Extension first. If it is not installed then please download it from https://www.magedelight.com/pub/extensions/magedelight-base.zip and unzip the package file into the root folder of your Magento 2 installation.
Root Directory is - "app/code/magedelight/#YourExtensionName#"
- Unzip the extension package file into the root folder of your Magento 2 installation.
- Connect to SSH console of your server:
- Navigate to the root folder of your Magento 2 setup
Run command as per below sequence,
php bin/magento setup:upgrade
php bin/magento setup:di:compile
php bin/magento setup:static-content:deploy
php bin/magento cache:clean
- log out from the backend and log in again
If you are using Magento 2.3 or later then you do not need to activate license. Extension will be activated with silent activation mechanism and does not require activation keys to be entered manually.
Unzip the Partial Payment pro extension package file into the root folder of your Magento 2 installation.
The only extension required/ mandatory to install is for partial payment is:
Magedelight > Base
Magedelight > PartialPayment
For the partial payment pro extension you need to select any one of the below preferable payment gateway connectors package. Other payment gateway connectors package you would require to to delete/remove it from the extension package. It may cause an error while installation. Below mentioned are the Payment gateway connectors for partial payment pro extensions. You would require to purchase the MageDelight Payment gateway extension package separately from the Mage Delight website.
For the offline
For the Offline (Cash on Delivery) > PartialPaymentOffline
If braintree in magento 2.3.x > PartialPaymentBraintree
If braintree in magento 2.4.x > PartialPaymentPaypalBraintree
If Payflowpro > PartialPaymentPayflowPro
For the Magedelight Authorizecim > PartialPaymentMdAuthorizeCim
For the Magedelight Cybersource > PartialPaymentMdCybersource
For the Magedelight Firstdata > PartialPaymentMdFirstdata
For the Magedelight Stripe > PartialPaymentMdStripe
Installation with Composer
Composer repository using this command:
composer config repositories.magedelight-repo composer https://packages.magedelight.com/
Replace repo public key and private key with your public and private key
composer config http-basic.gitlab.magedelight.com $PUBLIC_KEY $PRIVATE_KEY
composer require mage_delight/partialpaymentpro_module:*
composer require mage_delight/partialpayment_graphql:*
composer require hyva-themes/module-magedelight-partialpayment:*
To obtain your public and private keys, please navigate to the "My Account" section. In the "Download Extension Packages" tab, you will find the keys available for your access.
Backend Configuration (Admin side)
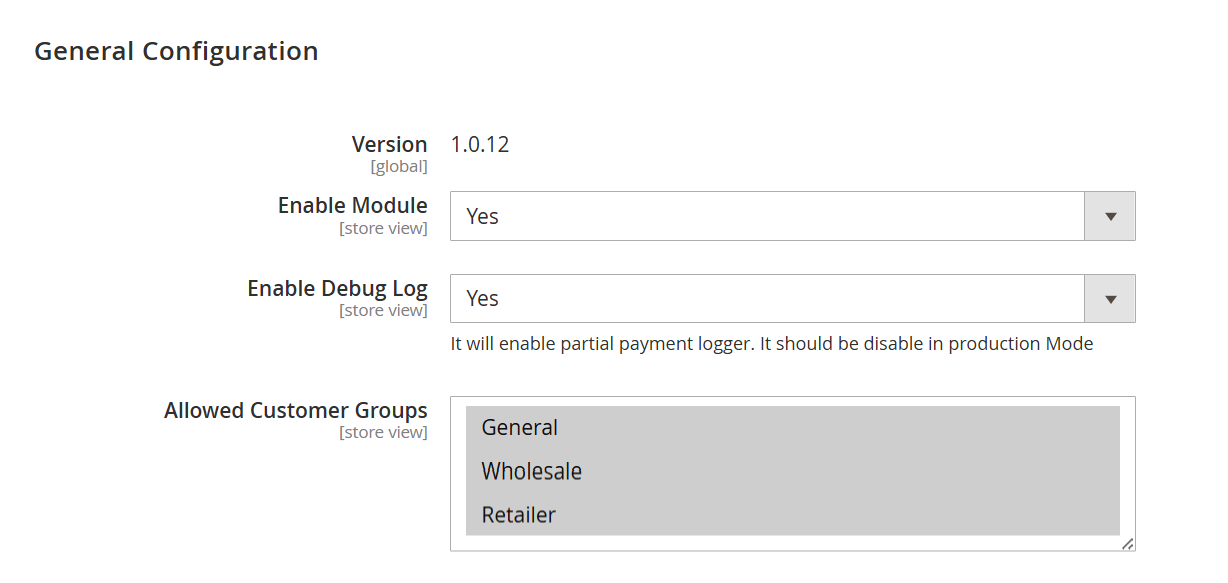
- Enable Module: Select "Yes" to enable the module for your store.
- Enable Debug Log: Select "Yes" to enable the module log.
- Allowed Customer Groups: Select multiple customer groups to enable the instalment facility.
EMI Configuration Product Wise
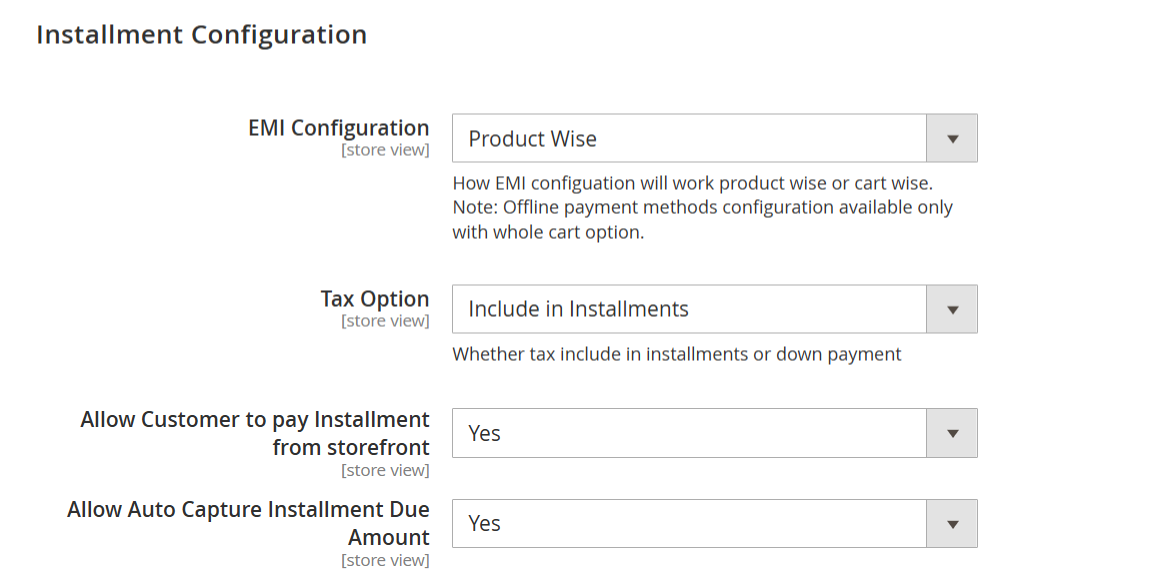
- EMI Configuration:
Product-wise: EMI is applied separately for each product.
- Tax Option: Choose how the tax will be applied:
Include in Installments: Taxes are divided across installment payments.
Include in Down Payment: Taxes are included entirely in the initial down payment.
Allow Customer to Pay Installment from Storefront: Set to Yes to enable customers to make installment payments directly from the storefront.
Allow Auto Capture Installment Due:
Select Yes to automatically process installment payments as they become due.
Select No to process installment payments manually.
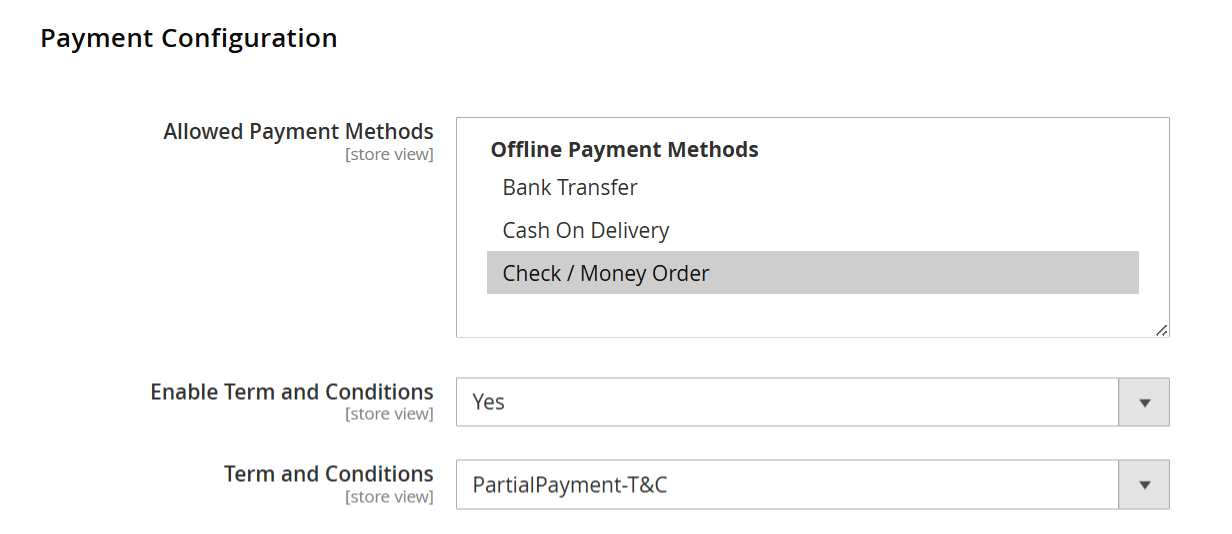
- Allowed Payment Methods: Select supported payment methods.
- Enable Terms and Conditions: Select "Yes" to enable the terms and conditions.
- Term and Conditions: Select the template from the drop-down list for the terms and conditions.
EMI Configuration Whole Cart
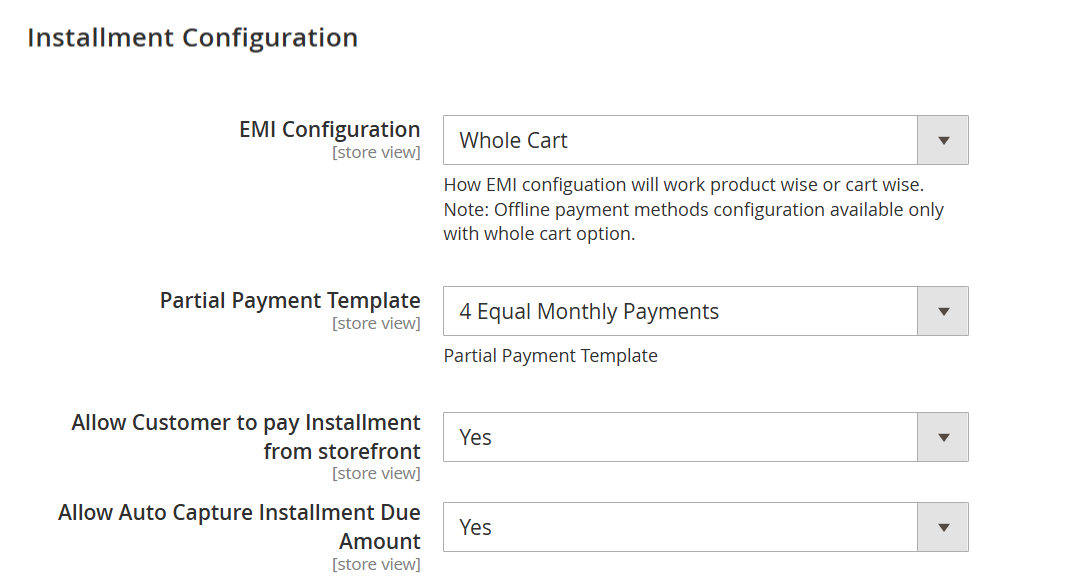
- EMI Configuration:
Cart-wise: EMI applies to the entire cart collectively.
- Partial Payment Template: Select the desired template from the dropdown list to configure partial payments for the entire cart.
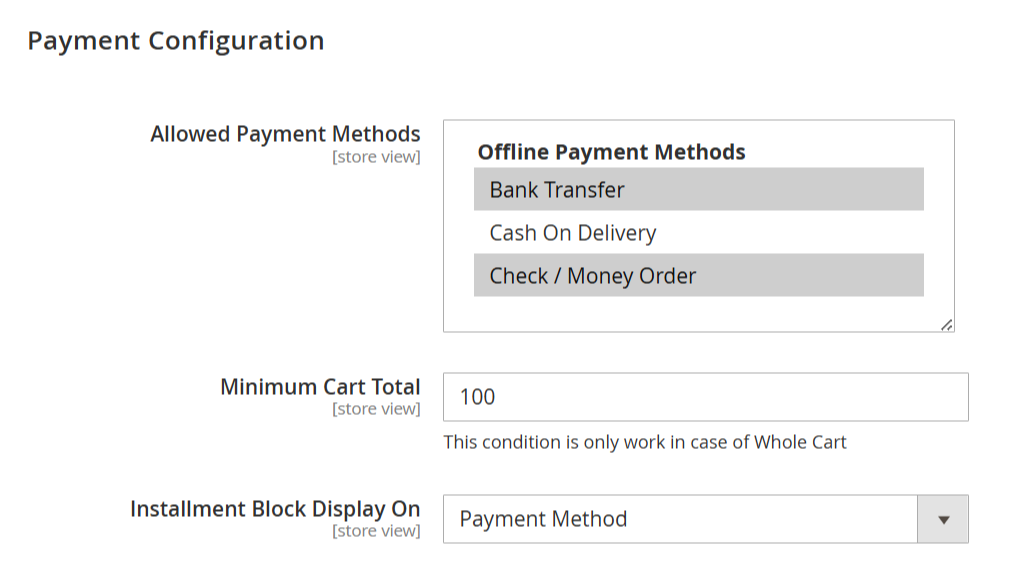
- Allowed Payment Methods: Select supported payment methods.
- Minimum Cart Total: Enter the minimum total cart amount required to enable installments.
- Installment Block Display On: Choose where to display the installment information block on the checkout page.
- Payment Method
- Payment Page
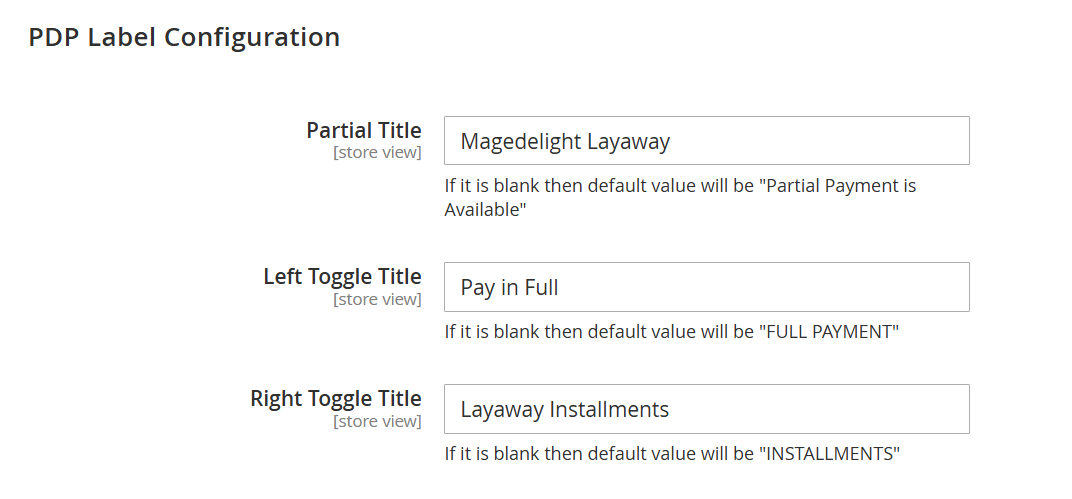
Partial Title: Enter a custom title for partial payments displayed on the product page.
Left Toggle Title: Define the title for the left-side toggle option on the product page.
Right Toggle Title: Set the title for the right-side toggle option for installment payments.
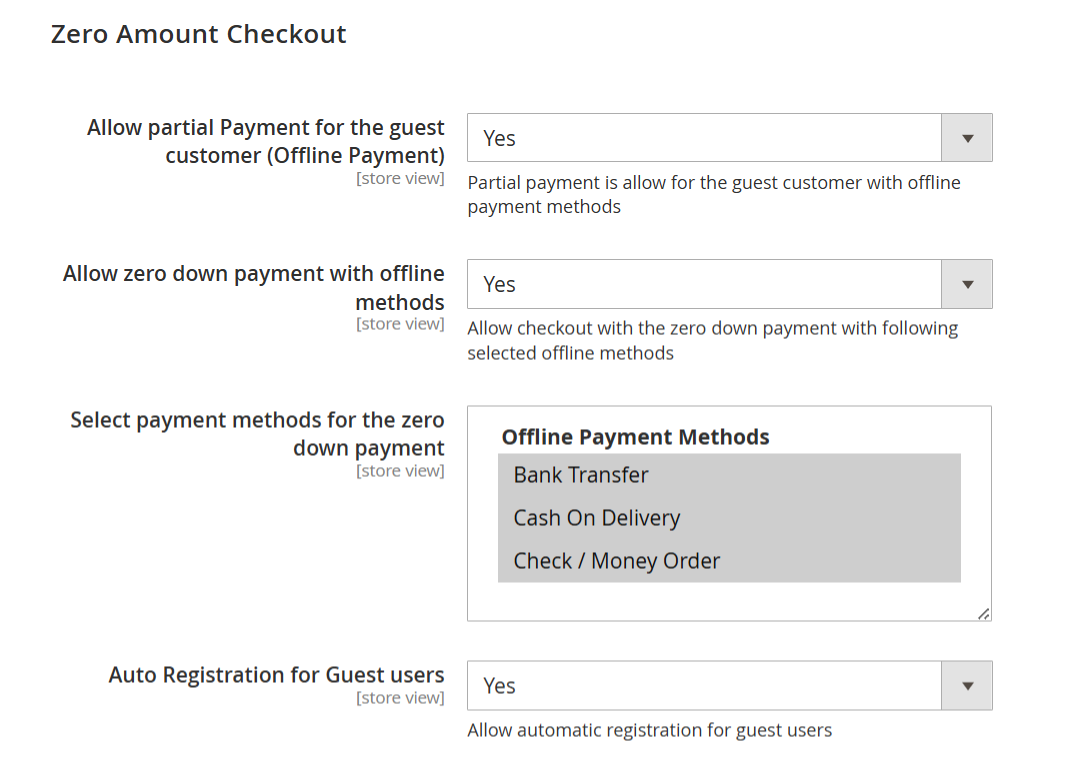
Allow Partial Payment for Guest Customers (Offline Payment): Select Yes to enable guest customers to make partial payments using offline payment methods.
Allow Zero Down Payment with Offline Methods: Select Yes to allow customers to complete checkout without making an initial down payment using selected offline payment methods.
Select Payment Methods for Zero Down Payment: Choose one or more offline payment methods (e.g., Bank Transfer, Cash On Delivery, Check/Money Order) that customers can use for zero down payment checkout.
Auto Registration for Guest Users: Set to Yes to automatically register guest users after checkout.
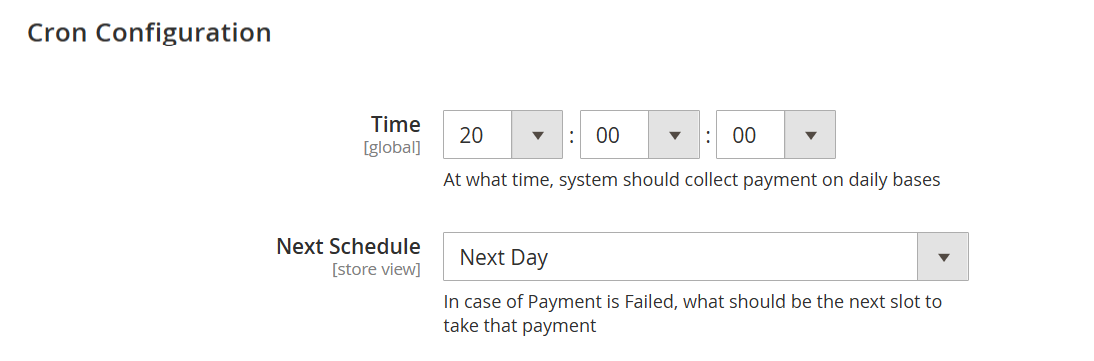
- Time: Select the time to run the CRON job to capture payment.
- Next Schedule: Select the CRON job schedule to run for the next payment capture.
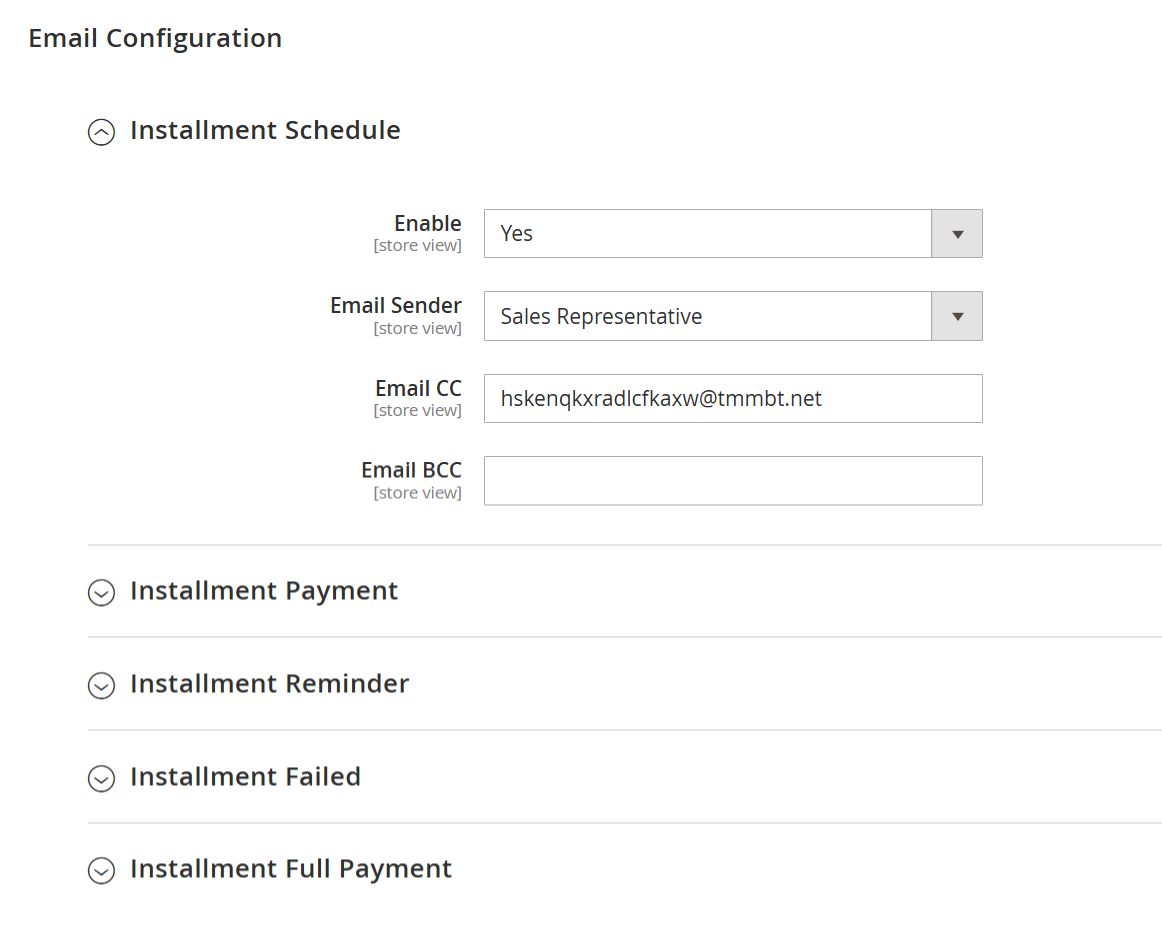
- Enable Installment Schedule: Select "Yes" to enable installment schedule.
- Email Sender: Select email sender from the available list.
- Email CC: Provide a list of email addresses to be kept as CC.
- Email BCC: Provide a list of email addresses to be kept as BCC.
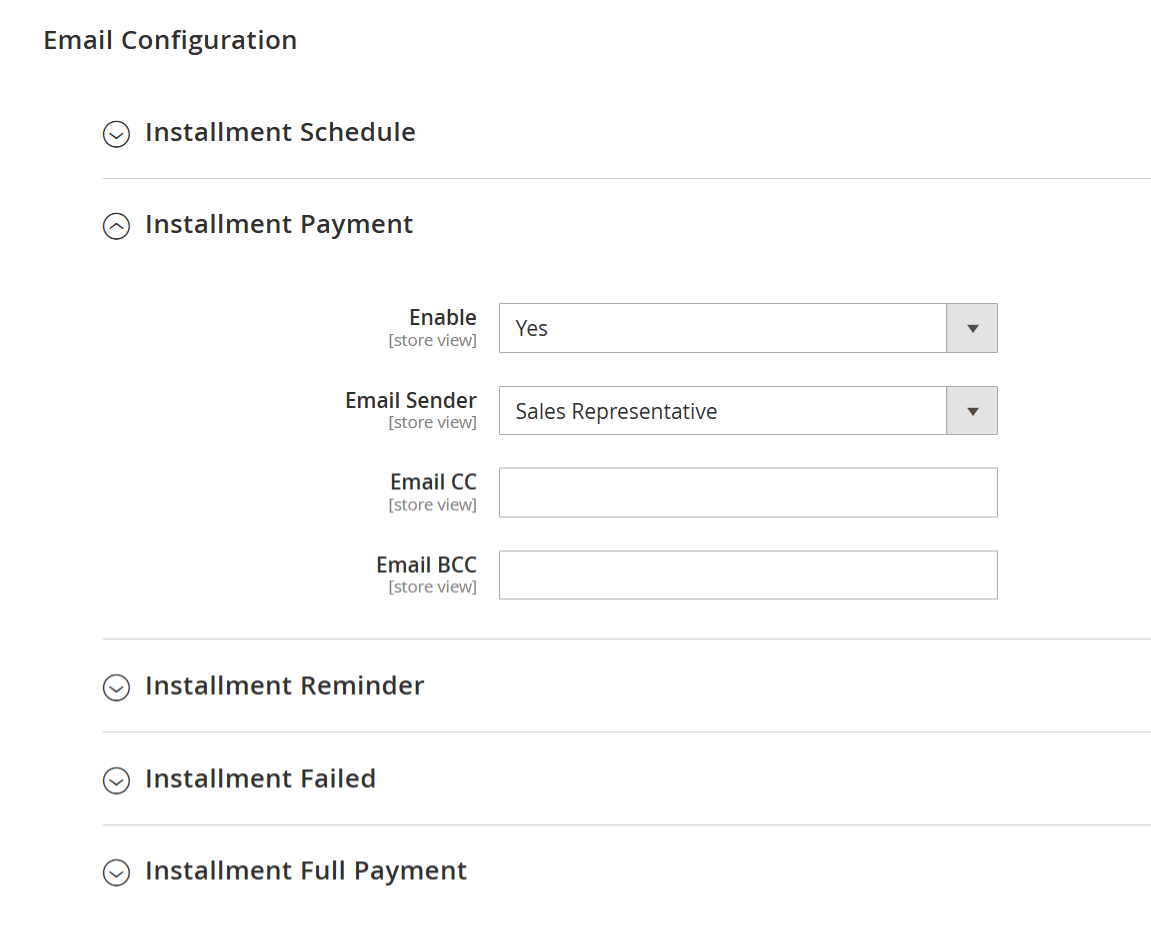
- Enable Installment Schedule: Select "Yes" to enable installment payment.
- Email Sender: Select email sender from the available list.
- Email CC: Provide a list of email addresses to be kept as CC.
- Email BCC: Provide a list of email addresses to be kept as BCC.
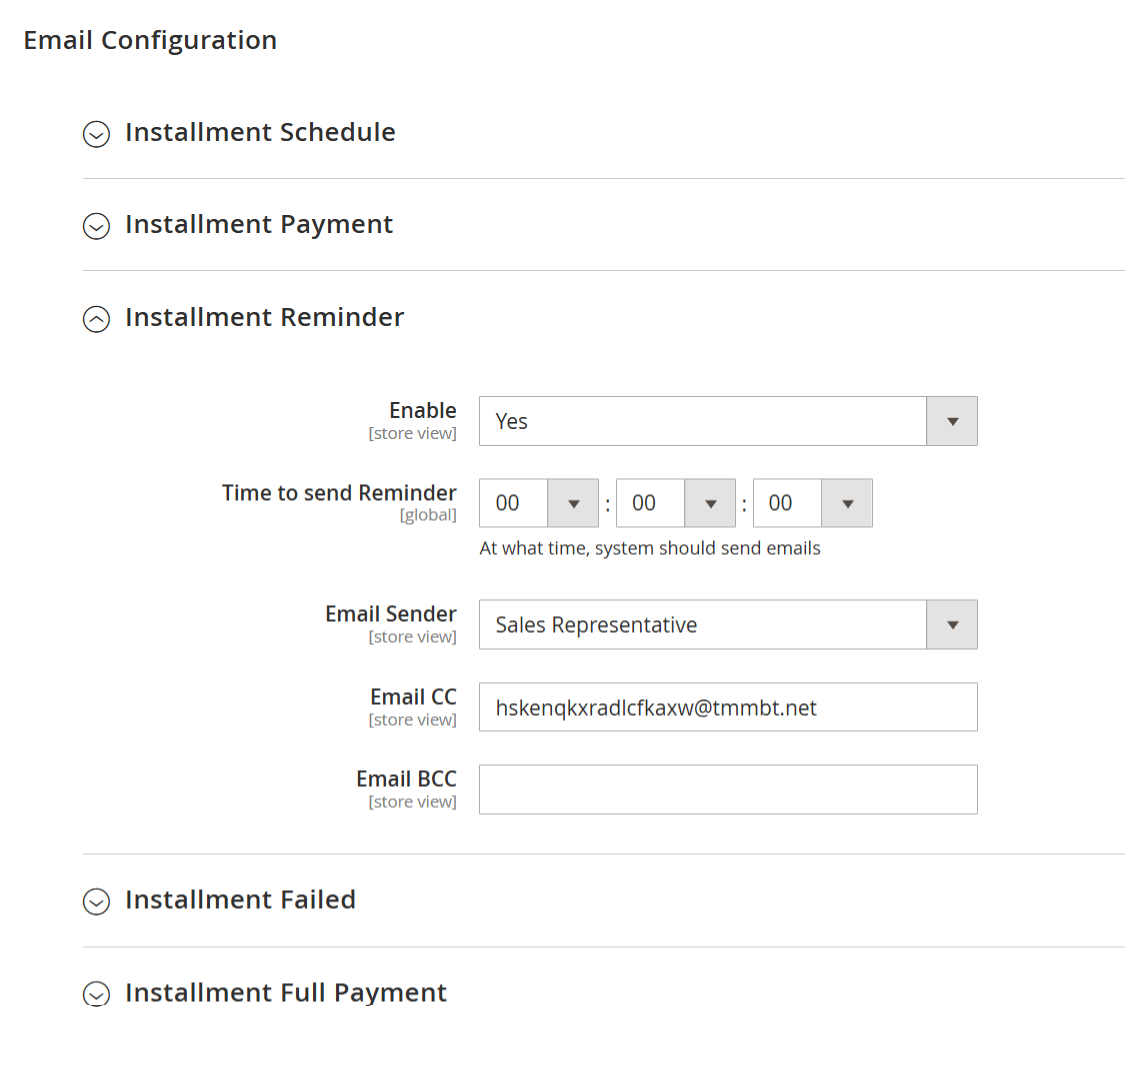
- Enable Installment Reminder: Select "Yes" to enable installment reminder.
- Time to send Reminder: Provide time to send installment reminder emails to a customer for the upcoming installment.
- Email Sender: Select email sender from the available list.
- Email CC: Provide a list of email addresses to be kept as CC.
- Email BCC: Provide a list of email addresses to be kept as BCC.
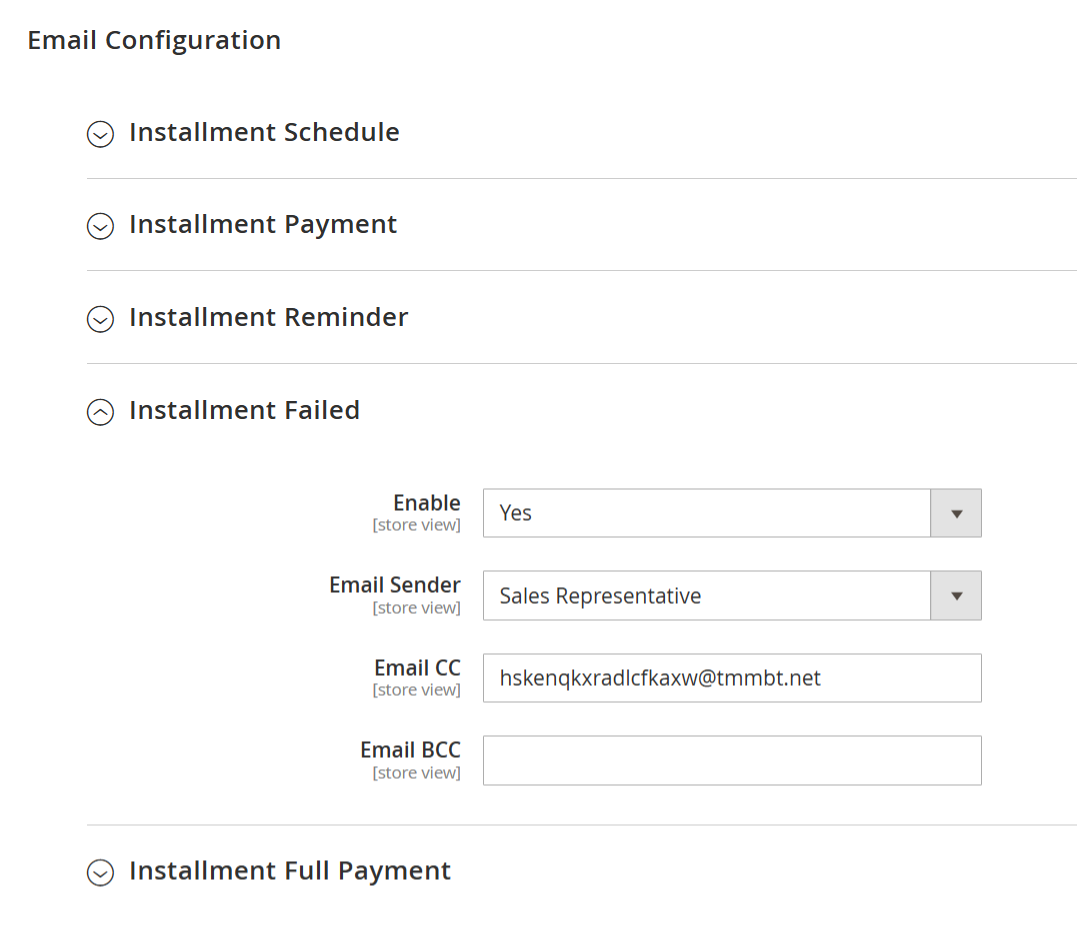
- Enable Installment Failed: Select "Yes" to enable installment failed.
- Email Sender: Select email sender from the available list.
- Email CC: Provide a list of email addresses to be kept as CC.
- Email BCC: Provide a list of email addresses to be kept as BCC.
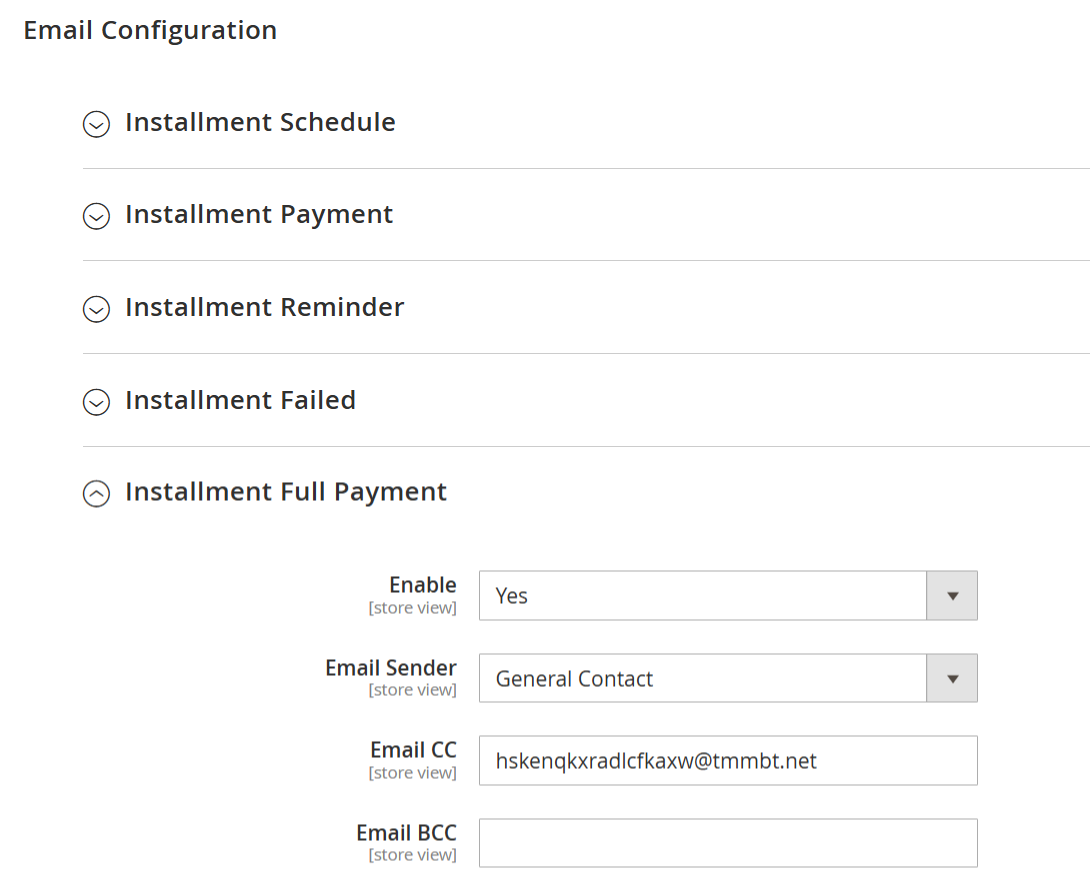
- Enable Installment Full Payment: Select "Yes" to enable installment on Full Payment.
- Email Sender: Select email sender from the available list.
- Email CC: Provide a list of email addresses to be kept as CC.
- Email BCC: Provide a list of email addresses to be kept as BCC.
Backend Functionality
Installment Templates
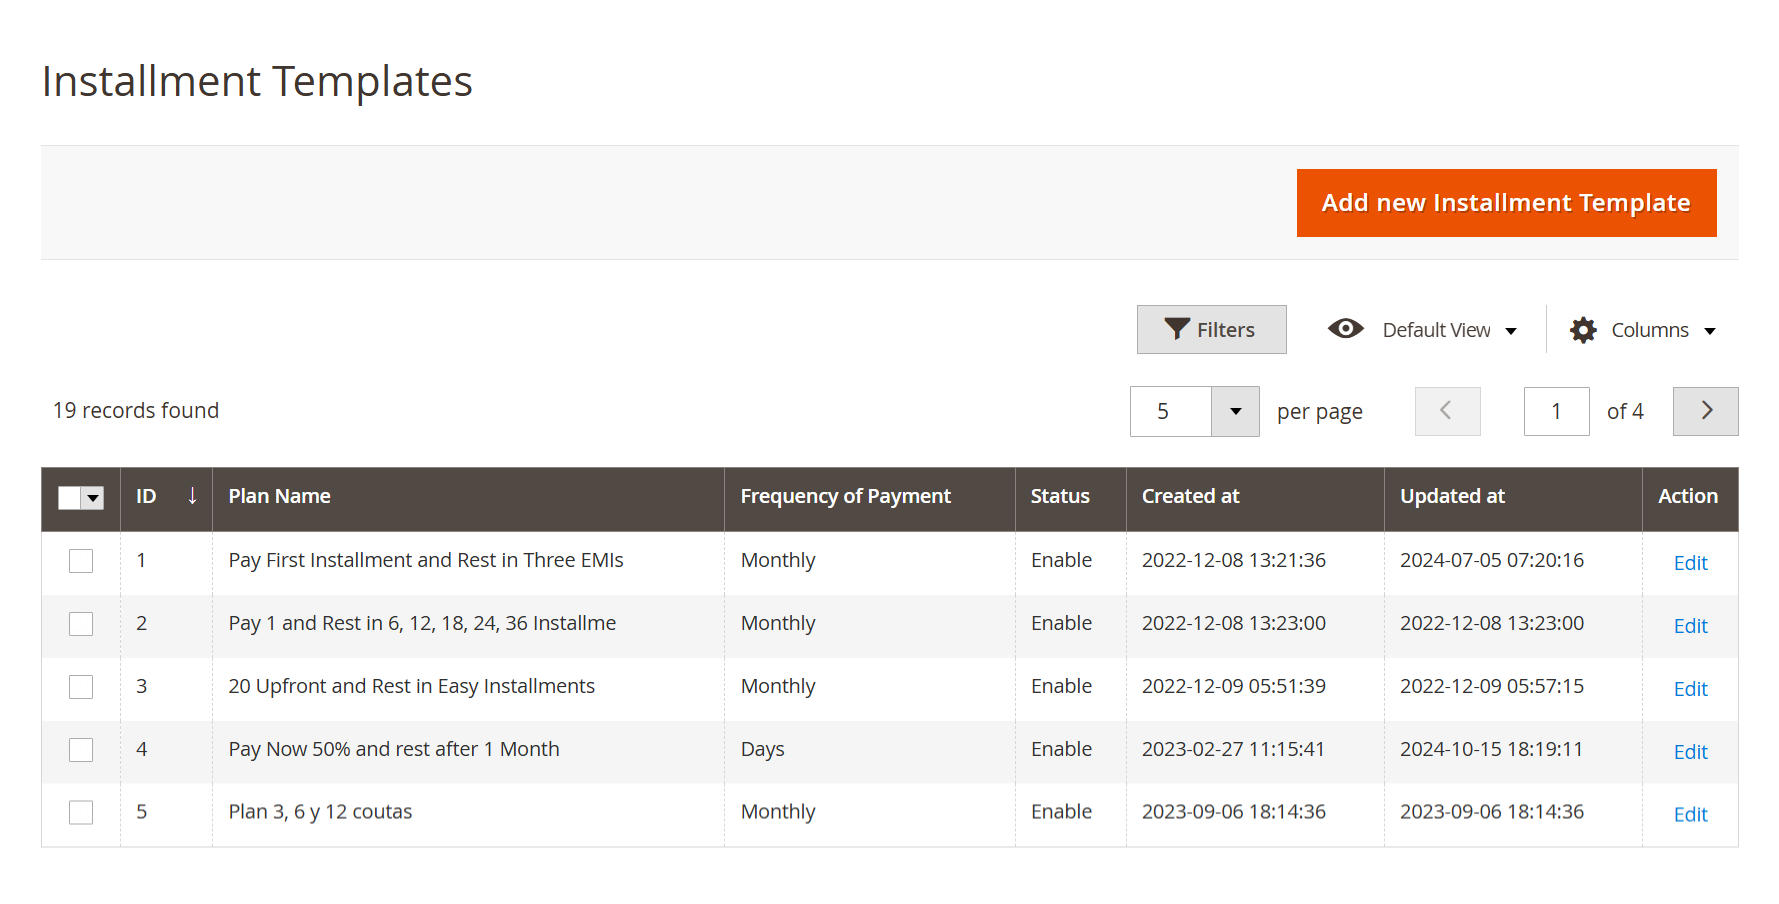
- This admin panel section allows you to manage all Installment Payment Templates used across your store for flexible customer payment options.
- Grid represents the point below:
ID: A unique identifier for each template.
Plan Name: The name of the installment plan (e.g., "3 Easy EMIs").
Frequency of Payment: Specifies how often payments will be made (e.g., Monthly, Days).
Status: Indicates whether the plan is active (Enable) or inactive (Disable).
Created at / Updated at: Shows when the plan was created or last modified.
Action: Use the Edit link to make changes to an existing template.
- Use the Filters button to search or narrow down templates, adjust the number of records shown using the per page dropdown, and navigate between pages with the arrow buttons.
- Click the "Add new Installment Template" button at the top right to create a new installment plan.
Add New Installment Template
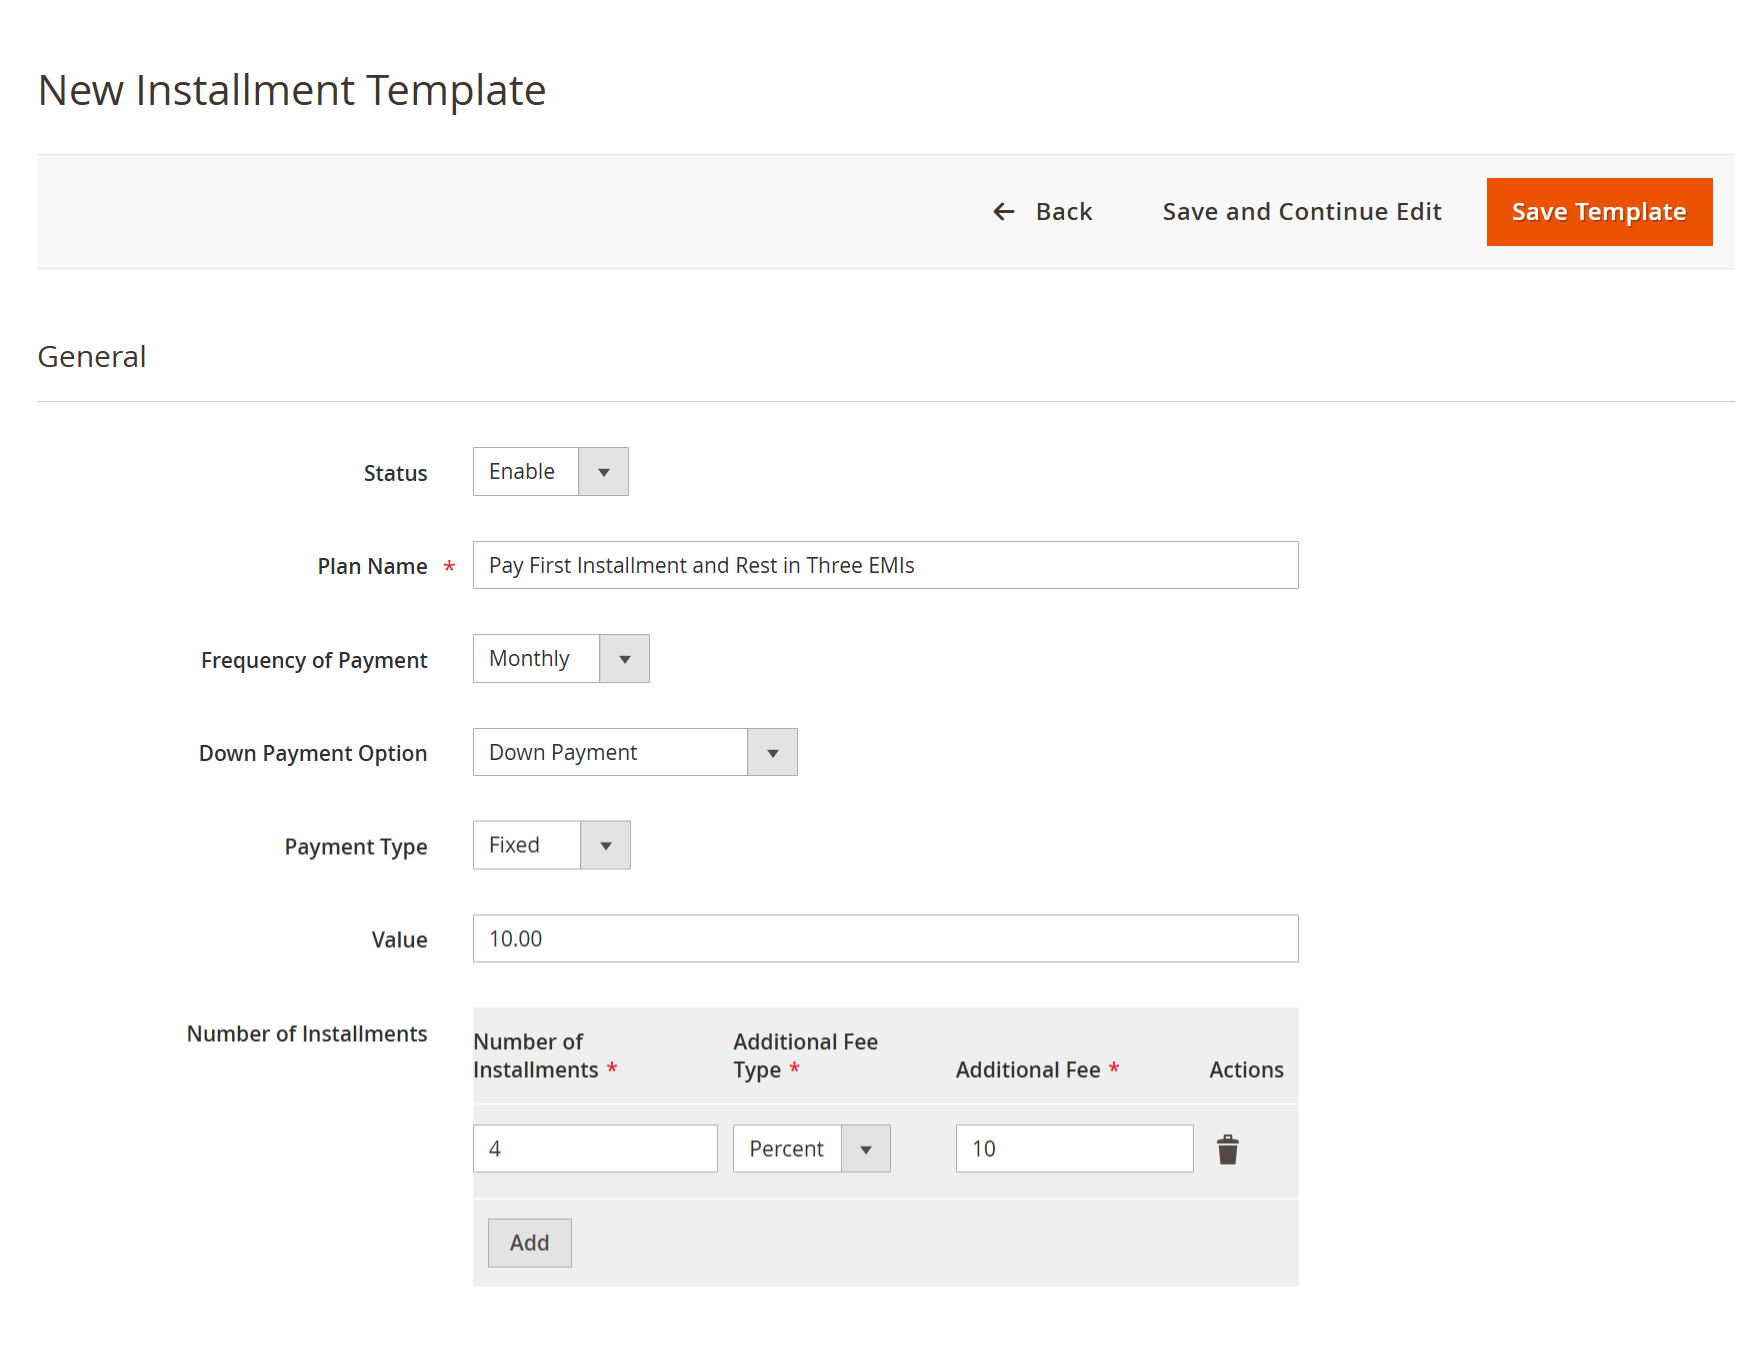
- The admin needs to create a new installment template in the Magento 2 admin panel. It includes several input fields and dropdowns for configuring how installment payments should be handled for customers.
Status: Select whether the template is enabled or disabled.
Plan Name: Enter a custom name for the installment plan. This is a required field.
Frequency of Payment: Choose how often the installments will be paid. Options include:
Weekly
Monthly
Quarterly
Days
Down Payment Option: Choose how the initial payment is handled:
Capture First Installment: Automatically charge the first installment at the time of purchase.
Down Payment: Collect a predefined down payment instead of the first installment.
Payment Type: Define how the installment value is calculated:
Fixed – A fixed amount per installment.
Percent –A percentage of the total order value.
Value: Enter the fixed amount or percentage based on the selected payment type. This defines the value for the down payment or first installment.
Number of Installments: Add one or more installment options with the following fields:
Number of Installments –Enter the total number of payments.
Additional Fee Type – Choose whether the fee is a Fixed amount or a Percentage.
Additional Fee – Enter the amount or percentage charged per installment.
Save and Continue Edit – Save your changes and remain on the form to continue editing.
Save Template – Save the installment template and return to the template grid.
Installment Profiles
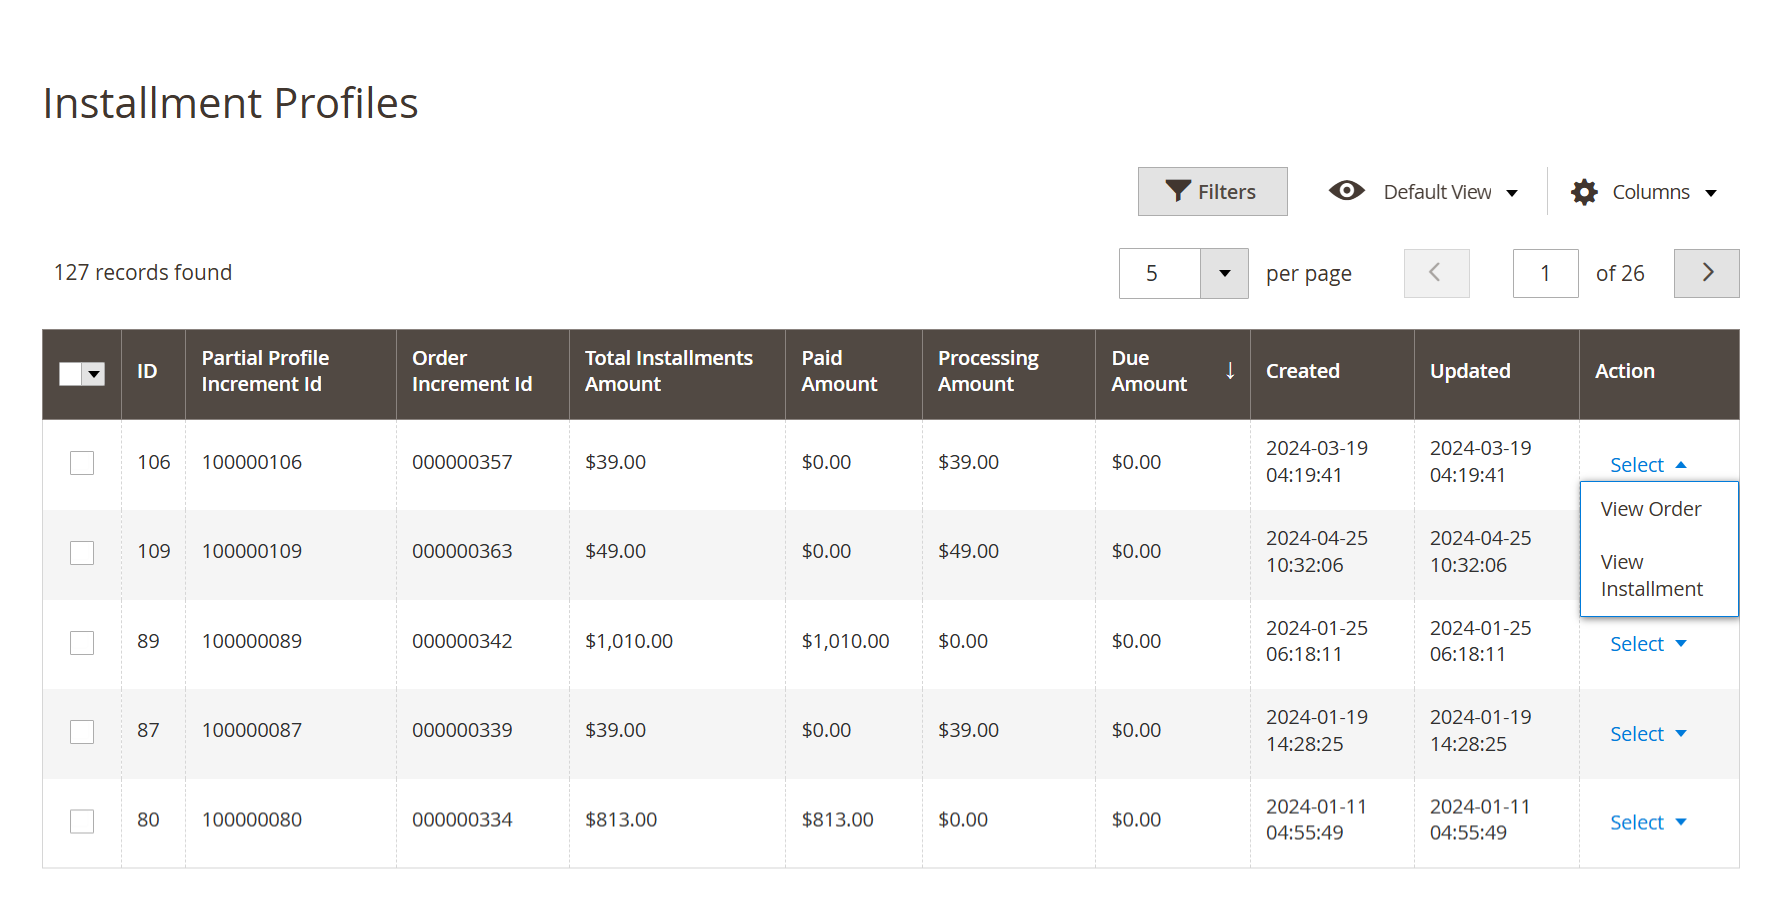
- The Installment Profiles grid provides a detailed list of all customer installment transactions linked to specific orders. This helps the admin track payment progress, view order details, and monitor pending or completed installment amounts.
ID: A unique internal identifier for each installment profile.
Partial Profile Increment ID: A system-generated reference number for the installment profile.
Order Increment ID: The Magento order number associated with the installment profile.
Total Installments Amount: The total value scheduled to be paid in installments for the corresponding order.
Paid Amount: The amount that has been successfully paid by the customer.
Processing Amount: The amount currently in progress (e.g., awaiting confirmation or payment gateway response).
Due Amount: The remaining balance still owed by the customer.
Created / Updated: Timestamps indicating when the profile was created and last updated.
Action: Click the Select dropdown to:
View Order – Open the related order in a new view.
View Installment – View detailed installment schedule and payment breakdown.
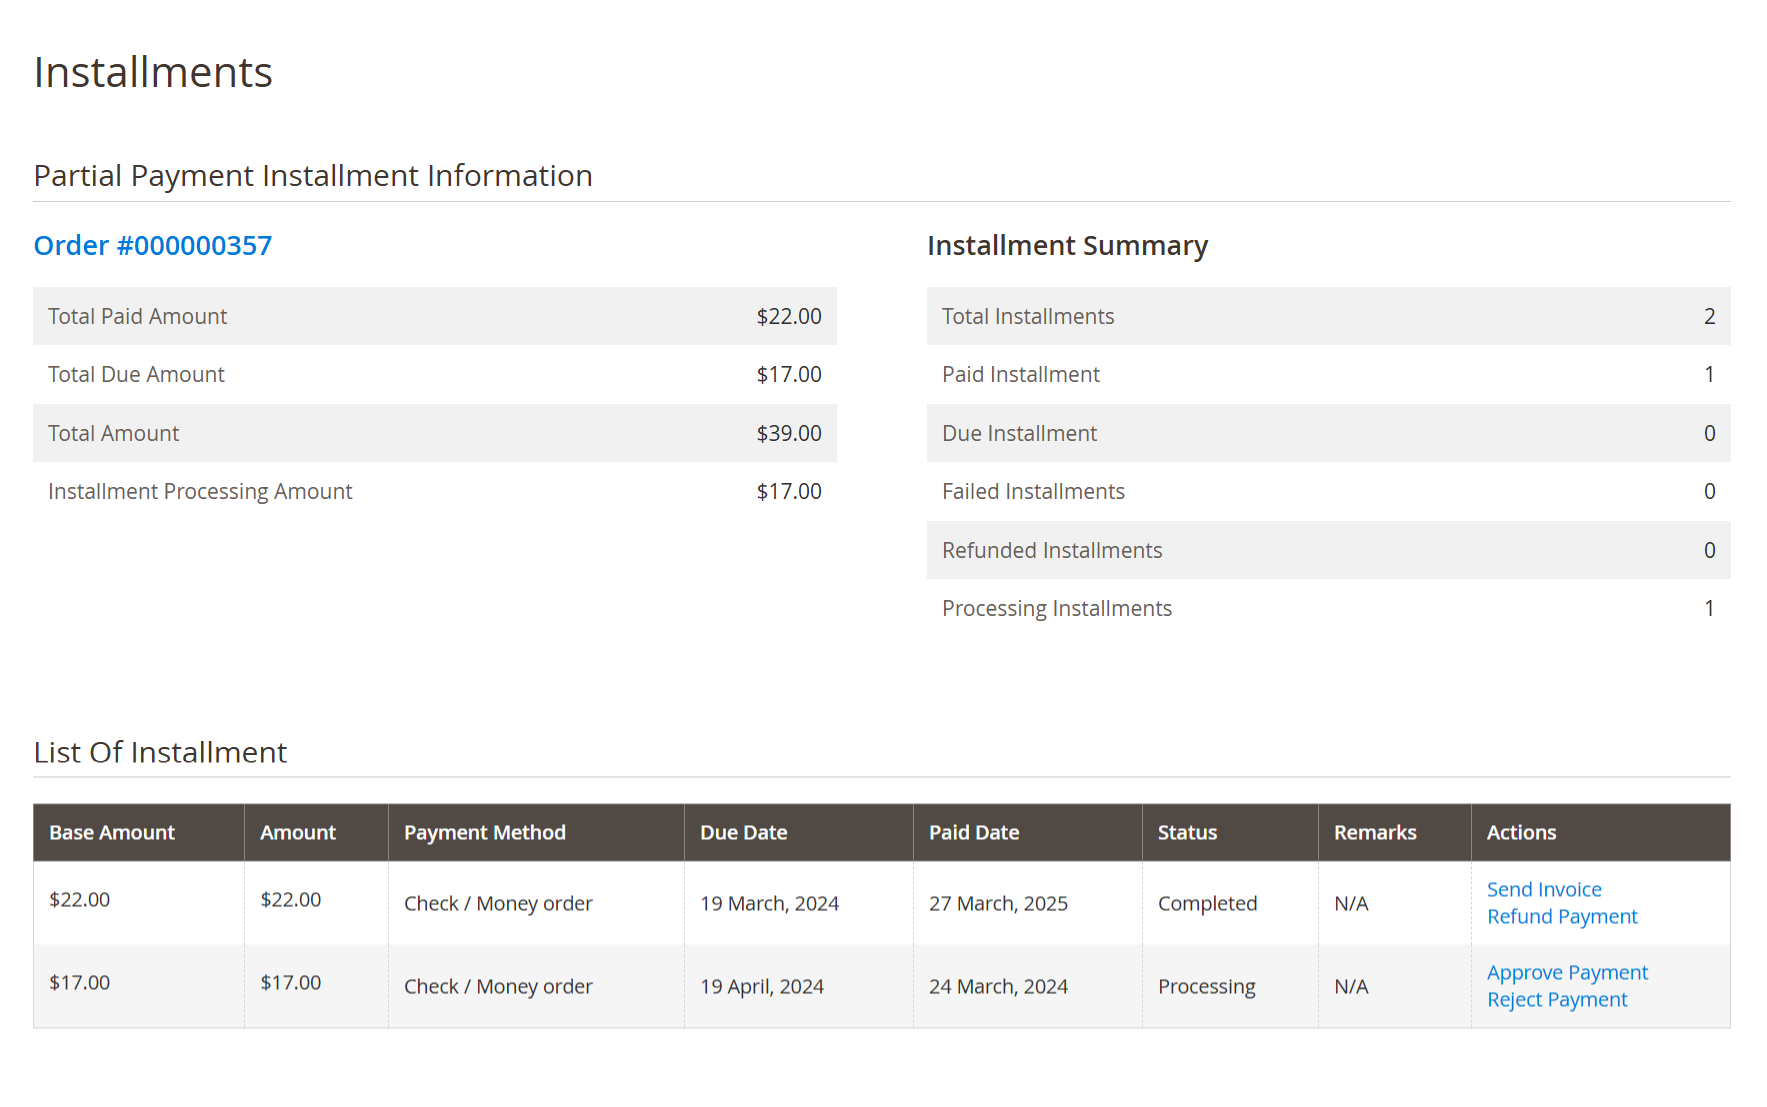
- Click on " View Installment" and it will open the Installment Summary provides a quick snapshot of the installment status for the order. It displays the total number of installments, how many have been paid, are due, or are currently processing. It also highlights any failed or refunded installments, giving admins a clear overview of payment progress. In addition, from the Actions column, admins can send an Invoice, Refund Payment, Approve Payment, or Reject Payment directly for each installment.
All Partial Payment Orders
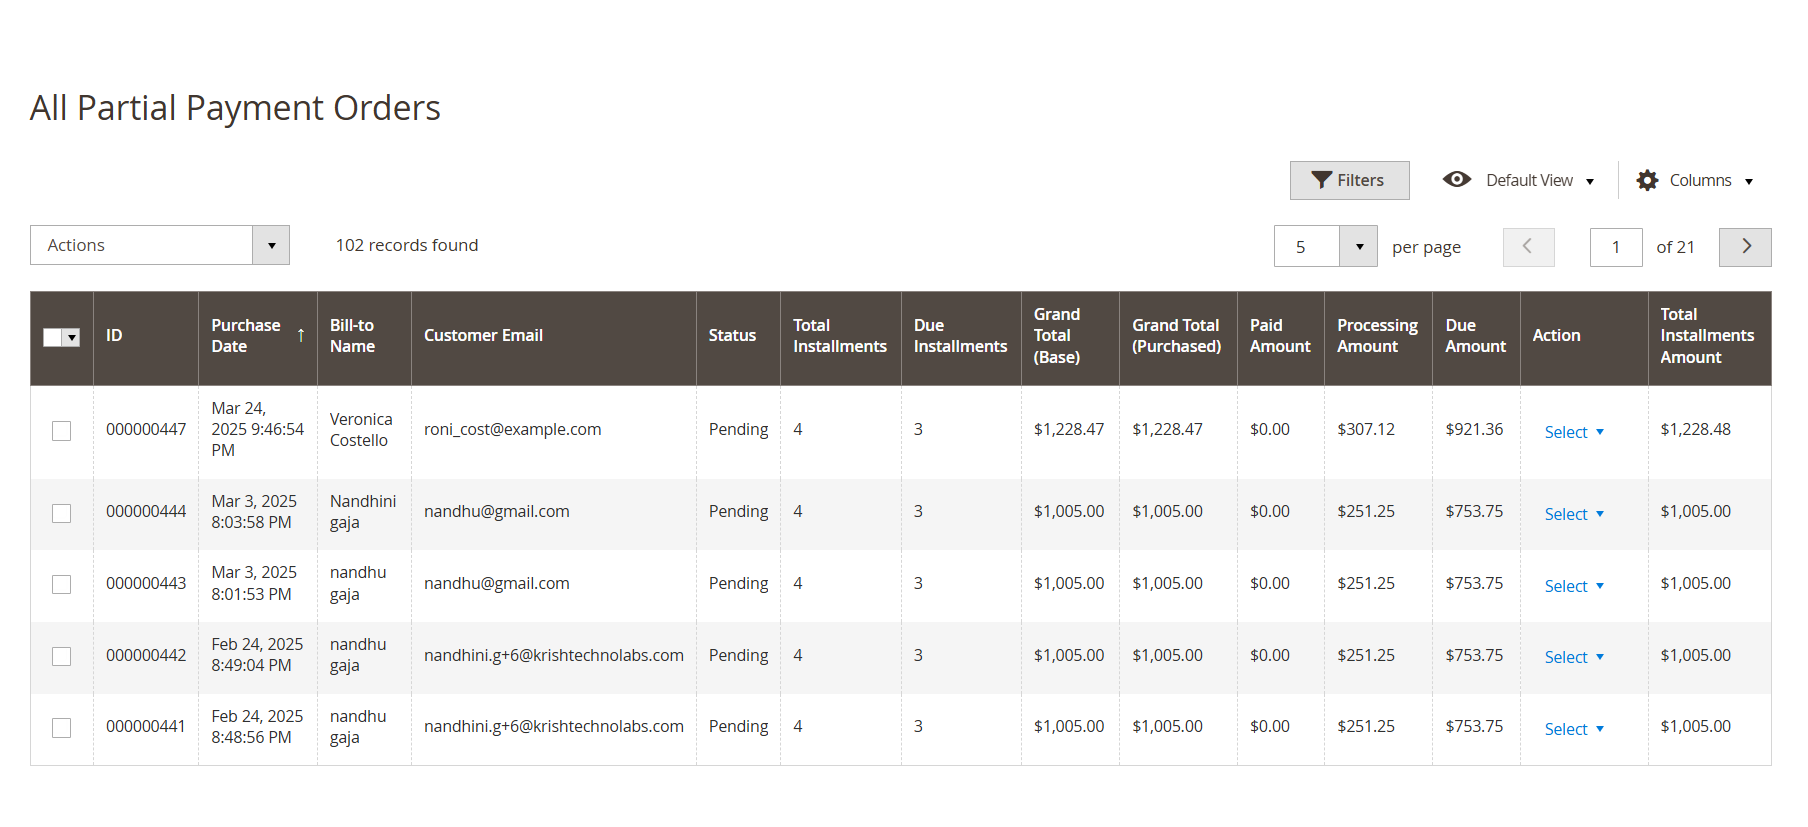
- The All Partial Payment Orders screen provides a centralized view of all customer orders placed using installment or partial payment methods. This dashboard helps store administrators effectively monitor payment progress, track outstanding balances, and manage follow-ups with ease.
ID: Unique order ID for quick reference within the partial payment system.
Purchase Date: Date and time when the order was placed.
Bill-to Name: The name of the customer as per billing information.
Customer Email: Email address of the customer who placed the order.
Status: Current status of the payment schedule (e.g., Pending, Completed).
Total Installments: Number of installment payments set up for the order.
Due Installments: Number of remaining unpaid installments.
Grand Total (Base): The order's total amount in the store's base currency.
Grand Total (Purchased): The final purchase amount at the time of checkout.
Paid Amount: Total amount successfully paid by the customer so far.
Processing Amount: Amount that is currently under processing (e.g., pending approval).
Due Amount: Outstanding balance yet to be paid.
Total Installments Amount: The overall amount covered under the installment plan.
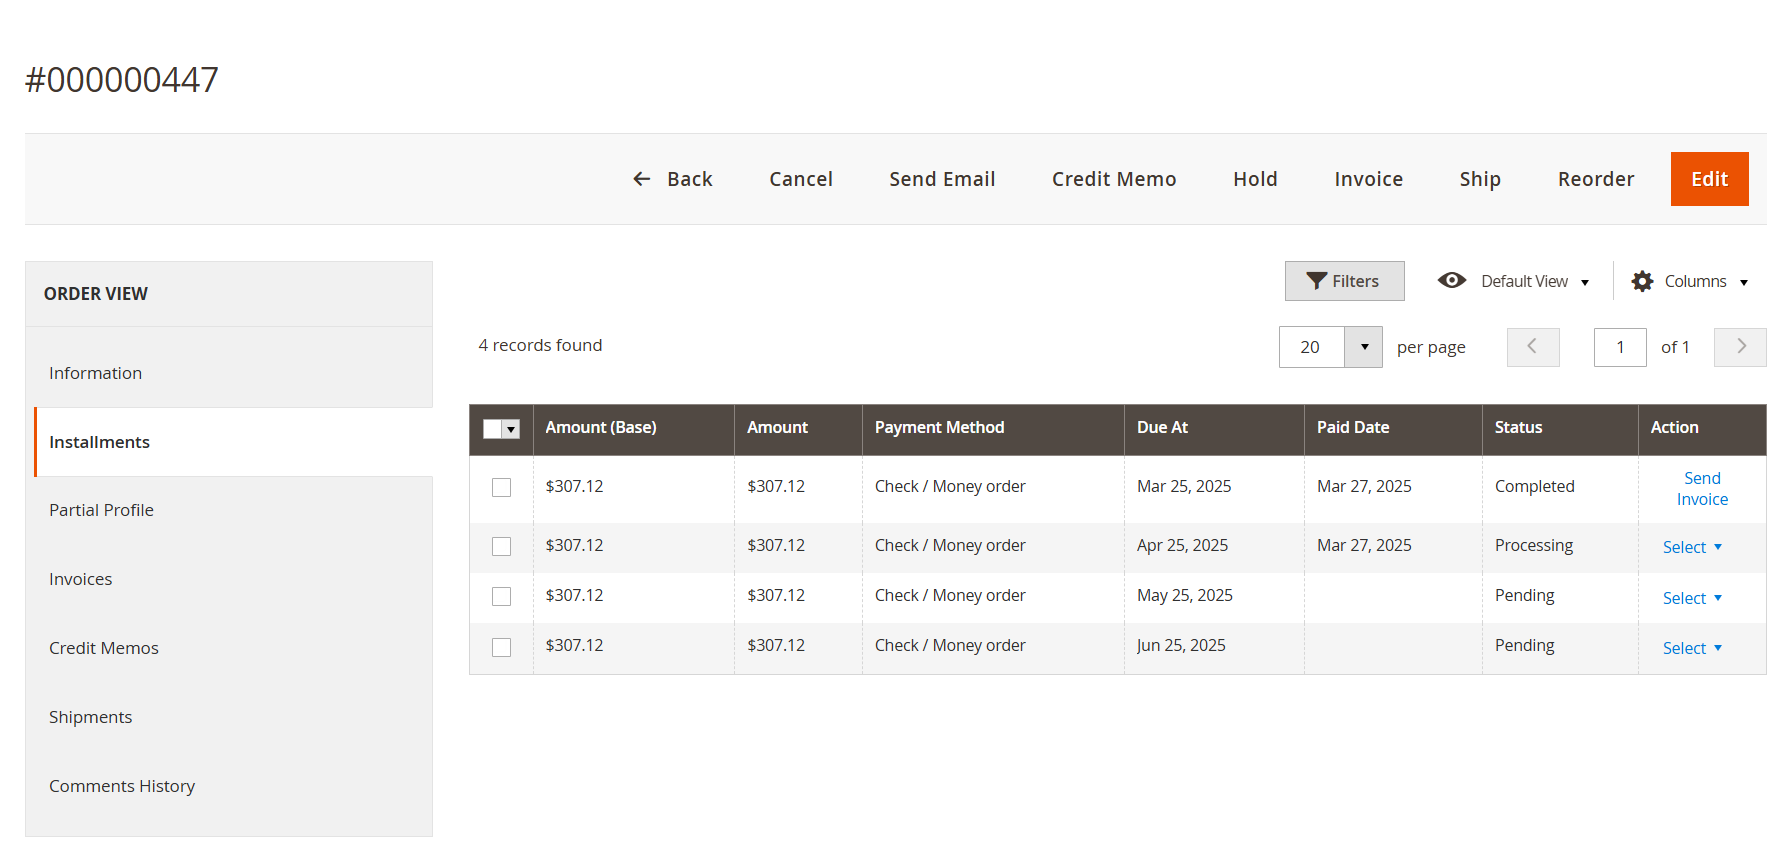
- Click on "View Order," and it will open the Installments tab under the Order Details page provides a detailed breakdown of all installment payments associated with a specific customer order. This view helps store administrators monitor payment status, track due dates, and take direct actions for each installment.
Amount (Base): The installment amount in the store’s base currency.
Amount: The final payable amount for the installment.
Payment Method: The payment option selected by the customer (e.g., Check / Money Order).
Due At: Scheduled date when the installment is expected to be paid.
Paid Date: The actual date on which the installment was marked as paid.
Status: Displays the current status of the installment:
Completed – Payment successfully received.
Processing – Payment is under review.
Pending – Payment is due but not yet received.
Action: Available actions include:
Send Invoice – Generate and send an invoice for the installment.
Select (dropdown) – Provides additional options such as Approve Payment, Reject Payment, or Refund (based on status).
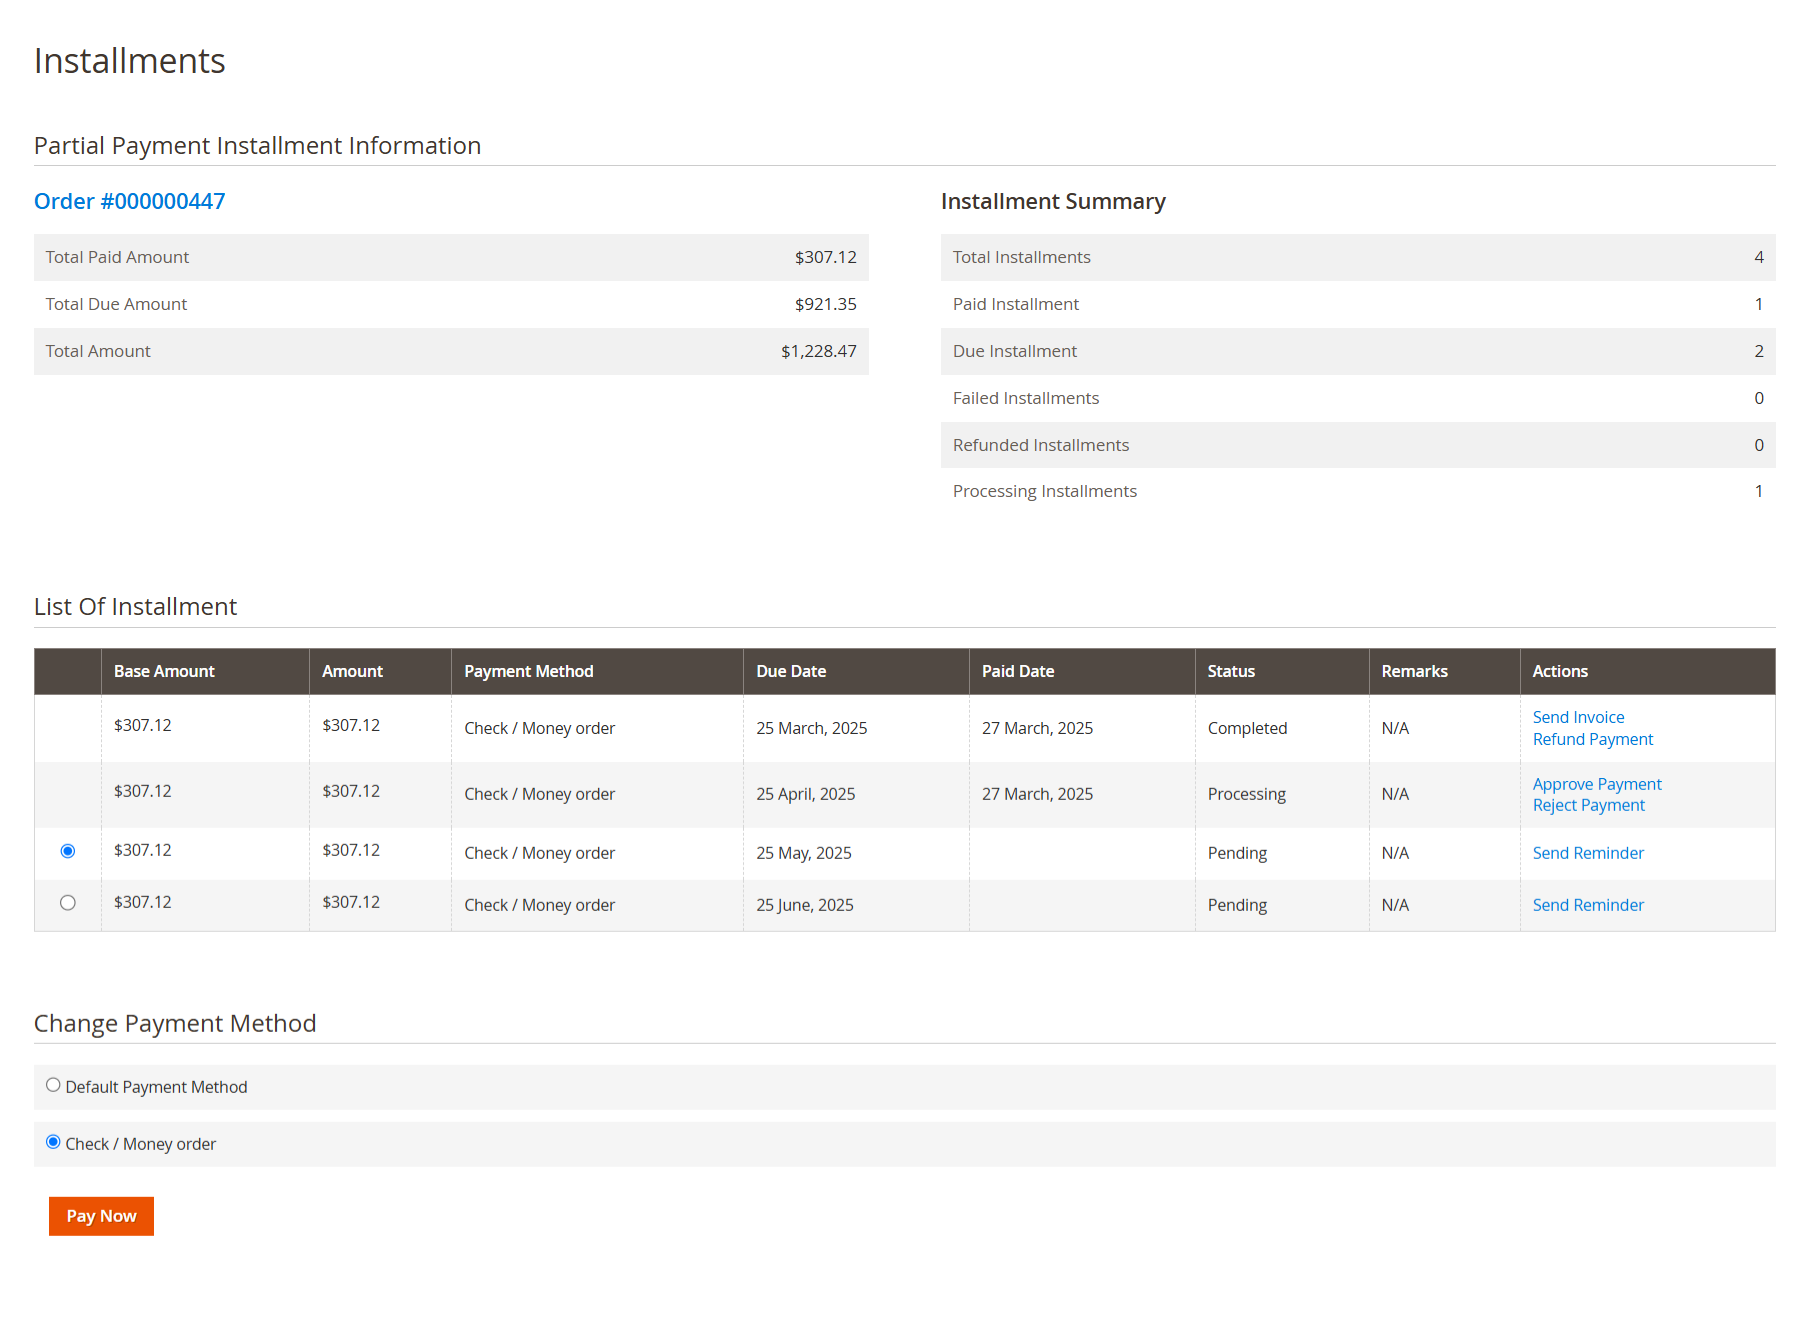
- The Installment Summary provides a quick overview of the payment plan for the order. It displays the total number of installments, how many are paid, pending, or in processing. It also shows if any installments have failed or been refunded. This helps both customers and admins track the overall progress at a glance. The Change Payment Method section allows customers to switch between available payment options (e.g., Check / Money Order) before proceeding. Once selected, they can securely complete the installment by clicking Pay Now.
All Installments
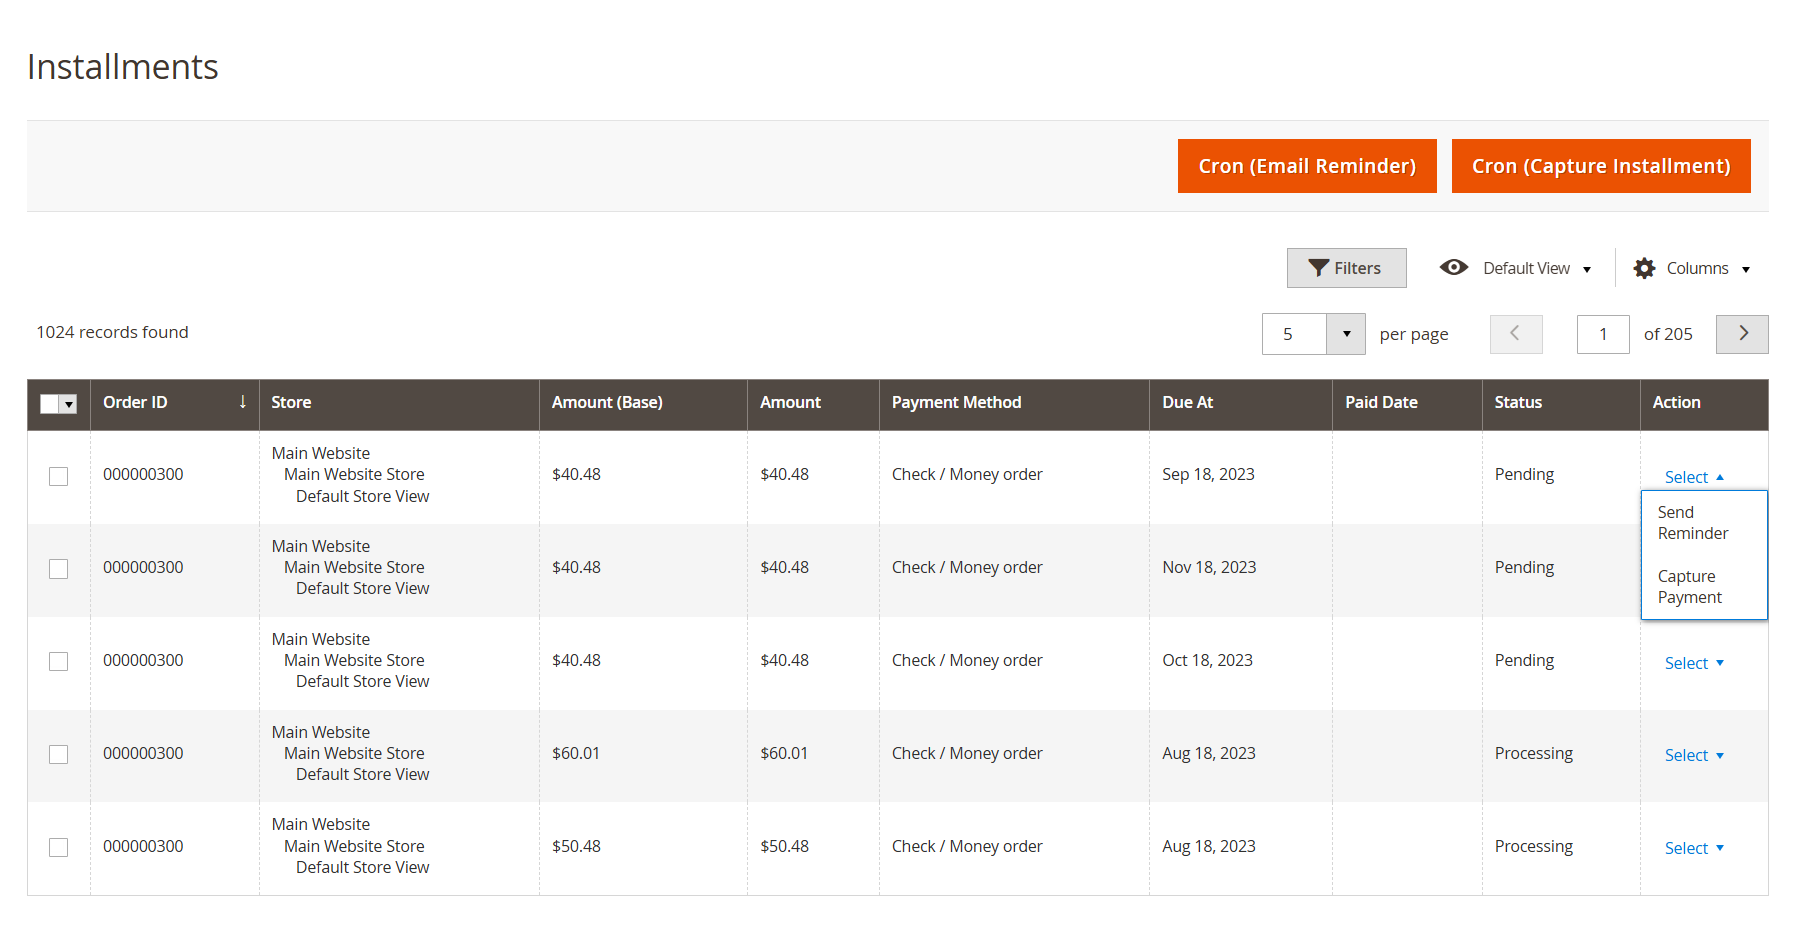
- The Installments page provides administrators with a centralized view of all installment payments scheduled across the store. This powerful grid allows for real-time monitoring of pending, processing, and due payments, while also offering quick actions to manage them efficiently.
Order ID: Displays the unique identifier of the order associated with the installment.
Store: Indicates which website or store the order originated from.
Amount (Base) / Amount: Shows the base and actual installment amount due for the order.
Payment Method: Displays the customer’s chosen method of payment (e.g., Check / Money Order).
Due At / Paid Date: Reflects the scheduled payment date and the actual date the payment was received (if applicable).
Status: Current state of the installation:
Pending – Payment is not yet made.
Processing – Payment is being reviewed or captured.
Action (Select Dropdown): Admins can take the following actions per installment:
Send Reminder – Sends a reminder email to the customer about the upcoming or overdue payment.
Capture Payment – Manually triggers the system to attempt payment capture.
Cron (Email Reminder): Runs a scheduled task that automatically sends email reminders for all due or upcoming installment payments. This reduces manual follow-ups and improves collection rates.
Cron (Capture Installment): Initiates the automatic payment capture process for eligible installments across all orders. This is useful for stores using payment gateways that support delayed or scheduled captures.
Frontend Functionality
Product Wise Installment
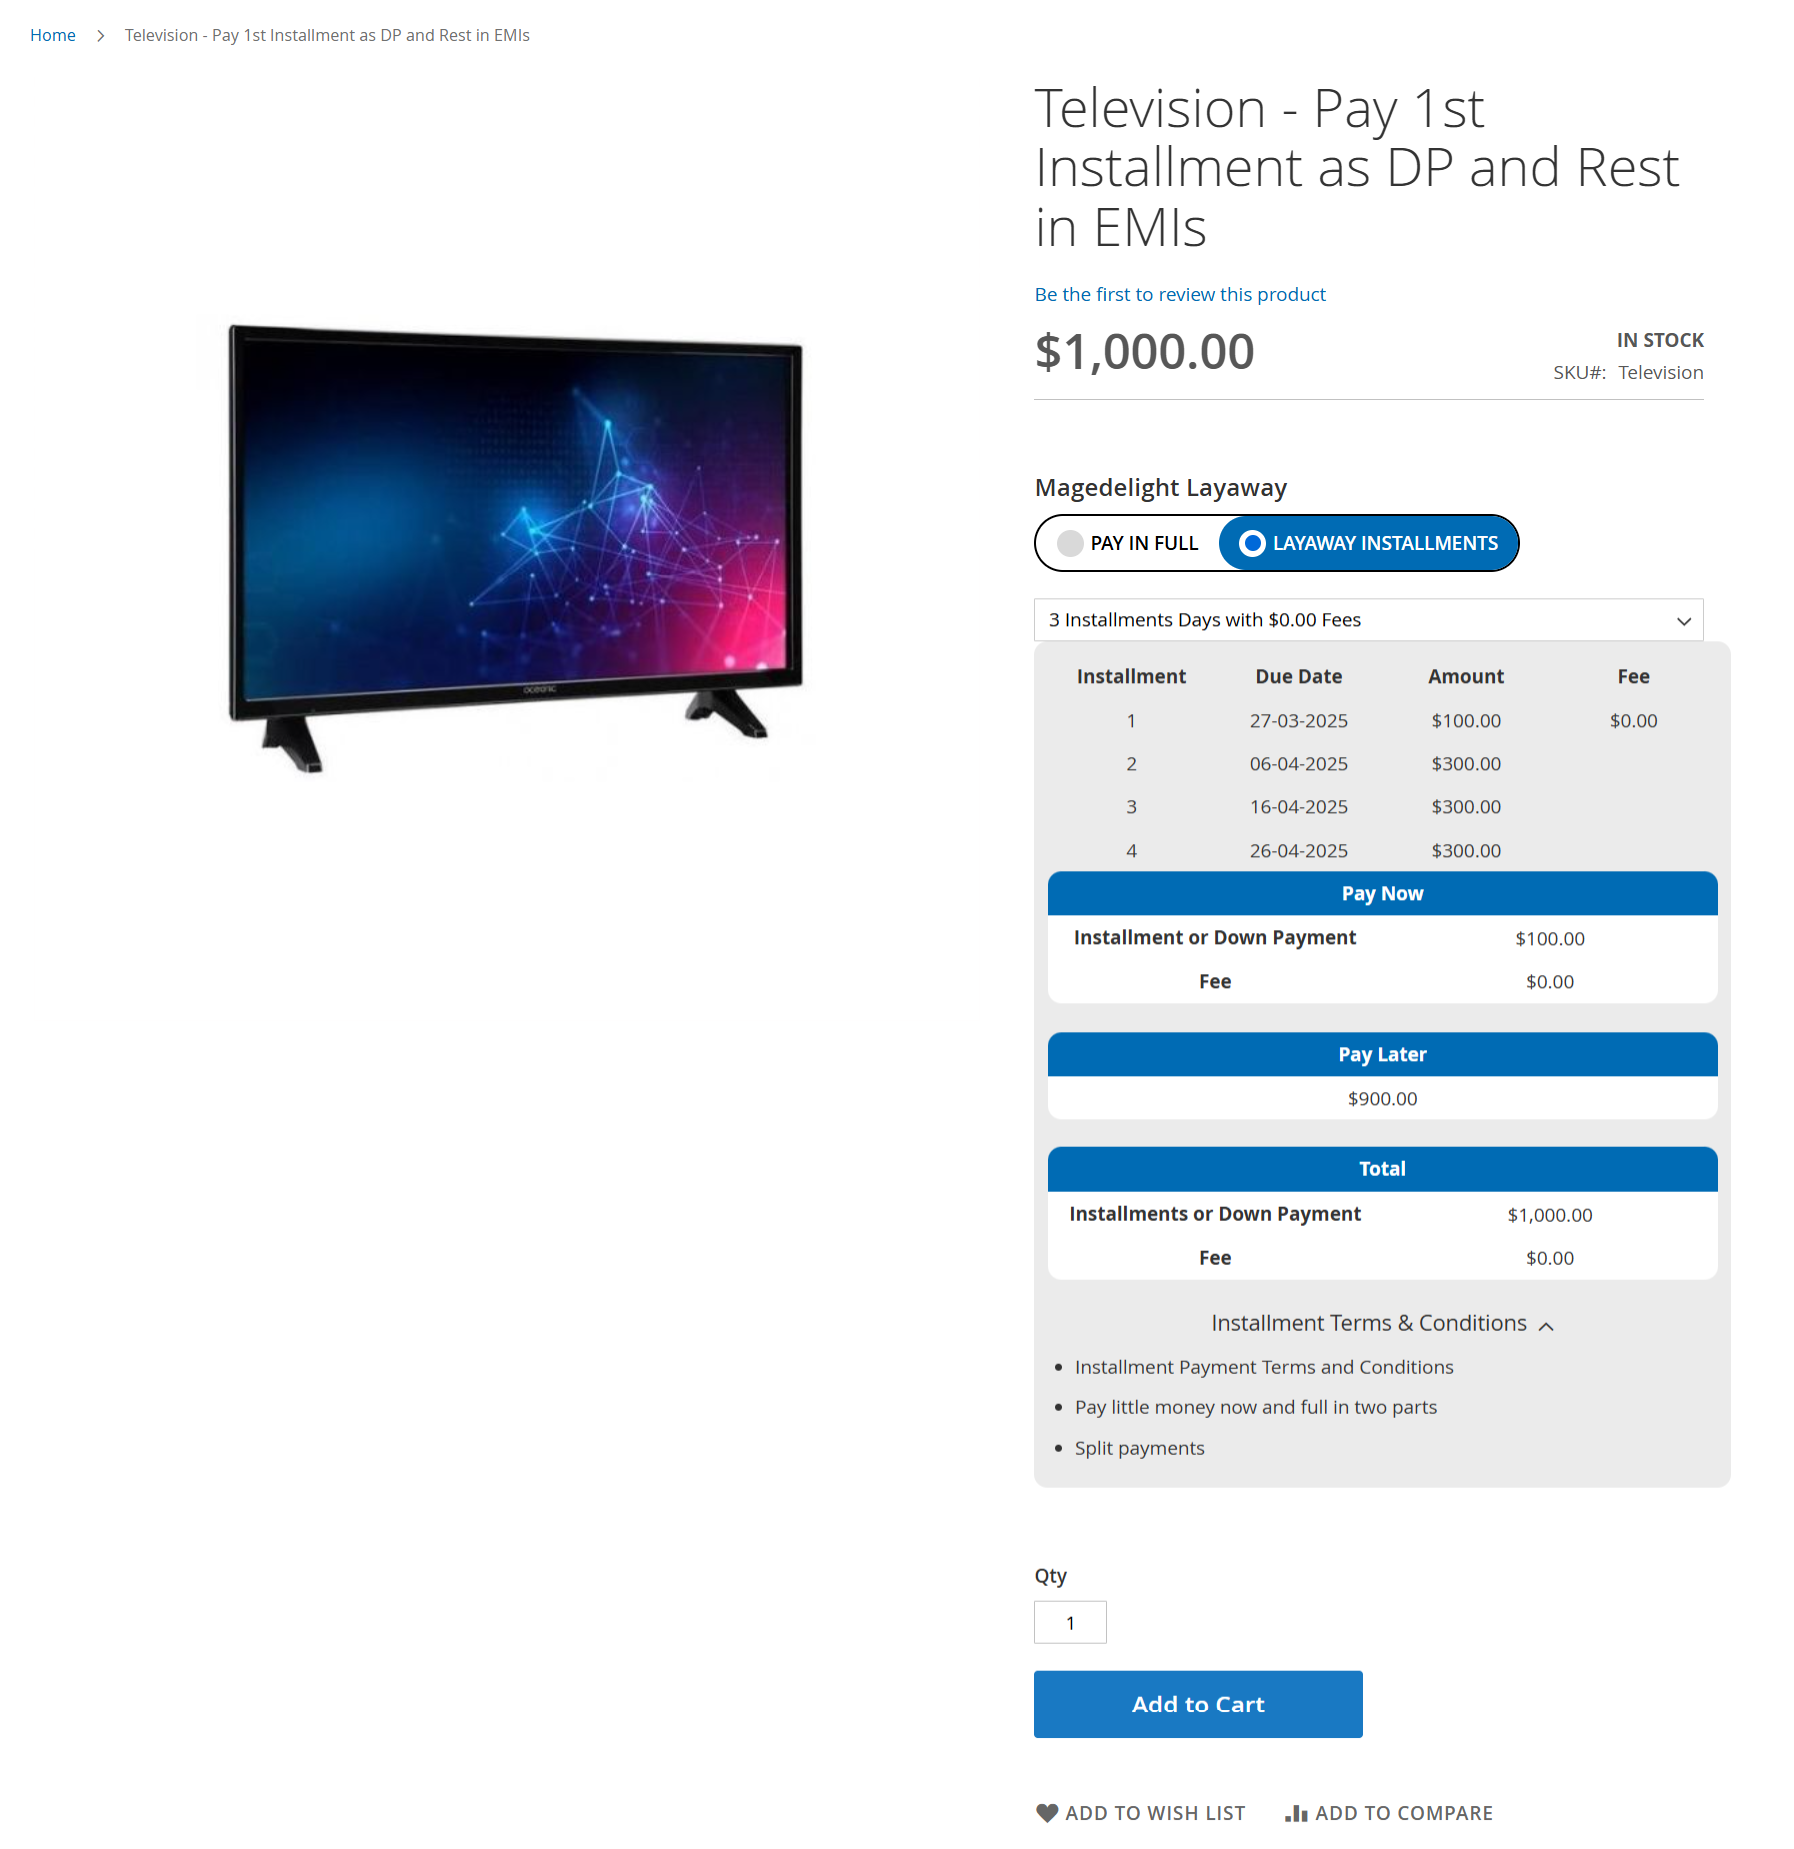
- This section of the Product Detail Page allows customers to choose between full payment or installment-based layaway plans before adding the product to the cart. It provides transparency and flexibility in how the total amount is paid.
Customers can toggle between "Pay in Full" and "Layaway Installments" before proceeding to checkout. When Layaway Installments is selected, a detailed payment schedule is shown with:
Installment Number, Due Dates, Amounts, and Associated Fees (if any).
A summary of the Installment or Down Payment to be paid immediately.
A breakdown of the Pay Later amount, showing the total of future installments.
The Total section reflects the full cost of the product, ensuring price transparency.
- Customers can confirm the initial payment using the "Pay Now" button or proceed by adding the product to the cart using "Add to Cart".
Additionally, a collapsible section labeled Installment Terms & Conditions provides key information about:
Payment terms and installment structure
Timing of remaining payments
Notes on split payment plans and how the full balance is handled
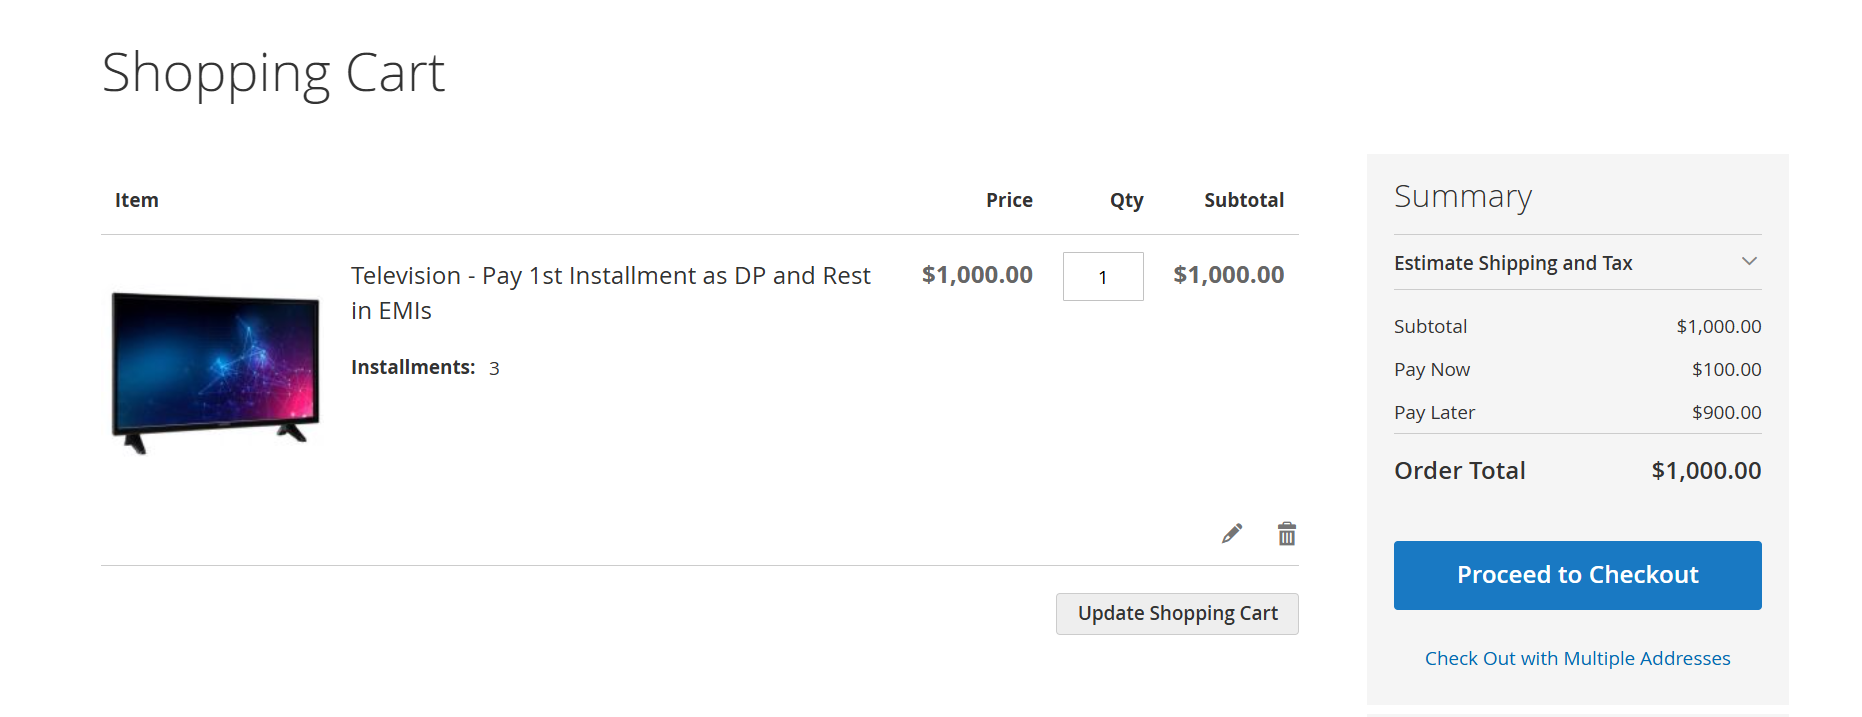
- The Shopping Cart page displays the selected product along with a clear breakdown of the installment-based payment structure, offering transparency before the customer proceeds to checkout.
When a customer selects a Layaway Installment Plan on the Product Detail Page, the shopping cart reflects this payment mode. The item is listed with the number of installments (e.g., Installments: 3), while the pricing summary clearly shows how the total amount will be split.
Subtotal – Displays the full product price.
Pay Now – The amount required immediately, typically a down payment or first installment (e.g., $100.00).
Pay Later – Remaining balance to be paid in future installments (e.g., $900.00).
Order Total – The total cost of the product, combining both immediate and future payments.
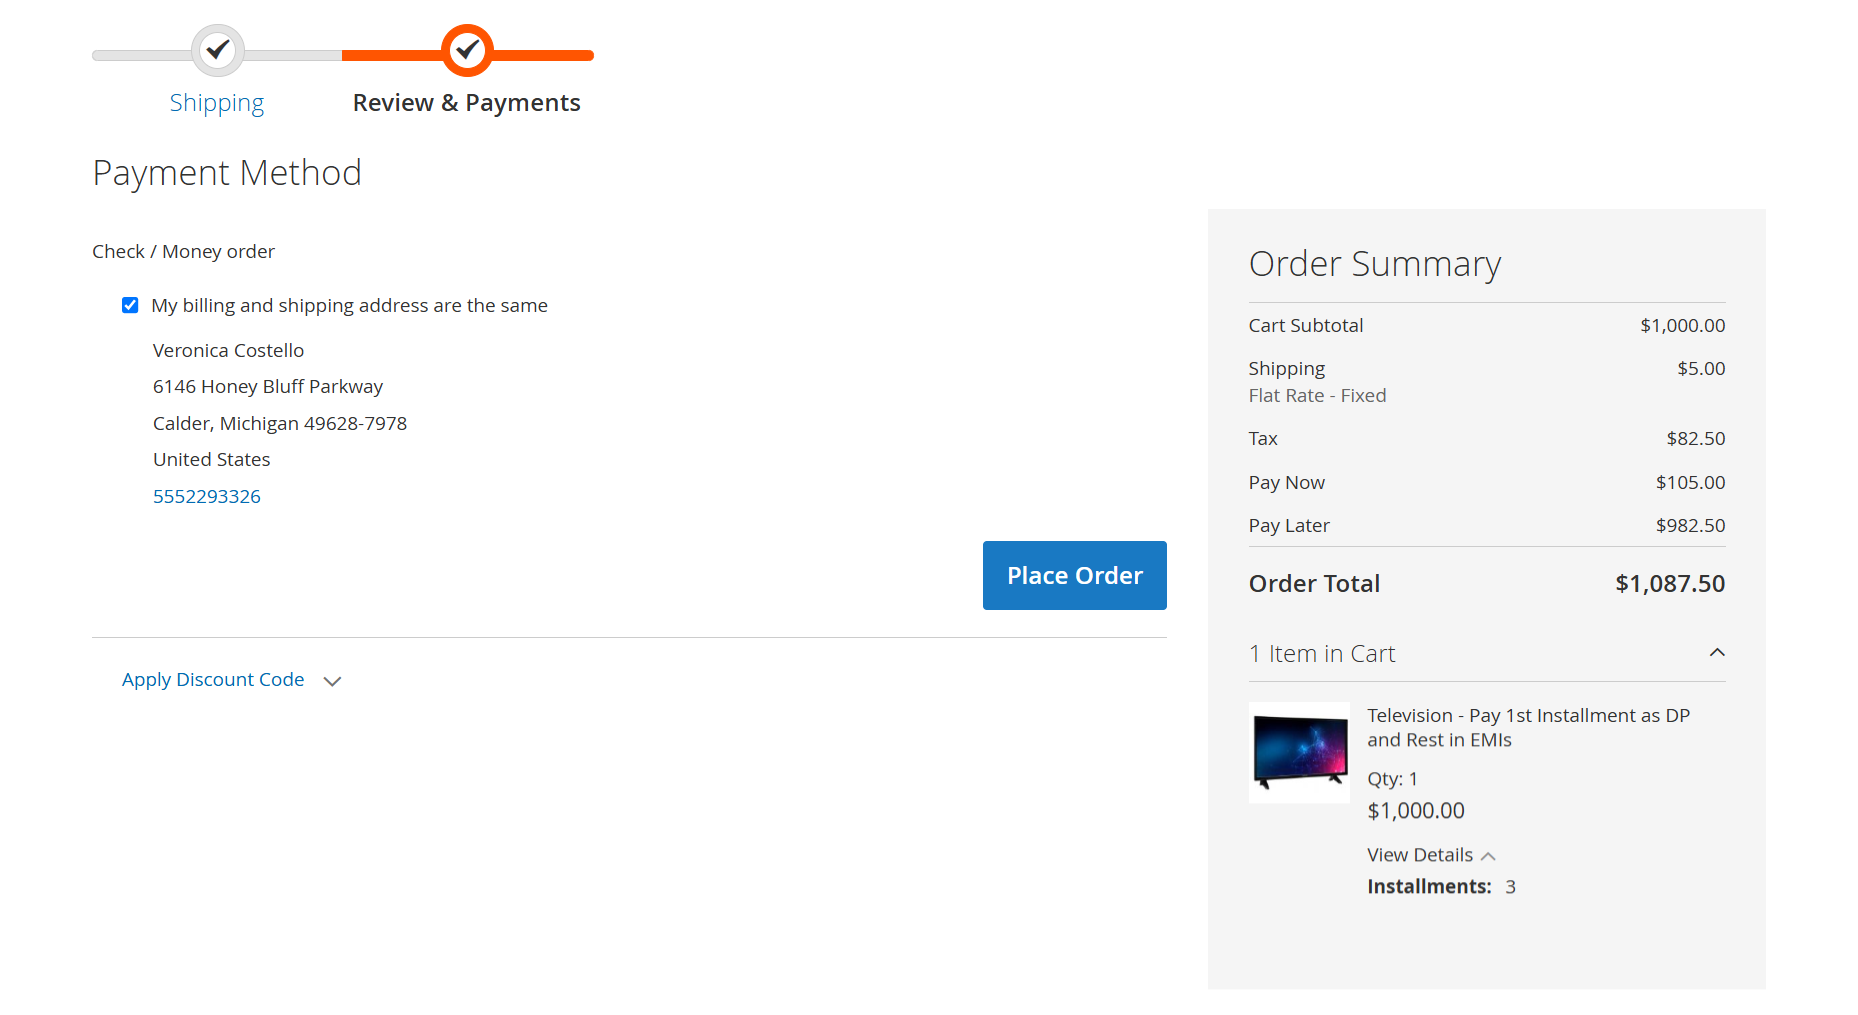
- The Review & Payments step is the final stage in the checkout process. When a customer selects an installment payment option, this page confirms the selected payment method, billing/shipping information, and presents a detailed order summary split between immediate and future payments.
Cart Subtotal – Total product price (e.g., $1,000.00).
Shipping – Flat-rate shipping cost (e.g., $5.00).
Tax – Applicable taxes calculated during checkout (e.g., $82.50).
Pay Now – Amount due immediately (includes tax and shipping on the first installment).
Pay Later – The remaining amount to be paid in future installments.
Order Total – Full cost including taxes and shipping.
The Installment Plan section also shows:
Number of installments selected (e.g., 3 Installments)
A visual summary of the product with price and quantity.
Whole Cart Installment
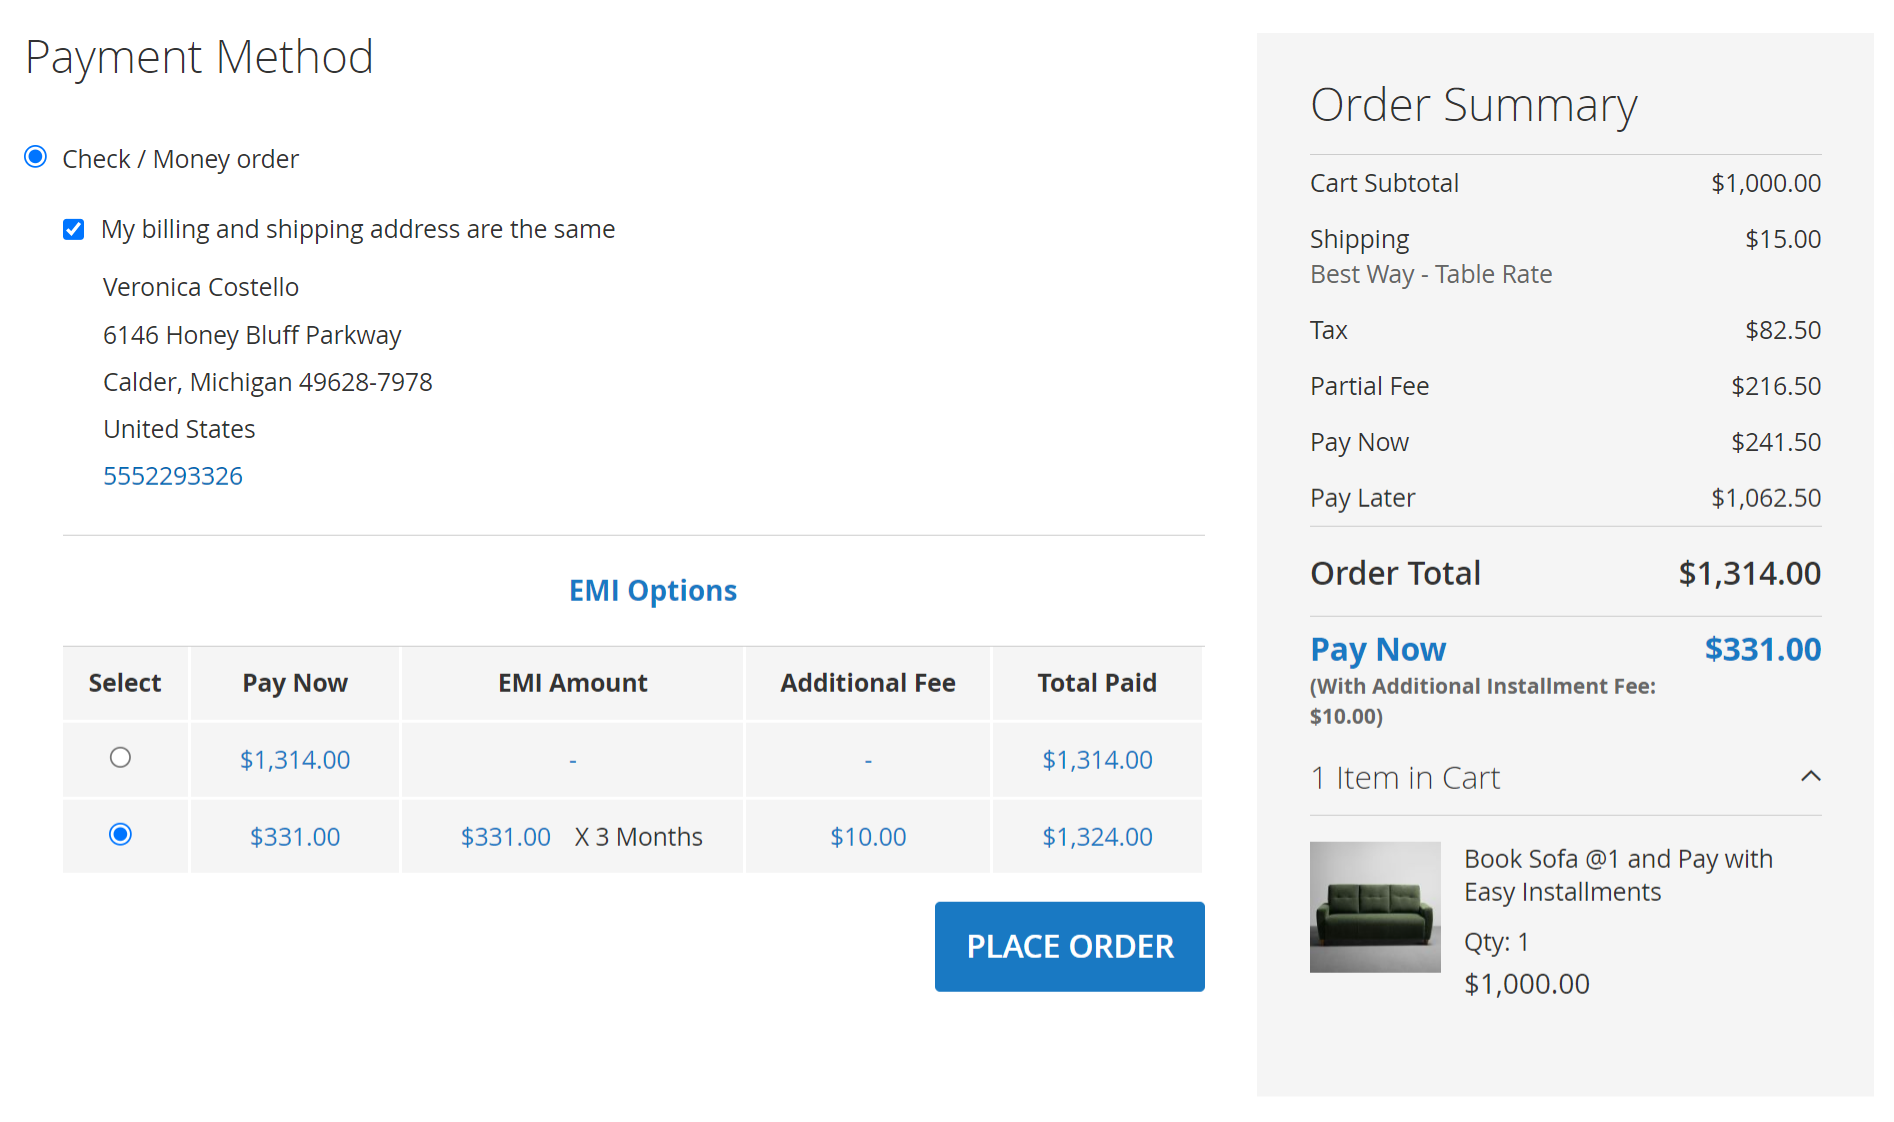
- When you select the EMI Configuration as "Whole Cart", then at the Payment Method step of checkout, customers can choose to complete the order using flexible EMI (Equated Monthly Installment) plans. This enables them to split the order total into smaller, more manageable payments instead of paying the full amount upfront.
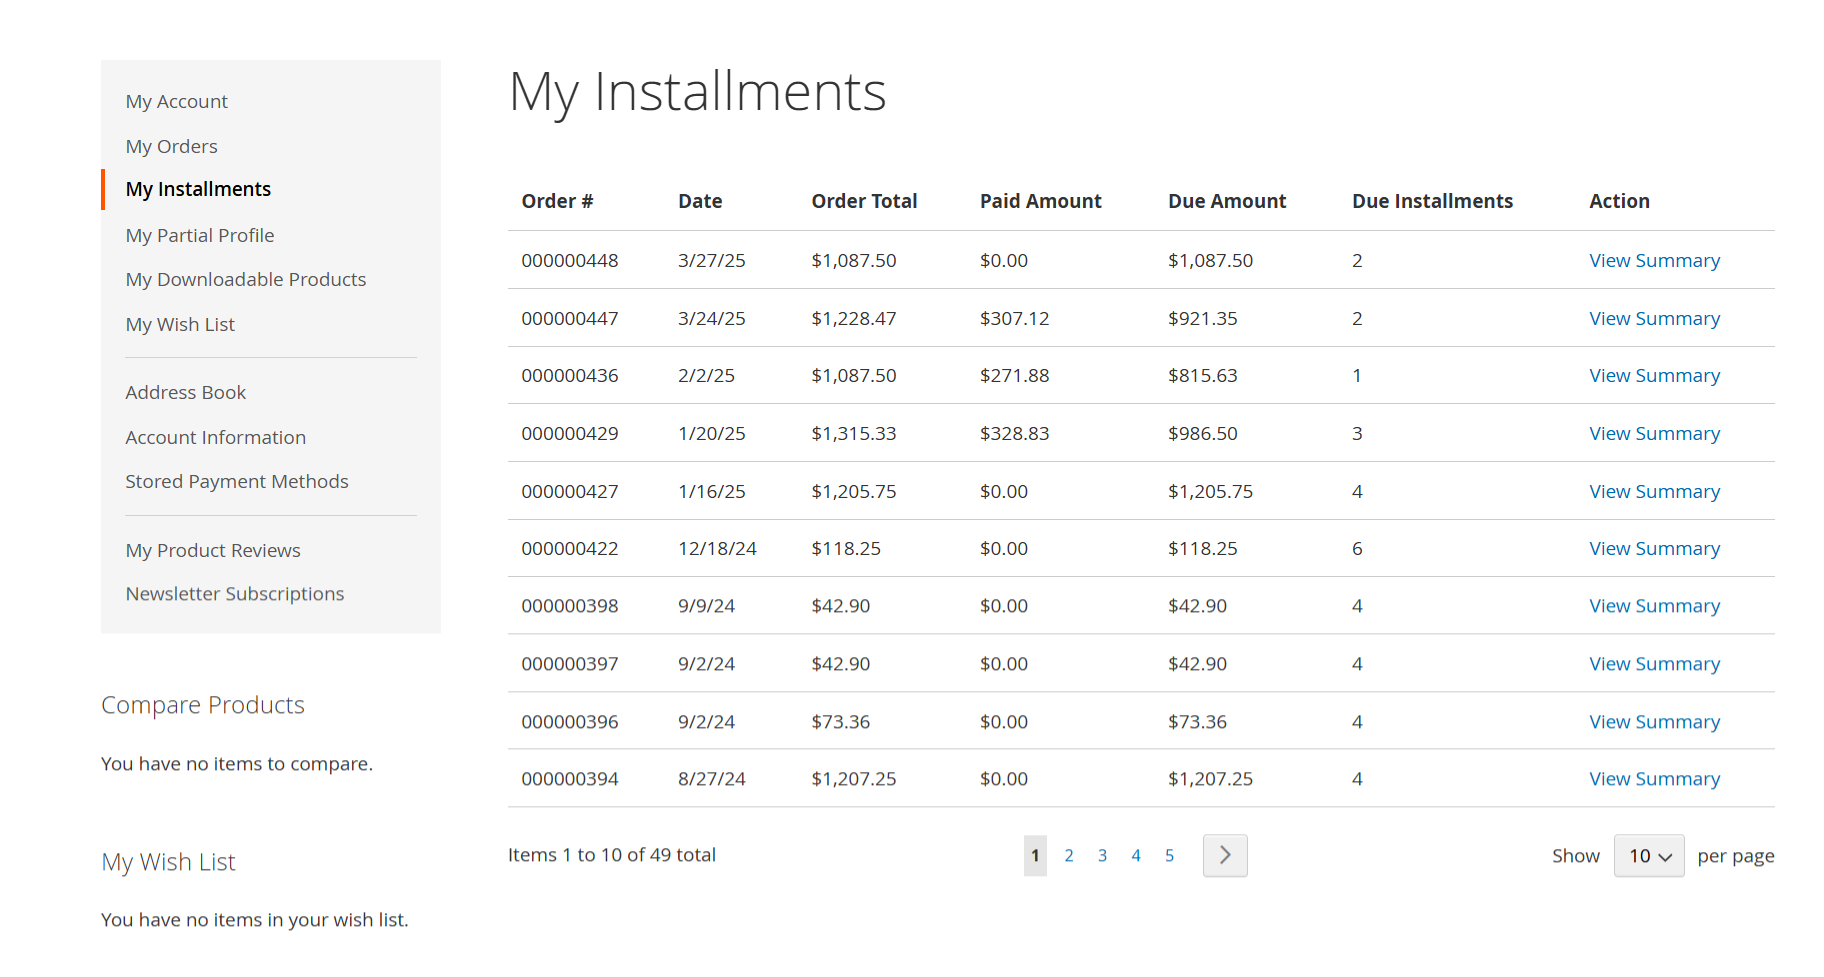
- List of orders with Installments under customer "My Account" section. The My Installments section gives customers a complete overview of all their installment-based orders, including total amount, paid amount, due balance, and pending installments. It lists each order with the ability to View Summary for detailed payment history and schedule. Customers can easily track progress and stay informed about upcoming payments. The section supports pagination for browsing multiple installment orders in one place.
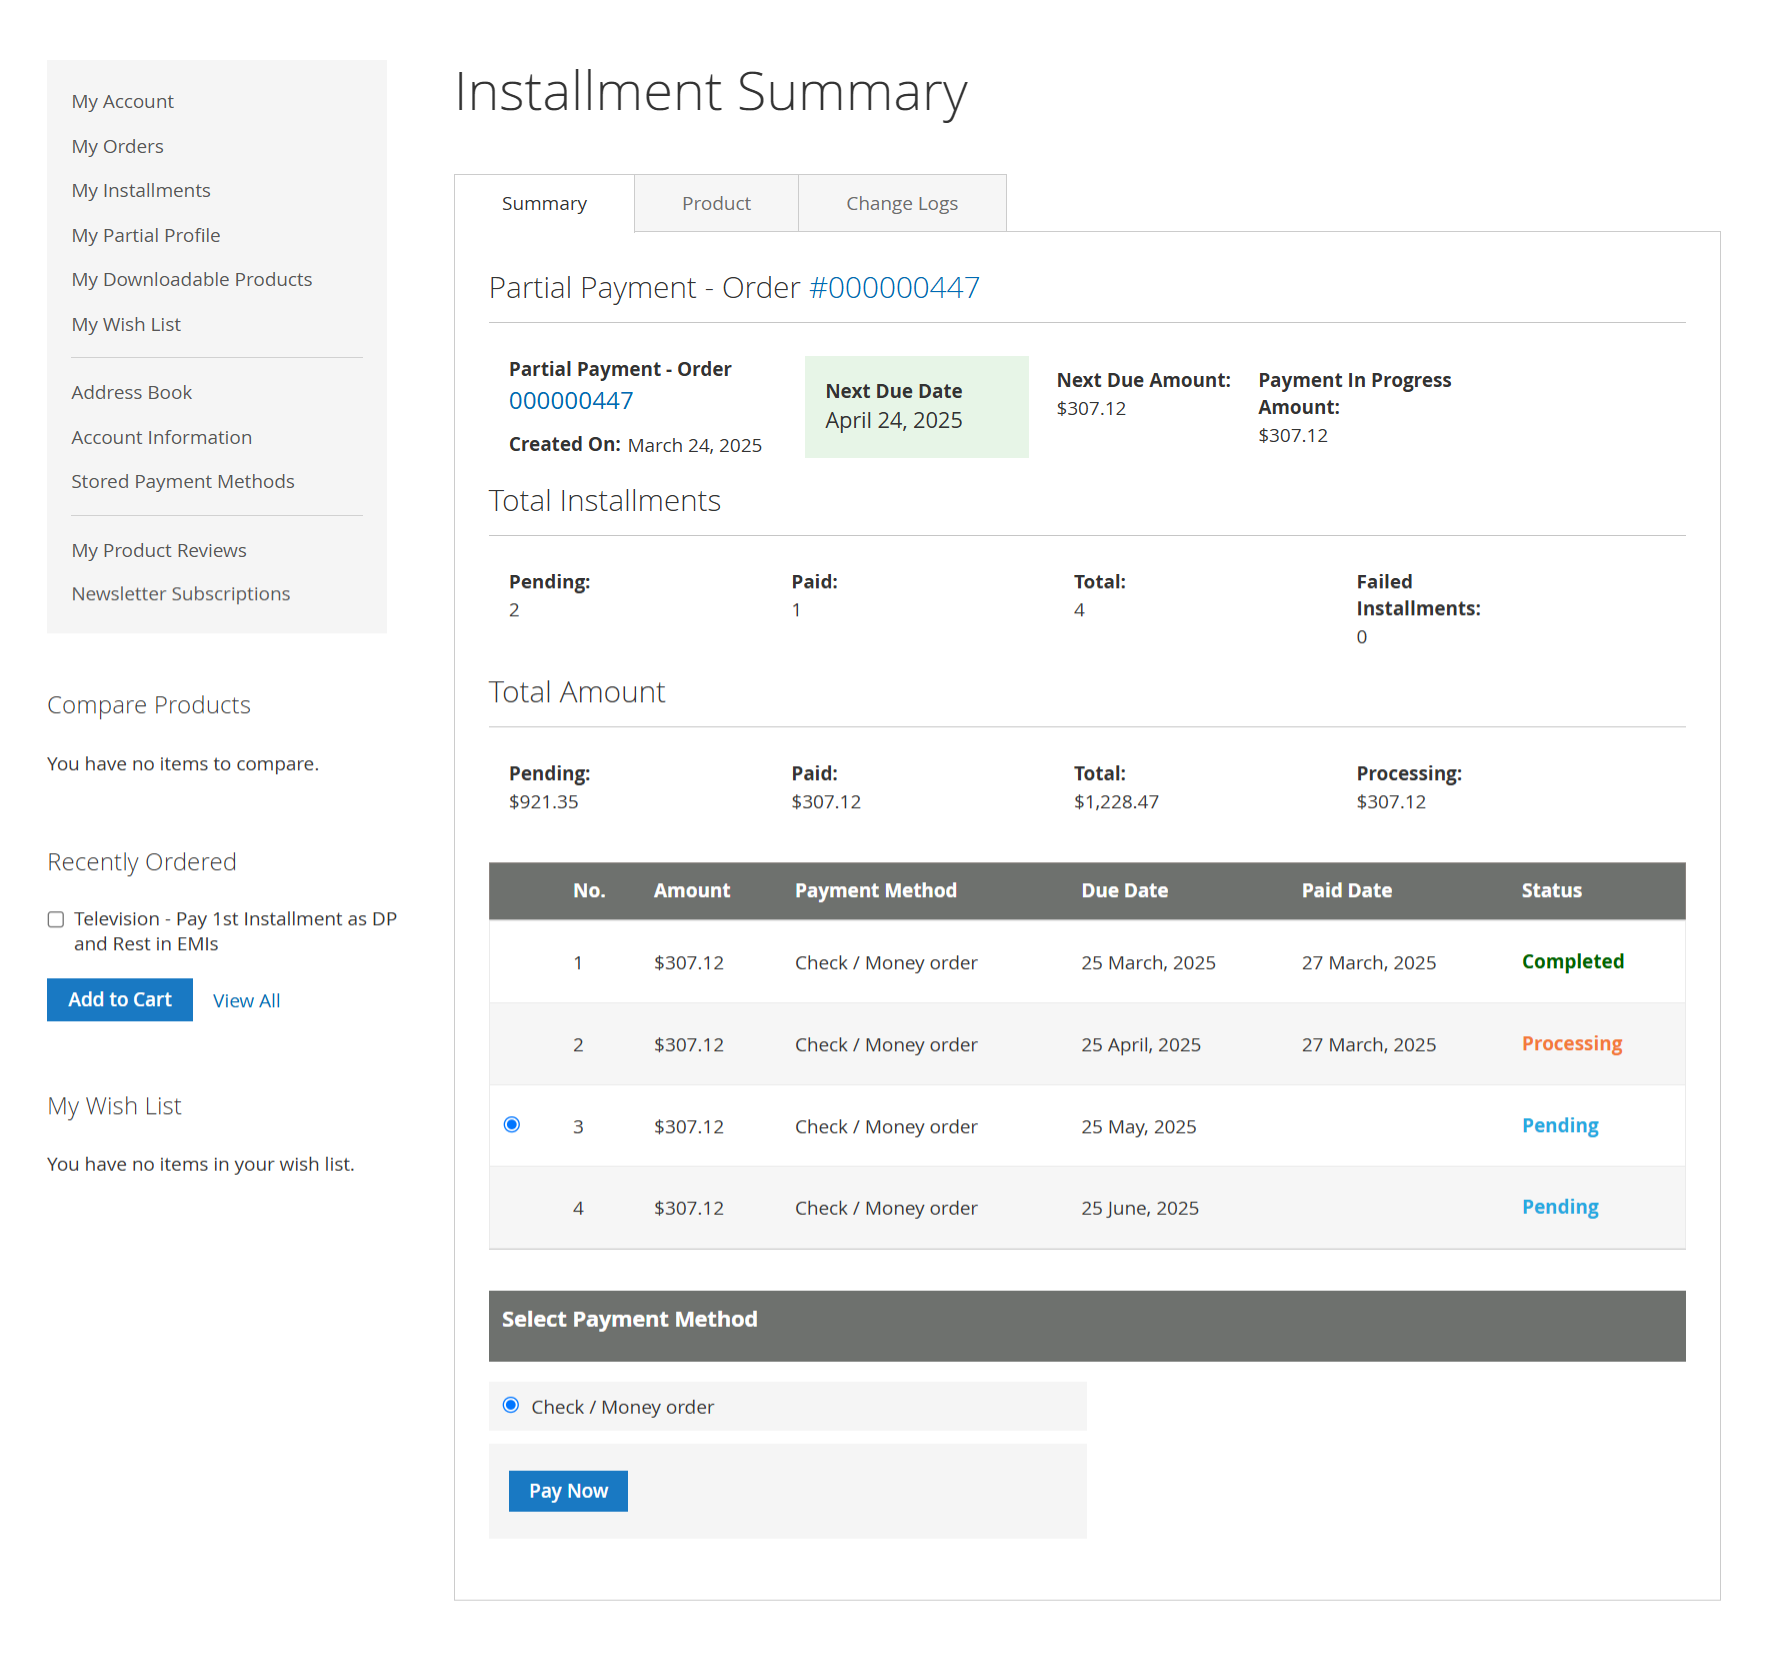
- The Installment Summary page provides a detailed view of an order's installment plan, including next due date, pending, paid, and processing amounts. Customers can see the full installment schedule with payment methods, statuses, and due/paid dates. The table highlights each installment's status (Completed, Processing, Pending) with action options like selecting payment and paying instantly. This page ensures clear visibility and control over ongoing installment payments.
Thank you for choosing MageDelight!
To use this extension, you will require to install MageDelight Base Extension first. If it is not installed then please download it from https://www.magedelight.com/extensions/magedelight-base-extension.zip and unzip the package file into the root folder of your Magento 2 installation.