
Installation
Twilio SDK will be required before you install the extension.
composer require twilio/sdk
Before installing the extension, please make sure to Backup your web directory and store database
You will require to install MageDelight Base Extension first. If it is not installed then please download it from https://www.magedelight.com/pub/extensions/magedelight-base.zip and unzip the package file into the root folder of your Magento 2 installation.
Root Directory is - "app/code/magedelight/#YourExtensionName#"
- Unzip the extension package file into the root folder of your Magento 2 installation.
- Connect to SSH console of your server:
- Navigate to the root folder of your Magento 2 setup
Run command as per below sequence,
php bin/magento setup:upgrade
php bin/magento setup:di:compile
php bin/magento setup:static-content:deploy
php bin/magento cache:clean
- log out from the backend and log in again
If you are using Magento 2.3 or later then you do not need to activate license. Extension will be activated with silent activation mechanism and does not require activation keys to be entered manually.
Installation with Composer
Composer repository using this command:
composer config repositories.magedelight-repo composer https://packages.magedelight.com/
Replace repo public key and private key with your public and private key
composer config http-basic.gitlab.magedelight.com $PUBLIC_KEY $PRIVATE_KEY
composer require mage_delight/smsprofile_module:*
composer require hyva-themes/magento2-hyva-magedelight-smsprofile:*
To obtain your public and private keys, please navigate to the "My Account" section. In the "Download Extension Packages" tab, you will find the keys available for your access.
Backend Configuration (Admin side)
General Configuration
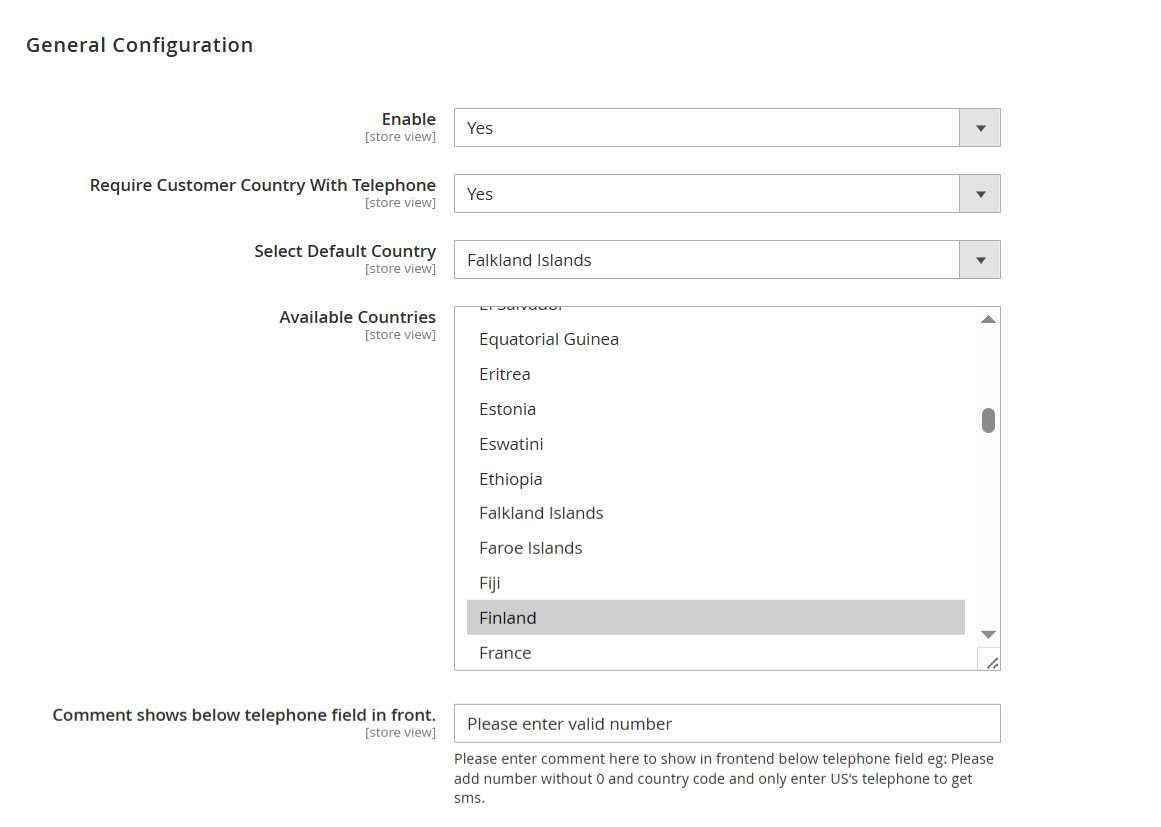
| Field | Description |
|---|---|
| Enable | Select Yes to enable the module and activate telephone and country validation on the frontend. Select No to disable the functionality. |
| Require Customer Country With Telephone | Select Yes to require customers to choose their country when entering a telephone number. This helps ensure correct number formatting. |
| Select Default Country | Choose the default country that will be pre-selected in the country dropdown on the frontend forms (e.g., checkout or registration). |
| Available Countries | Select one or more countries to display in the country dropdown. Only the selected countries will be available for customers to choose from. |
| Comment Shows Below Telephone Field in Frontend | Enter a positive number to display below the telephone field on the frontend. This helps guide customers on how to correctly enter their phone number. |
SMS Service Providers
SMS
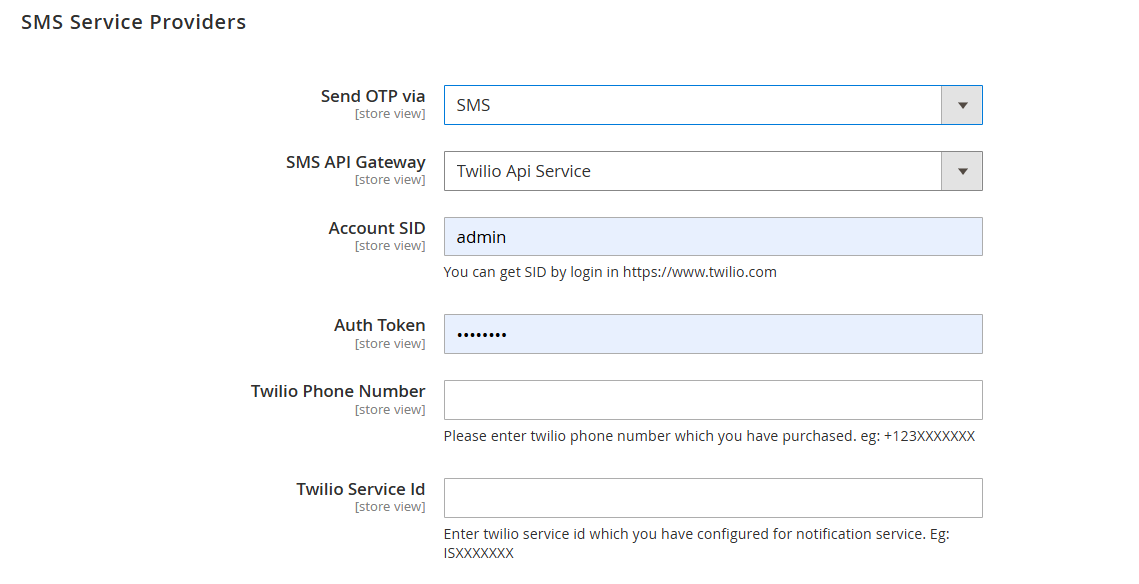
| Field | Description |
|---|---|
| Send OTP via | Select the desired option, SMS from the drop-down list to be used for sending OTP messages. |
| SMS API Gateway | Select the SMS API gateway you wish to integrate with your store. You may choose Twilio or any other supported provider based on your SMS service provider. |
| Account SID | Enter the Account SID provided by your SMS gateway provider. |
| Auth Token | Enter the authentication token issued by your SMS gateway provider. |
| Twilio Phone Number | Specify the phone number assigned to your Twilio account for sending SMS messages. |
| Twilio Service ID | Provide the Twilio Service ID used for messaging services. |
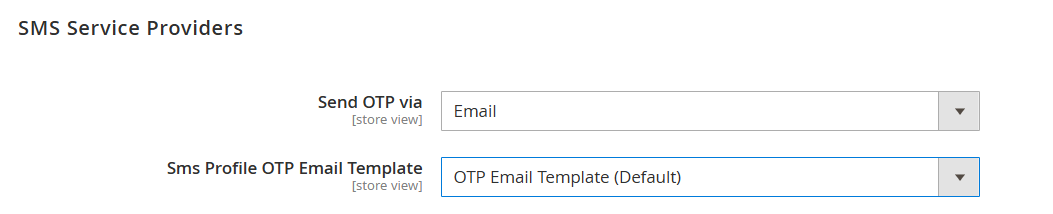
| Field | Description |
|---|---|
| Send OTP via | Select the method for sending OTPs (e.g., Email or SMS). |
| SMS Profile OTP Email Template | Choose the email template used to send OTPs when the "Email" option is selected. |
Both (Email and SMS ) With Twilio API Gateway
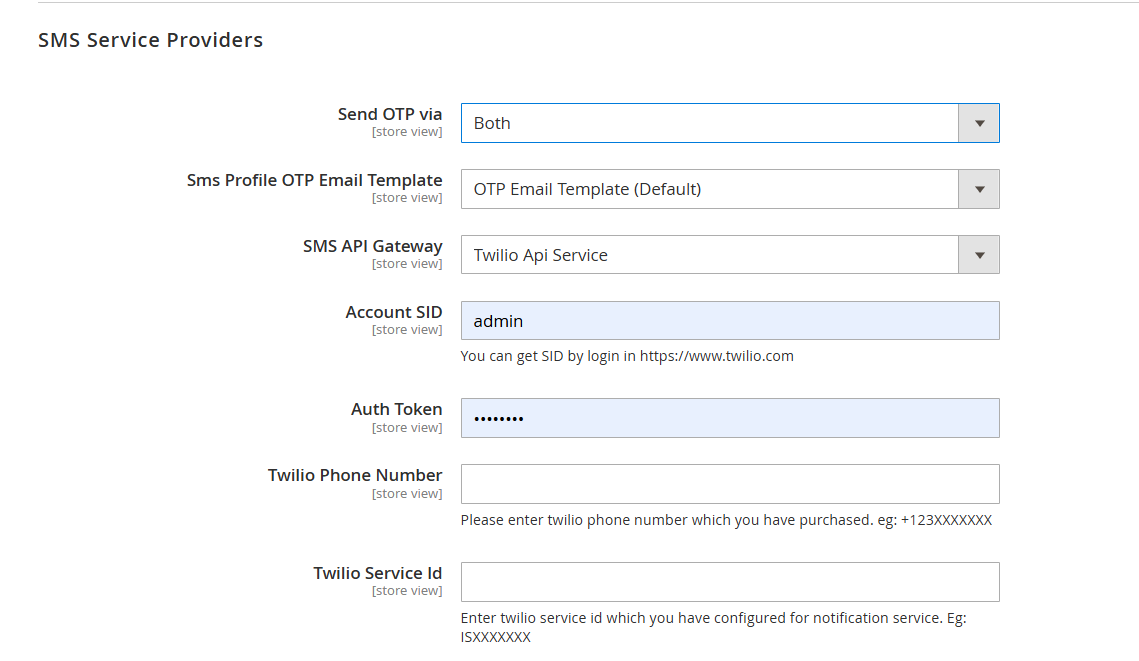
| Field | Description |
|---|---|
| Send OTP via | Select how OTPs will be sent: via both (Email and SMS ) |
| Sms Profile OTP Email Template | Choose the email template used to send OTPs when Email is selected. |
| SMS API Gateway | Select the SMS service provider (e.g., Twilio) to send OTPs via SMS. |
| Account SID | Enter the Twilio Account SID obtained from your Twilio account dashboard. |
| Auth Token | Enter the authentication token provided by Twilio for secure API access |
| Twilio Phone Number | Provide the Twilio phone number used for sending OTPs (e.g., +123XXXXXXXX). |
| Twilio Service ID | Enter the Twilio Messaging Service ID used for the SMS notification service (e.g., ISXXXXXXXX). |
Both (Email and SMS ) With Other SMS API Gateway
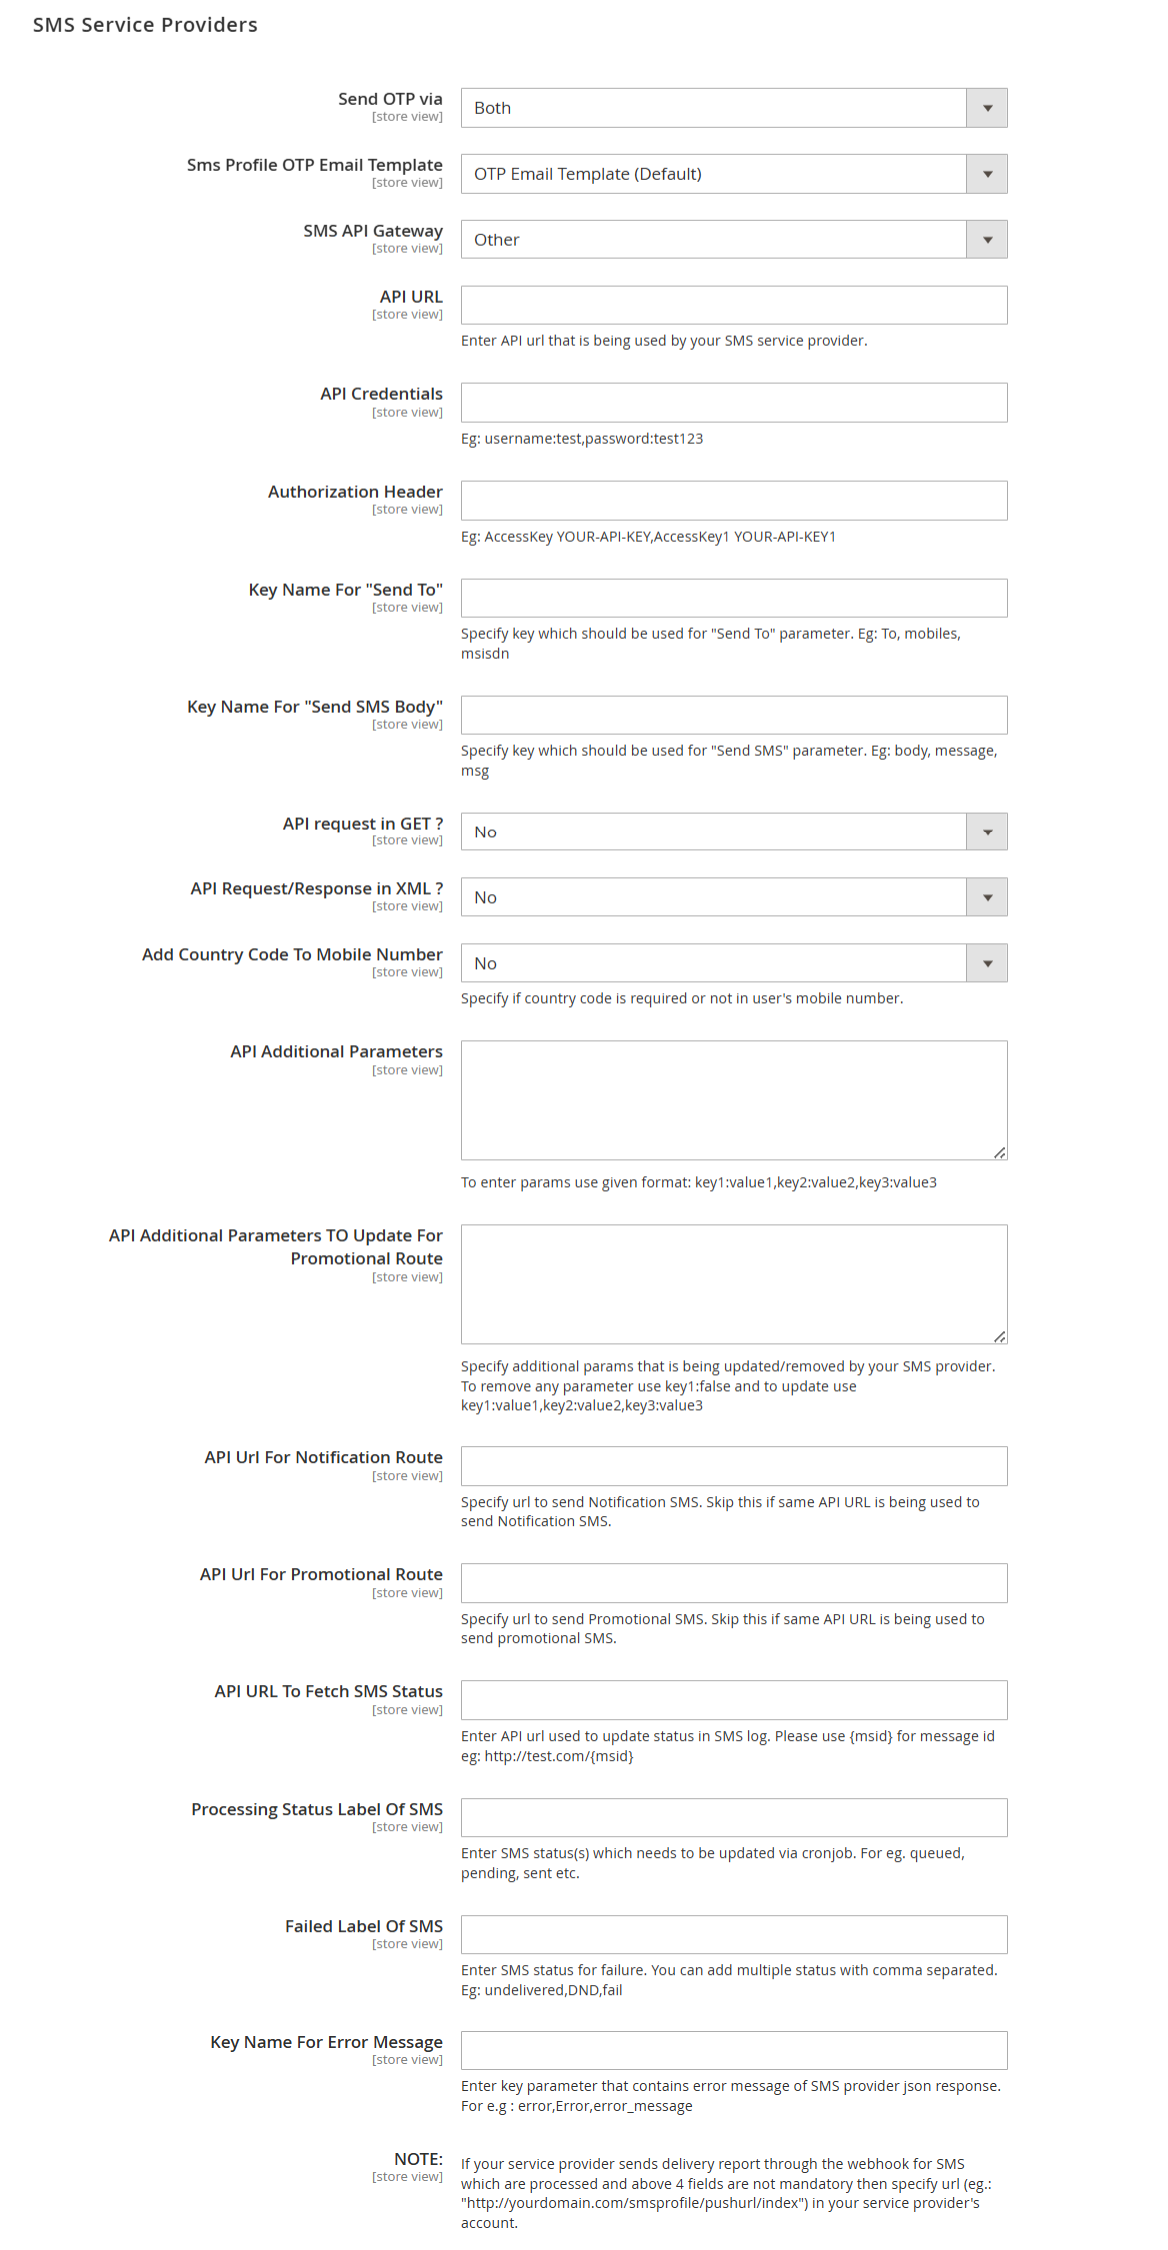
| Field | Description |
|---|---|
| Send OTP via | Select how OTPs are sent: Email, SMS, or Both |
| Sms Profile OTP Email Template | Choose the email template used when sending OTPs via email. |
| SMS API Gateway | Select Other to configure a custom SMS gateway manually. |
| API URL | Enter the base URL provided by your SMS service provider for sending messages. |
| API Credentials | Provide authentication credentials in the format: username:test password:test123 |
| Authorization Header | Enter the API key or token in the required header format (e.g., AccessKey YOUR-API-KEY). |
| Key Name for "Send To" | Specify the key used to define the recipient (e.g., to, mobiles, msisdn). |
| Key Name for "Send SMS Body" | Specify the key used for the message body (e.g., message, body, msg). |
| API Request in GET? | Select Yes if the API request should use the GET method. |
| API Request/Response in XML? | Select Yes if the API communicates using XML format. |
| Add Country Code to Mobile Number | Select Yes to automatically append country codes to mobile numbers. |
| API Additional Parameters | Enter extra parameters in key:value format separated by commas (e.g., type:transactional,lang:en) |
| API Additional Parameters to Update for Promotional Route | Provide parameters specific to promotional route configuration or use key1:false to remove. |
| API URL for Notification Route | Enter the API URL for sending notification messages. |
| API URL for Promotional Route | Enter the API URL for sending promotional messages. |
| API URL to Fetch SMS Status | Provide the endpoint used to fetch the delivery status of sent messages. Use a placeholder like {msid} for the message ID. |
| Processing Status Label of SMS | Enter the SMS status values (e.g., queued, pending) to update via cron. |
| Failed Label of SMS | Enter possible failure status values separated by commas (e.g., undelivered,DND,fail). |
| Key Name for Error Message | Enter the response key that contains the error message (e.g., error, error_message). |
OTP Configurations
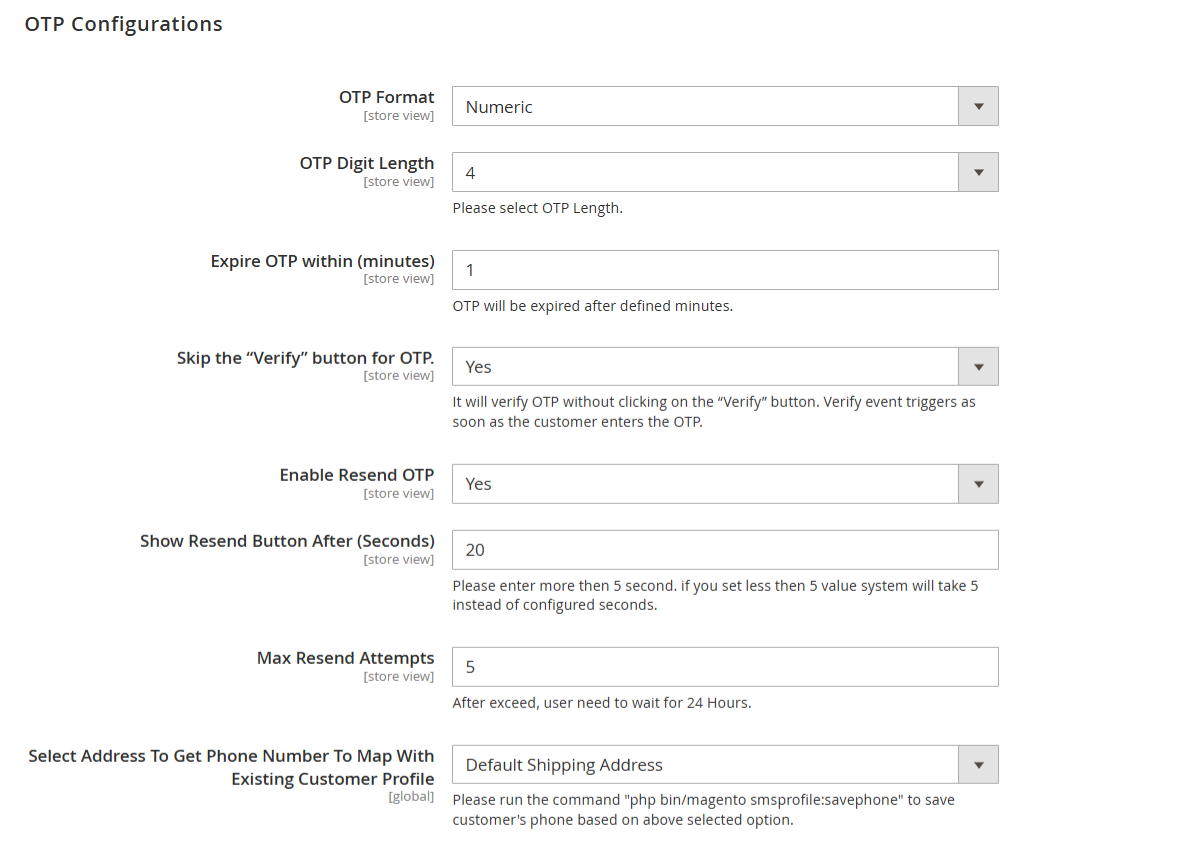
| Field | Description |
|---|---|
| OTP Format | Select the format for the OTP (One-Time Password). Options typically include Numeric, Alphanumeric, etc. |
| OTP Digit Length | Choose the number of digits in the OTP. For example, selecting "4" will generate a 4-digit OTP. |
| Expire OTP Within (Minutes) | Define how long the OTP remains valid. The OTP will expire after the specified number of minutes. |
| Skip the "Verify" Button for OTP | Select Yes to automatically verify the OTP as soon as the user enters it. Selecting No will require users to manually click the "Verify" button. |
| Enable Resend OTP | Select Yes to allow users to request a new OTP if needed. Select No to disable the resend feature. |
| Show Resend Button After (Seconds) | Specify how many seconds the user must wait before the Resend OTP button appears. If set below 5, the system will default to 5 seconds. |
| Max Resend Attempts | Set the maximum number of OTP resend attempts allowed. After exceeding this number, users will have to wait 24 hours before trying again. |
| Select Address To Get Phone Number To Map With Existing Customer Profile | Choose the address source (e.g., Default Shipping Address) to fetch the phone number for mapping with the customer profile. |
reCAPTCHA Settings
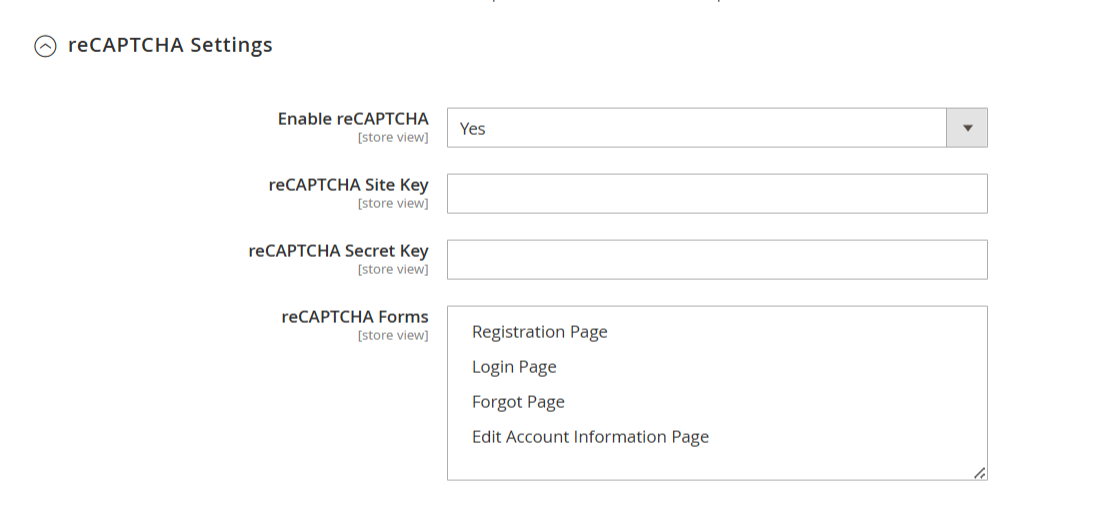
| Field | Description |
|---|---|
| Enable reCAPTCHA | Select Yes to enable Google reCAPTCHA on selected frontend forms. Select No to disable it. |
| reCAPTCHA Site Key | Enter your Google reCAPTCHA Site Key here. You can obtain this from the Google reCAPTCHA admin console. |
| reCAPTCHA Secret Key | Enter your Google reCAPTCHA Secret Key. This is used for backend validation of reCAPTCHA responses. |
| reCAPTCHA Forms | Select the forms where reCAPTCHA should be applied. Common options include:
Only the selected forms will display the reCAPTCHA widget to users. |
Login and Registration
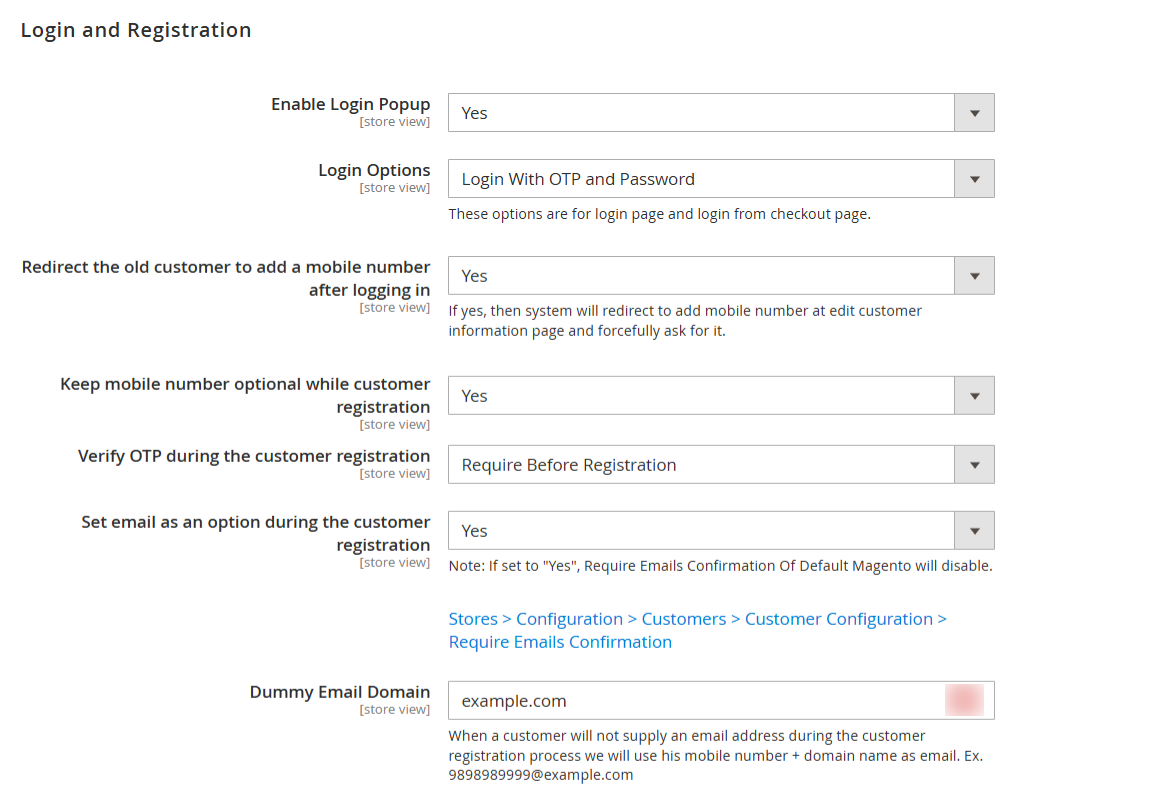
| Field | Description |
|---|---|
| Enable Login Popup | Select Yes to display a login popup instead of redirecting customers to a separate login page. |
| Login Options | Choose how customers can log in to their accounts:
|
| Redirect the Old Customer to Add a Mobile Number After Logging In | Select Yes to redirect existing users to the customer information page after login to add their mobile number, if it’s missing. |
| Keep Mobile Number Optional While Customer Registration | Select Yes to make the mobile number optional during registration. Select No to make it a required field. |
| Verify OTP During Customer Registration | Determine when OTP verification is needed during registration:
|
| Set Email as an Option During the Customer Registration | Select Yes to allow email to be optional during registration. If enabled, Magento’s default email confirmation will be disabled. |
| Dummy Email Domain | Specify a domain (e.g., example.com) to auto-generate an email address when none is provided.Format: {mobile_number}@{dummy_domain} (e.g., [email protected]). |
Checkout Settings
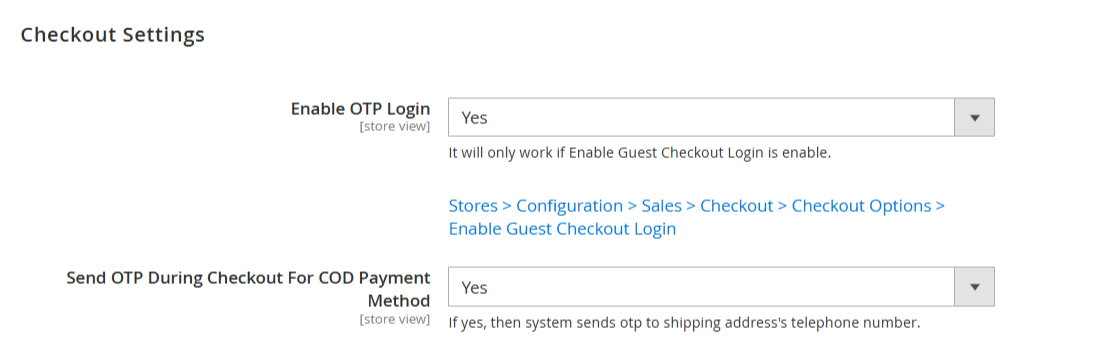
| Field | Description |
|---|---|
| Enable OTP Login | Select Yes to allow customers to log in using an OTP during the checkout process. |
| Send OTP During Checkout For COD Payment Method | Select Yes to send an OTP to the customer's shipping address phone number when Cash on Delivery (COD) is selected at checkout. |
Admin Notification
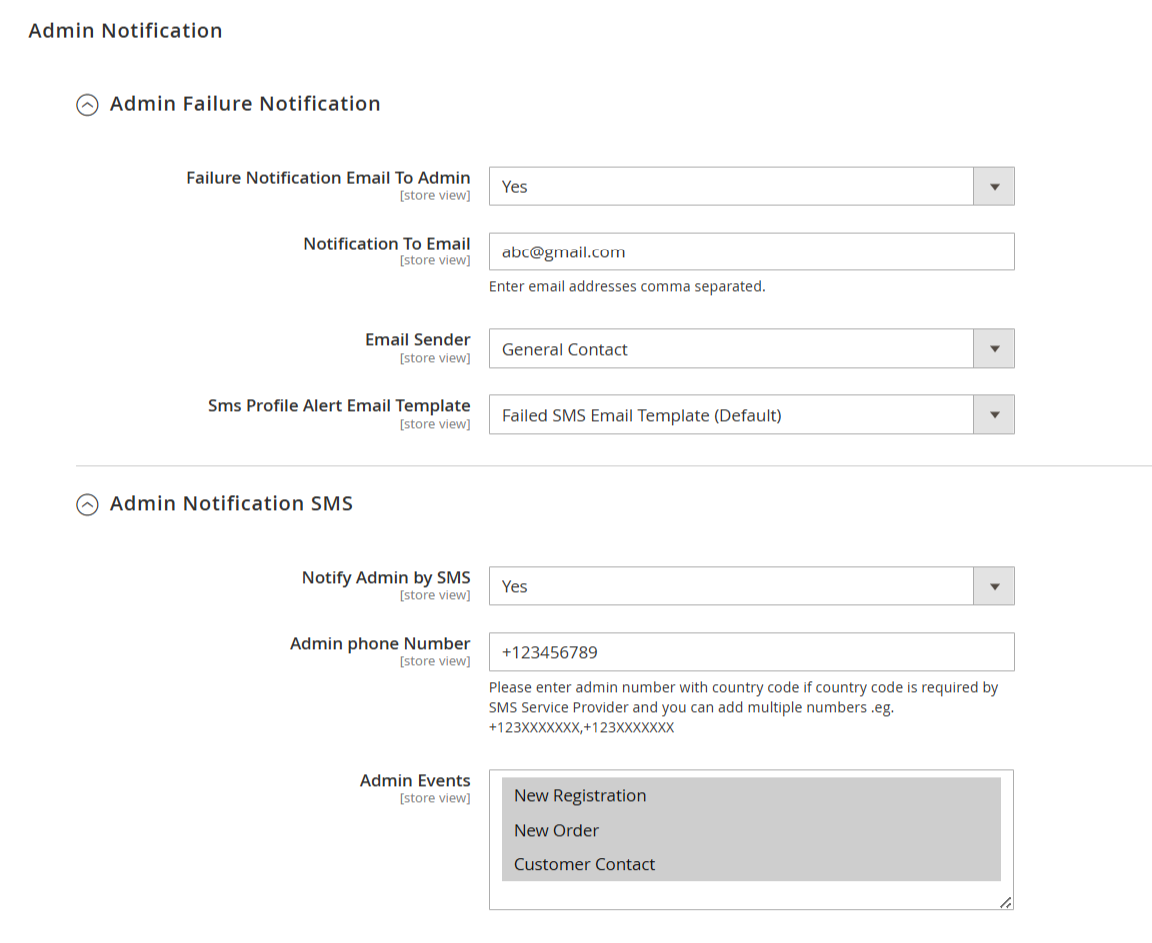
- This section allows store admins to receive alerts via email or SMS when certain events occur or when SMS sending fails.
| Field | Description |
|---|---|
| Failure Notification Email To Admin | Select Yes to enable email alerts for failed SMS notifications. |
| Notification To Email | Enter one or more admin email addresses (comma-separated) where failure notifications should be sent. |
| Email Sender | Choose the email identity that will be used as the sender for failure notifications (e.g., General Contact). |
| SMS Profile Alert Email Template | Select the email template to be used for SMS failure alerts. Default: Failed SMS Email Template (Default). |
| Notify Admin by SMS | Select Yes to enable SMS notifications to the admin for selected events. |
| Admin Phone Number | Enter the admin's phone number, including the country code. You can enter multiple numbers separated by commas. |
| Admin Events | Choose the events for which the admin should receive SMS alerts. Available options:
|
Customer SMS Configuration
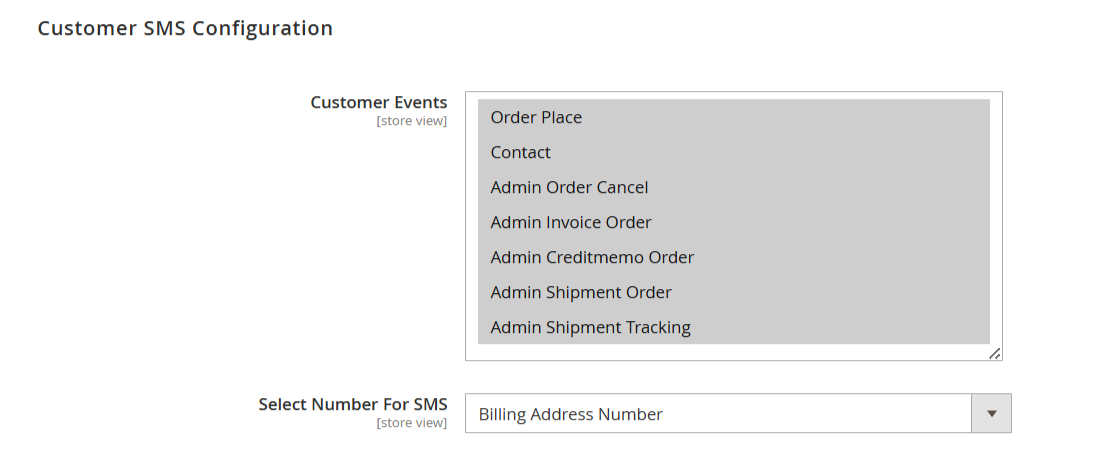
- This section allows you to configure SMS notifications that are sent to customers based on specific order and account-related events.
| Field | Description |
|---|---|
| Customer Events | Select the events that will trigger SMS notifications to customers. You can select multiple events from the list:
|
| Select Number For SMS | Choose which phone number should receive the SMS notifications:
|
Developer Options
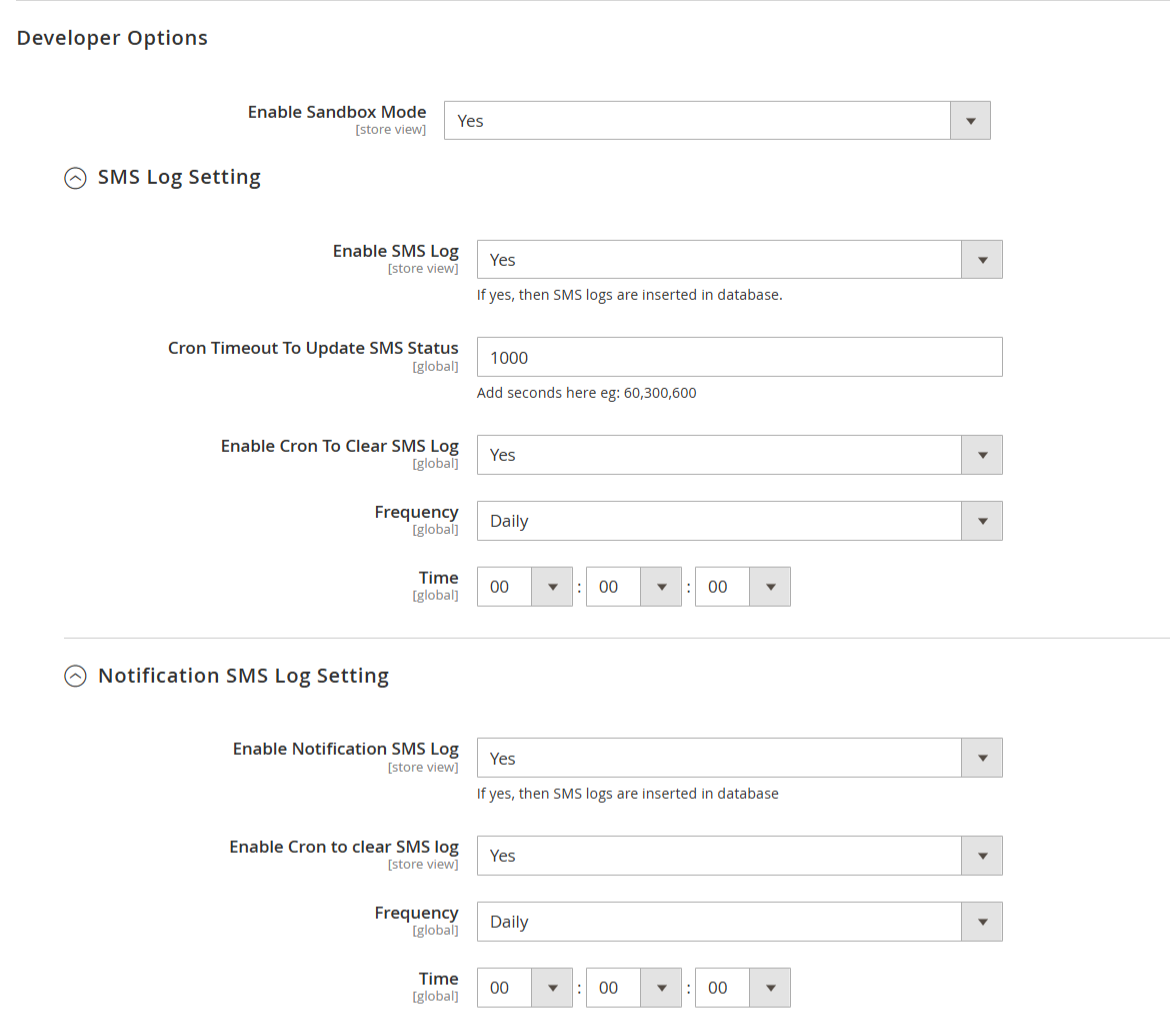
- This section allows you to manage how all SMS logs—including general and notification-specific (admin/customer) logs—are stored, updated, and automatically cleared from the system.
| Field | Description |
|---|---|
| Enable Sandbox Mode | Select Yes to activate sandbox mode. In this mode, SMS will not be sent—useful for testing without incurring SMS charges. |
| Enable SMS Log | Select Yes to store SMS logs in the database. This helps in tracking sent messages and their statuses. |
| Cron Timeout to Update SMS Status | Specify the time (in seconds) after which the system should update the status of sent SMS messages. Example values: 60, 300, 600, 1000. |
| Enable Cron to Clear SMS Log | Select Yes to enable an automatic cron job that clears old SMS logs from the database. |
| Frequency | Choose how often the SMS logs should be cleared. Example options: Daily, Weekly, etc. |
| Time | Set the exact time at which the cron job will run to clear SMS logs. |
| Enable Notification SMS Log | Select Yes to store logs of notification-related SMS messages in the database. |
| Enable Cron to Clear SMS Log | Select Yes to automatically clear notification SMS logs using a cron job. |
| Frequency | Set how often the notification SMS logs should be cleared. |
| Time | Define the time of day the cron job should run for clearing notification SMS logs. |
Email Template Configuration

| Field | Description |
|---|---|
| Sms Profile Notification Template | Select the email template that will be used to send notification emails related to the SMS profile. |
Backend Functionality
OTP SMS Templates
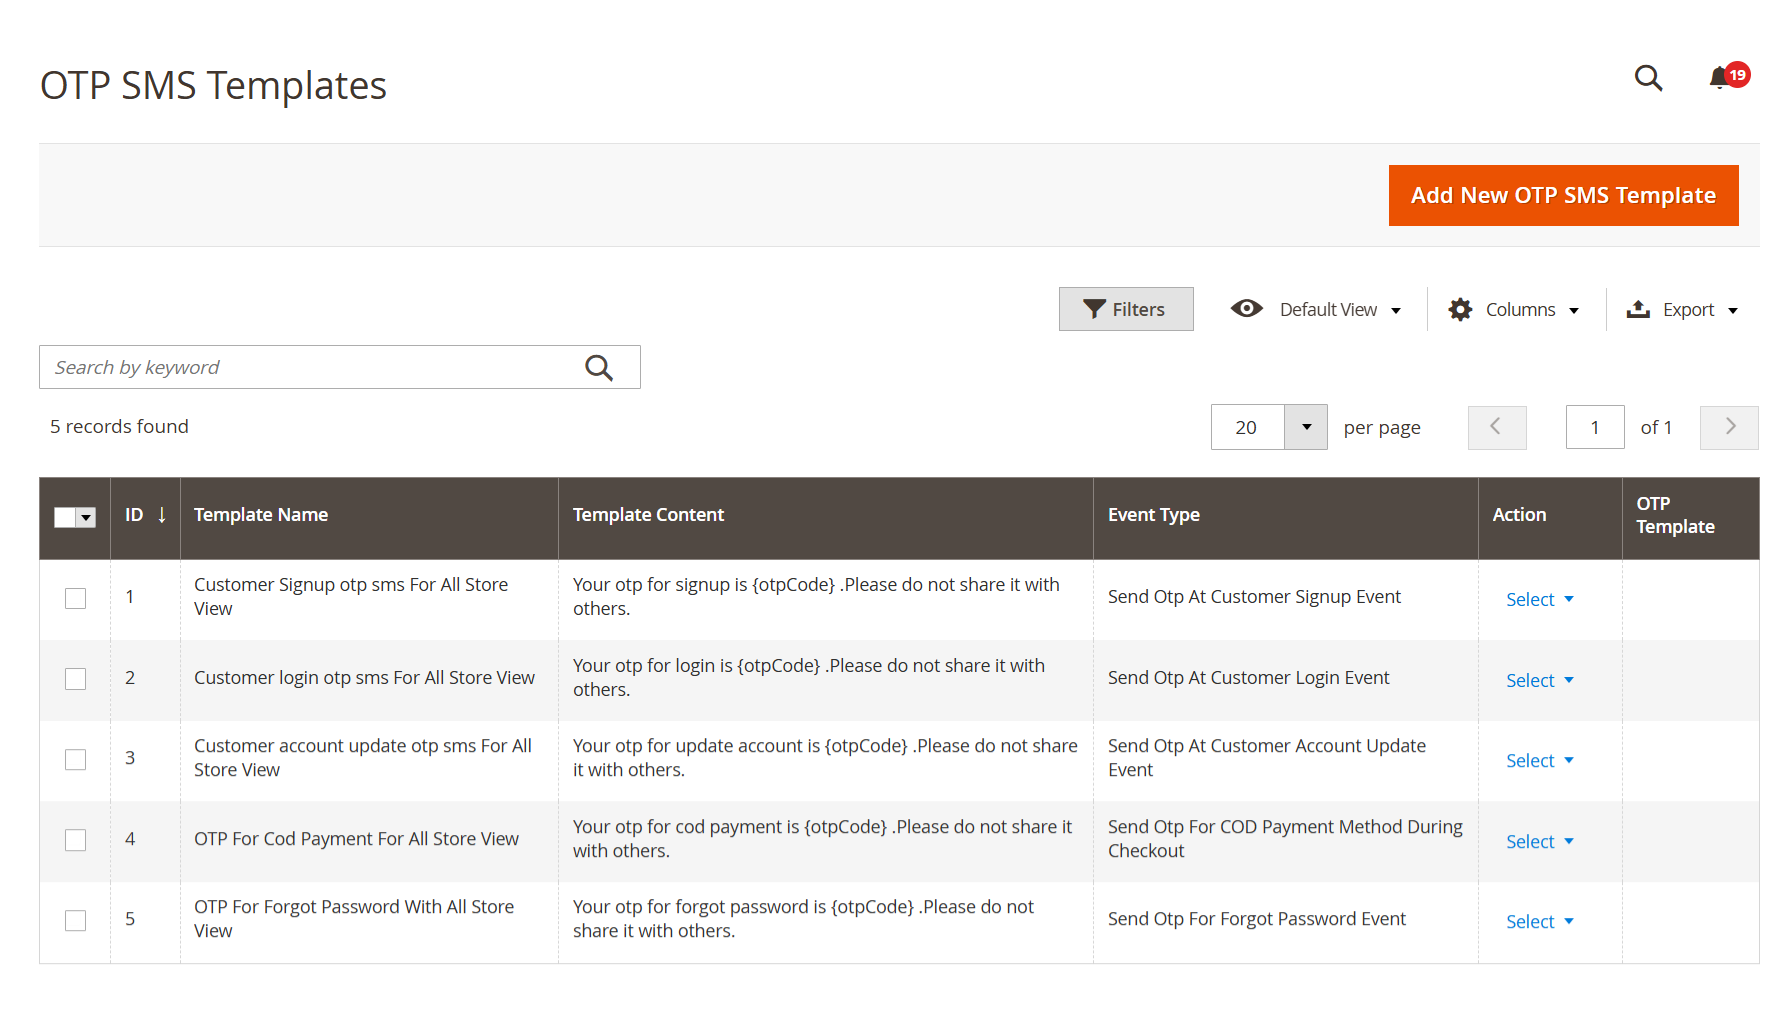
- This section allows users to view and manage OTP SMS templates through a dedicated grid interface, where previously added templates can be reviewed, edited, or removed. Click the "Add New OTP SMS Template" button at the top right to create a new SMS template for any customer-related OTP event.
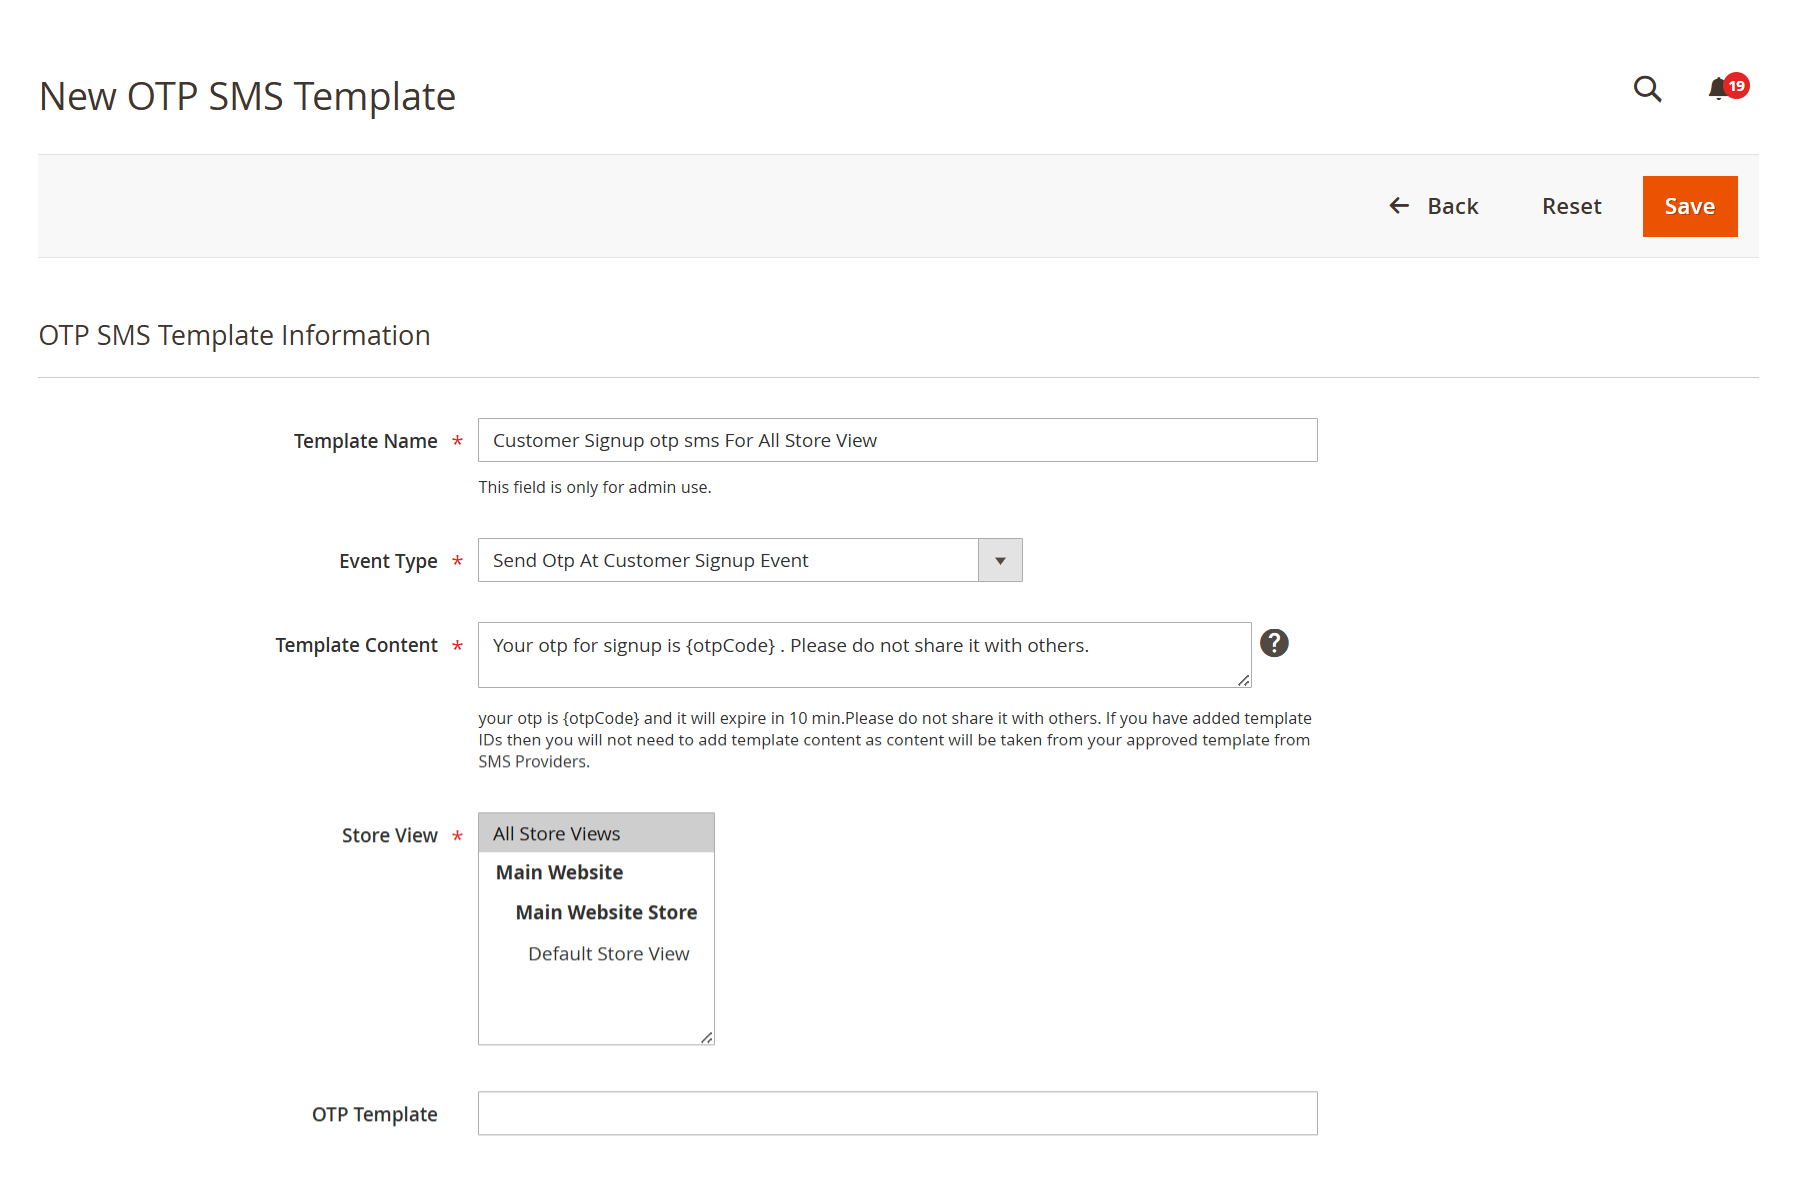
This section allows you to create a new OTP SMS template that will be triggered by specific customer actions such as signup, login, or password reset.
Field Description Template Name Provide user user-friendly name to identify the SMS template by the admin. Event Type Select the event that will trigger this SMS. Options may include:
Send OTP At Customer Signup Event
Send OTP At Customer Login Event
Send OTP For COD Payment Method During Checkout
Send OTP For Forgot Password Event
etc.
Template Content Provide template content as given in the sample "Dear Customer, use {otpcode} as OTP for your recent transaction. OTP is valid for 10 minutes.". Store View Select store view to send SMS with the current template. OTP Template Enter the ID or identifier of the pre-approved template from your SMS provider
SMS Promotional
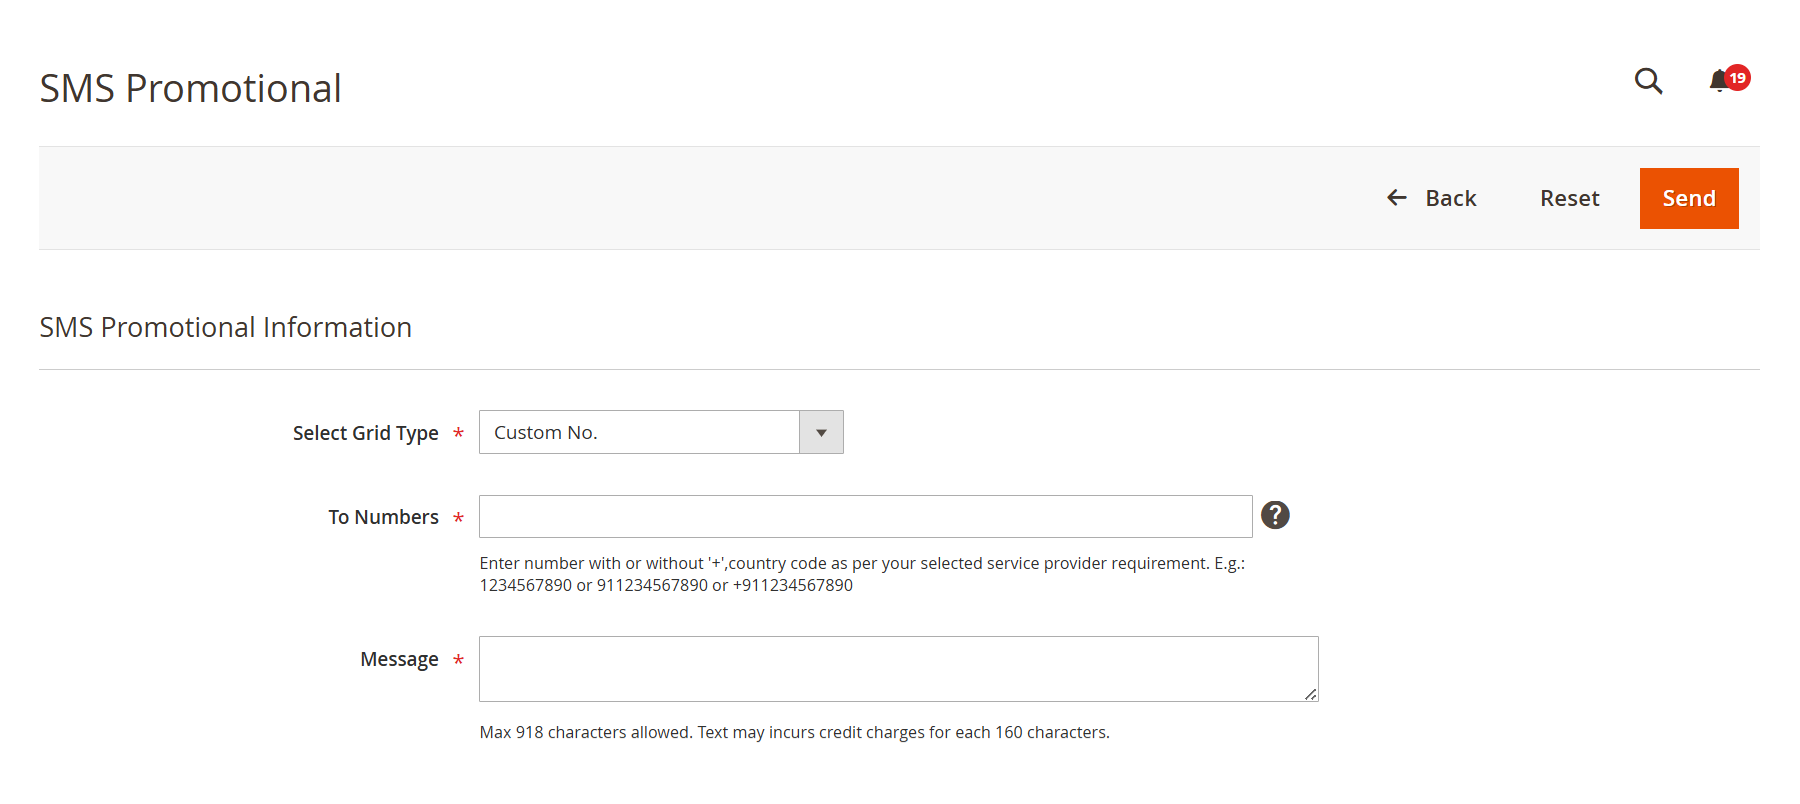
| Field | Description |
|---|---|
| Select Grid Type | Select the type to send promotional SMS. Current selected type is "Custom Numbers". |
| To Numbers | Provide comma-separated customer numbers as per your SMS service provider's requirements. |
| Message | Provide a promotional message to send to the entered numbers. |
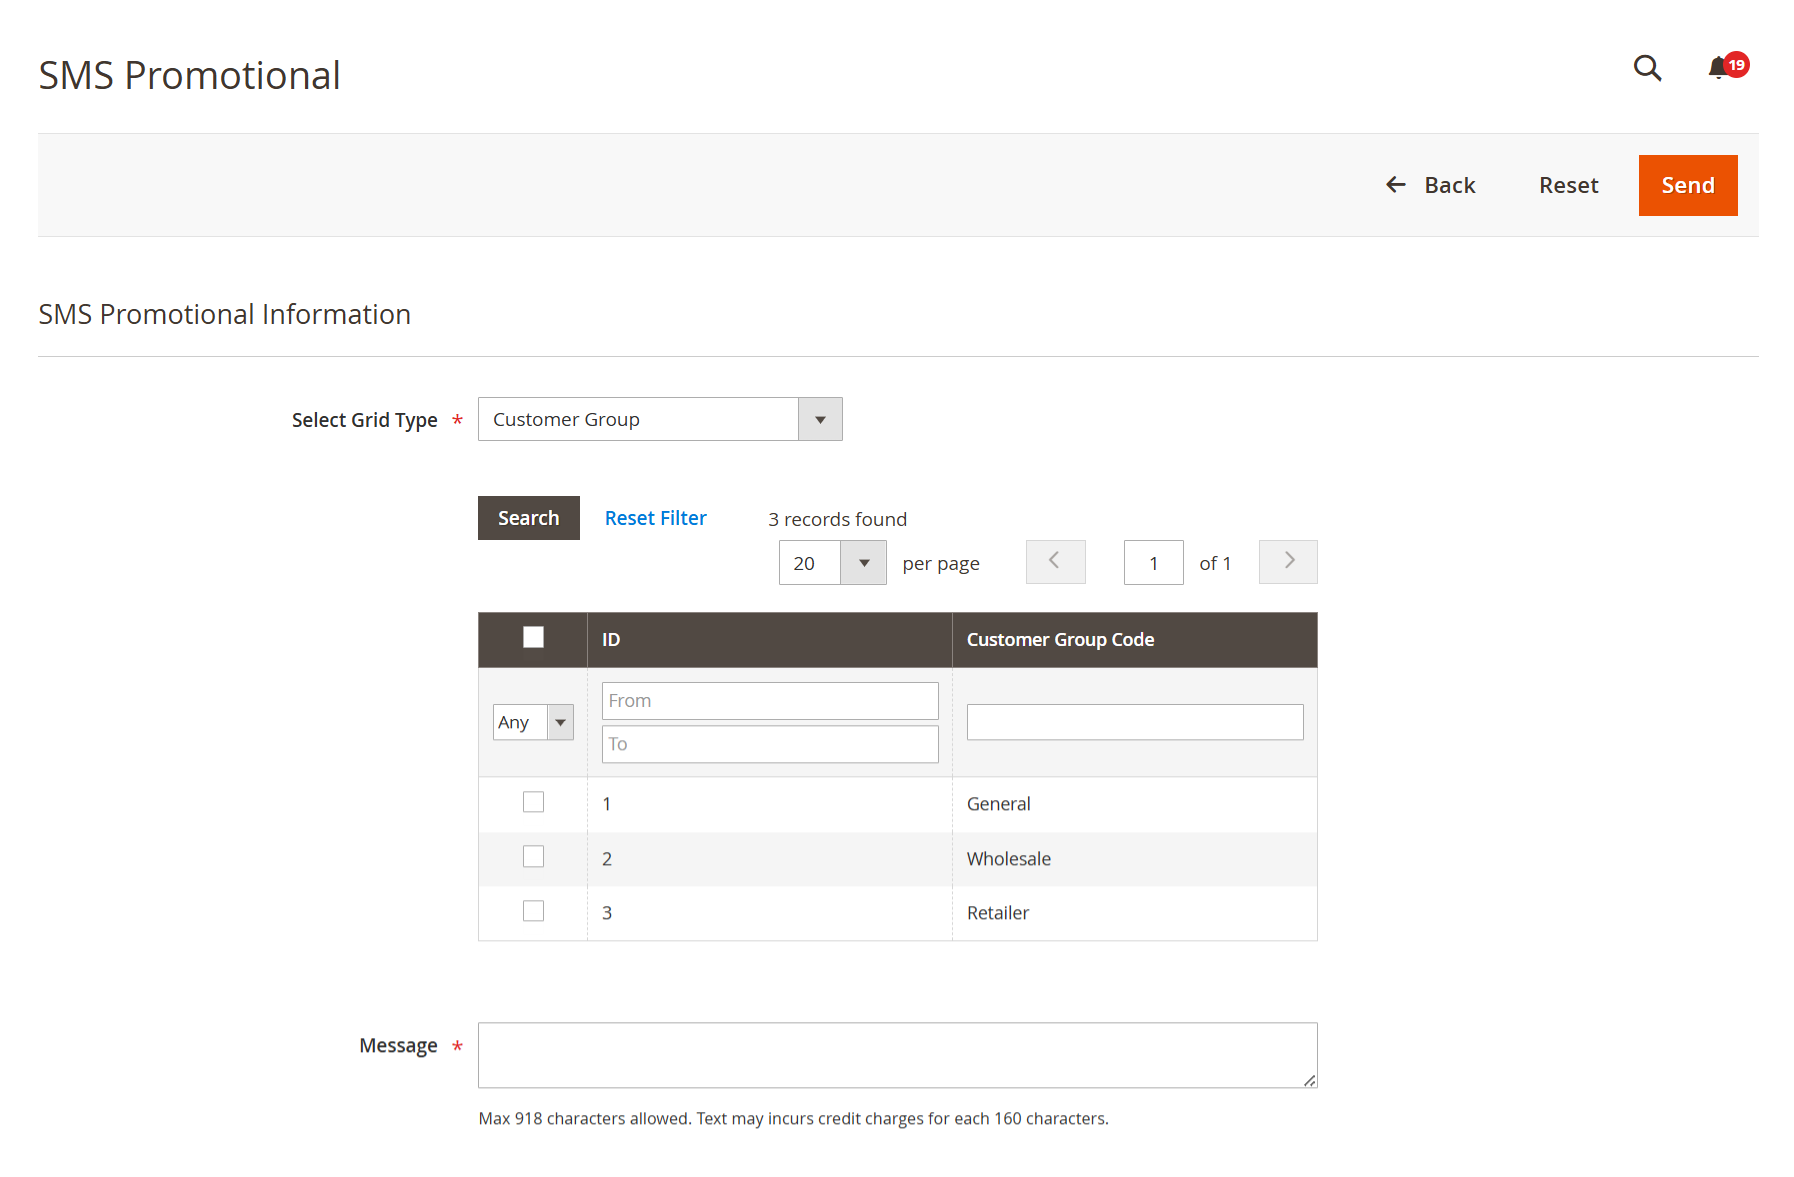
| Field | Description |
|---|---|
| Select Grid Type | Select the type to send promotional SMS. Current selected type is "Customer Group". |
| Customer Group | Select the customer group to send promotional SMS. It will be sent to all customers who belong to the selected customer group. |
| Message | Provide a promotional message to send to the selected customer group numbers |
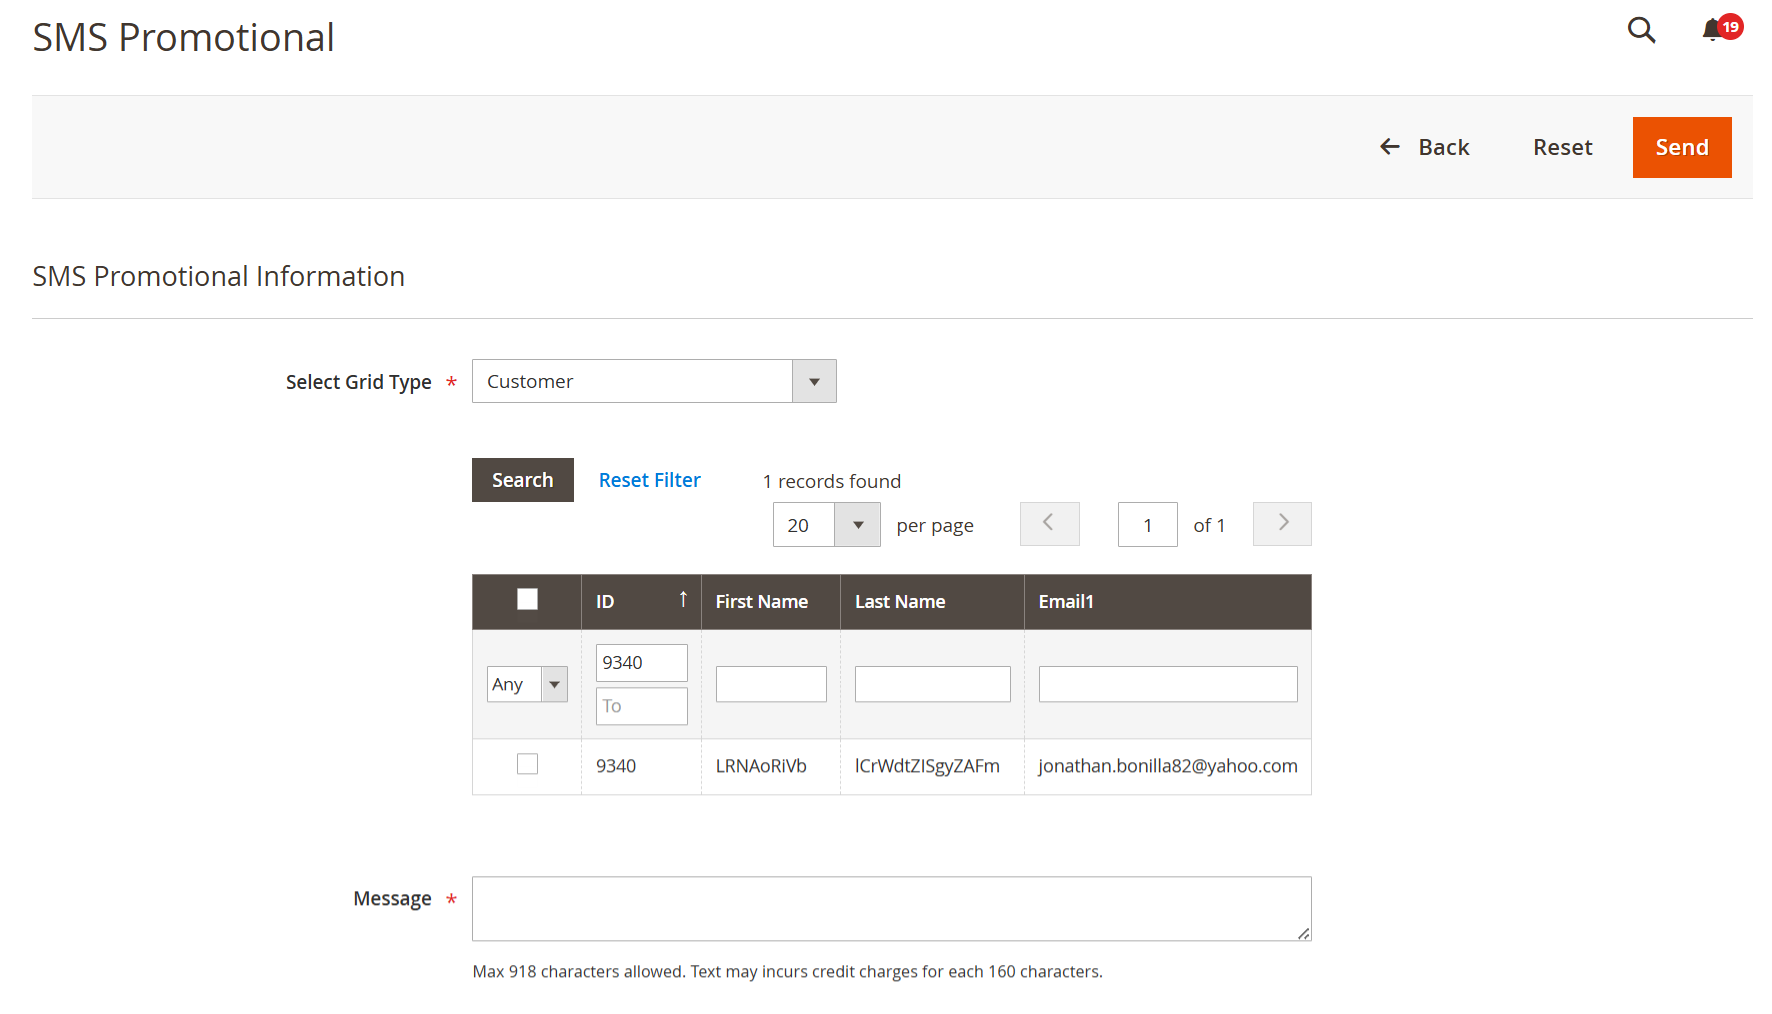
| Field | Description |
|---|---|
| Select Grid Type | Select type to send promotional SMS. Current selected type is "Customers". |
| Customer Group | Select customers to send promotional SMS. A searchable, filterable table showing customer details such as:
|
| Message | Provide a promotional message to send to the selected customer. |
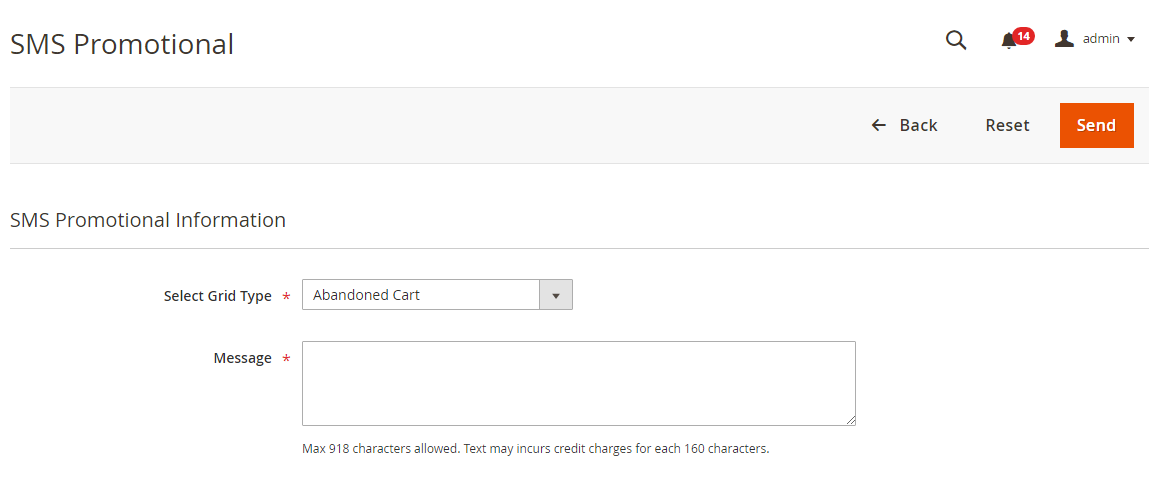
| Field | Description |
|---|---|
| Select Grid Type | Select the type to send promotional SMS. Current selected type is "Abandoned Cart". |
| Message | Provide a promotional message to send to those customers who have abandoned. |
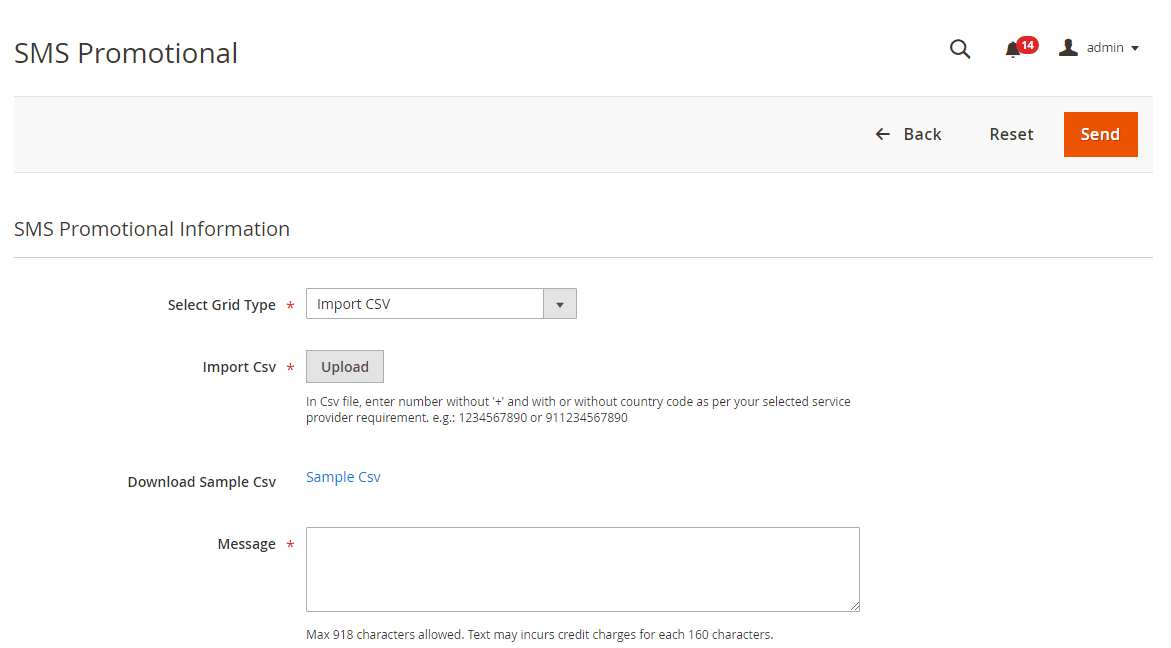
| Field | Description |
|---|---|
| Select Grid Type | Select the type to send promotional SMS. Current selected type is " Import CSV". |
| Import CSV | Upload a CSV file with the list of customer numbers to send promotional SMS. |
| Download CSV | Download a sample CSV file to get the file format. |
| Message | Provide a promotional message to send to imported customers from CSV. |
SMS Logs
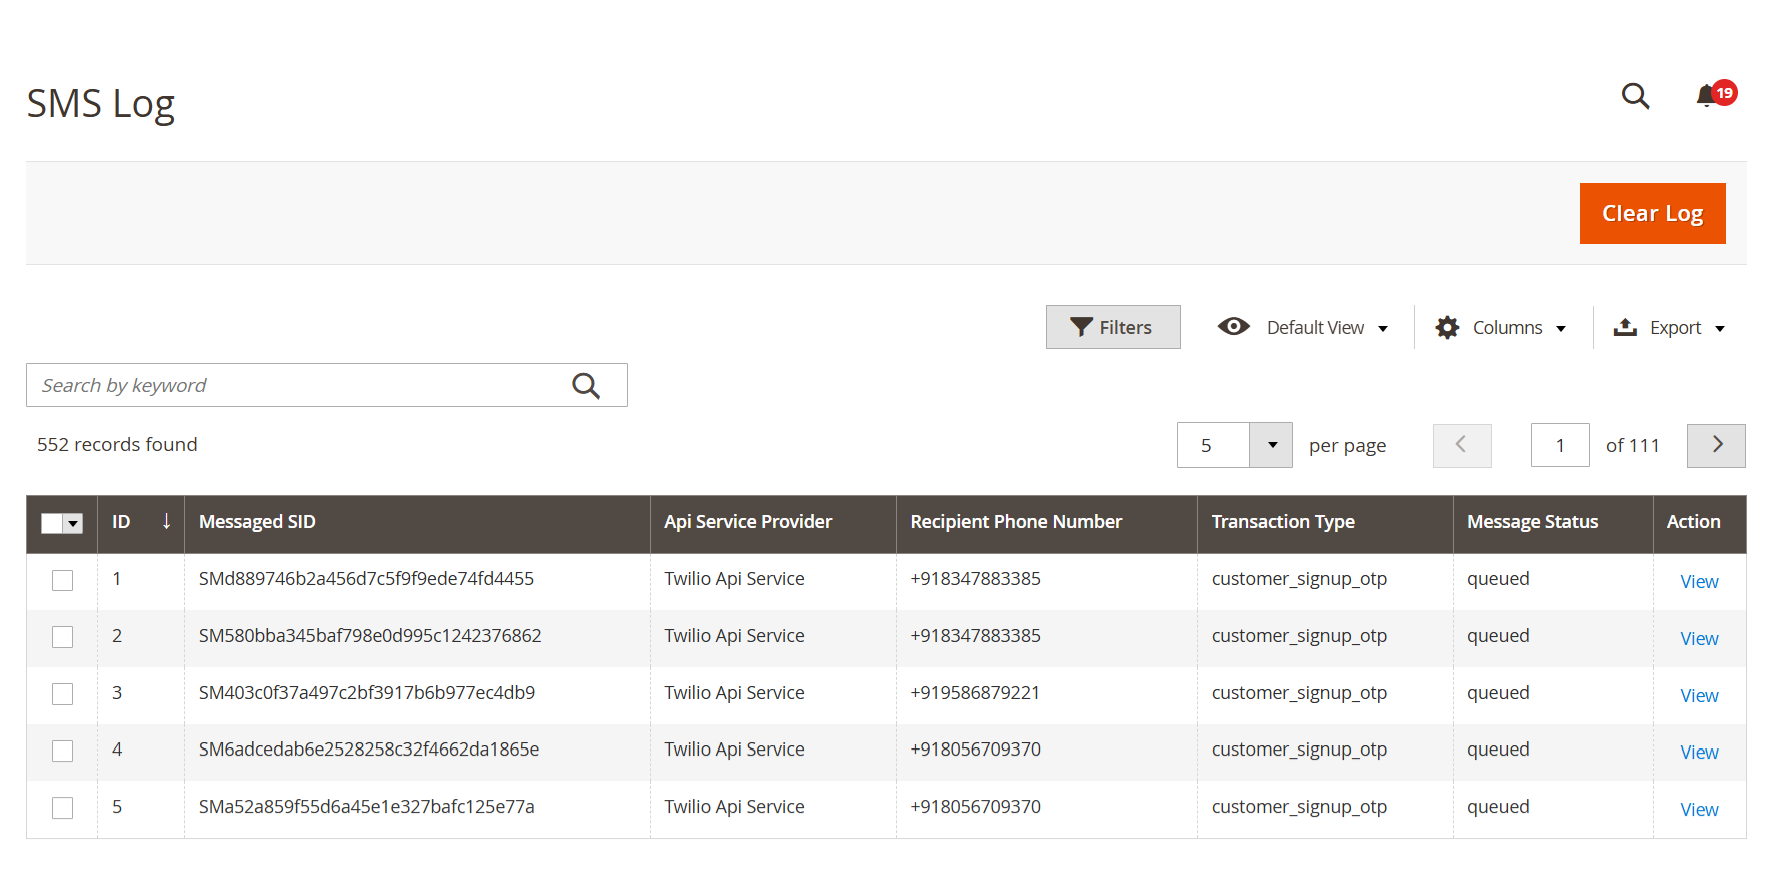
- .This section offers a comprehensive log of all SMS messages sent or attempted through the system, enabling users to monitor delivery status, audit activity, and troubleshoot issues effectively. Users can search and filter logs by status, phone number, service provider, or transaction type for streamlined access. Additional features include pagination for easy navigation, an export option for CSV or Excel downloads, and a Clear Log function to permanently delete all records—please use this option with caution, as it is irreversible.
Frontend Functionality
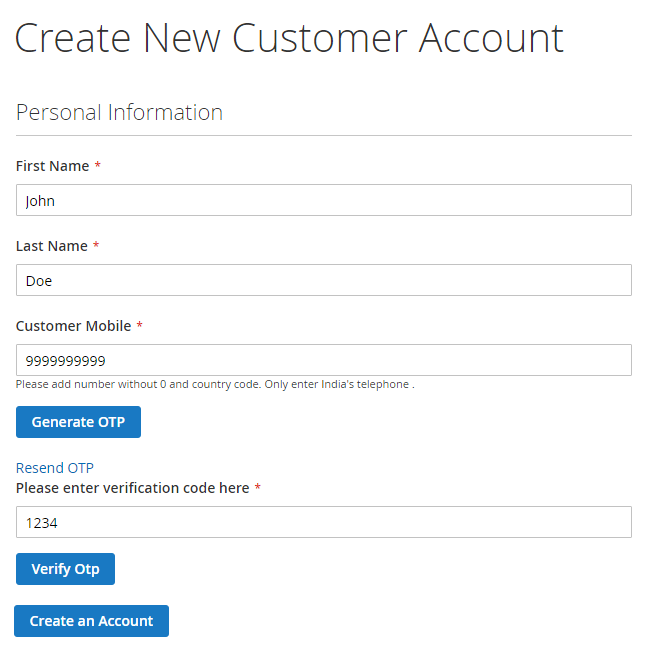
- During customer registration, users are required to enter their mobile number and request an OTP (One-Time Password) using the Generate OTP button. The OTP is sent via SMS and must be entered in the verification field before proceeding. Once verified using the Verify OTP button, users can complete the registration by clicking Create an Account. This ensures mobile number validation for secure account creation.
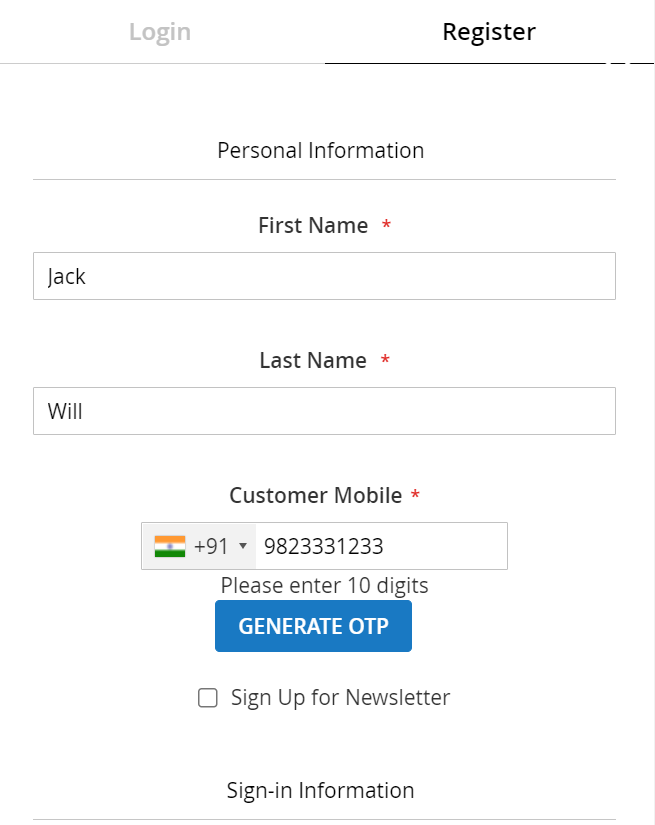
- During customer registration, users are prompted to enter their details along with a valid 10-digit mobile number. After selecting the appropriate country code, users must click the Generate OTP button to receive a One-Time Password via SMS. This OTP is used to verify the mobile number before account creation, ensuring secure and authenticated registration.

- During the login process, registered customers can authenticate using their mobile number. After selecting the correct country code and entering a valid 10-digit number, users click the Generate OTP button to receive a One-Time Password via SMS. This OTP enables secure and password-free login, offering a seamless and user-friendly authentication experience.
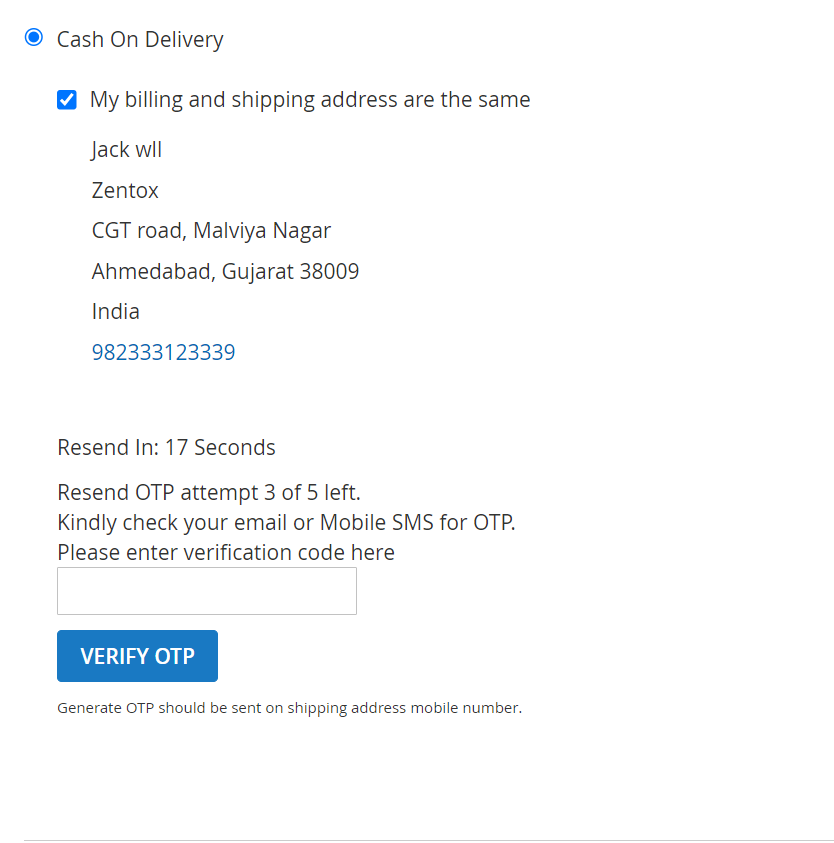
- OTP verification on the checkout process if the selected payment method is "Cash on Delivery. During the checkout process with the Cash On Delivery (COD) payment method, customers must verify their order using a One-Time Password (OTP) sent to their shipping address mobile number. A countdown timer is displayed for OTP resend eligibility and the remaining number of resend attempts. Customers must enter the received OTP and click the Verify OTP button to complete verification. This process ensures added security and helps prevent fraudulent COD orders.
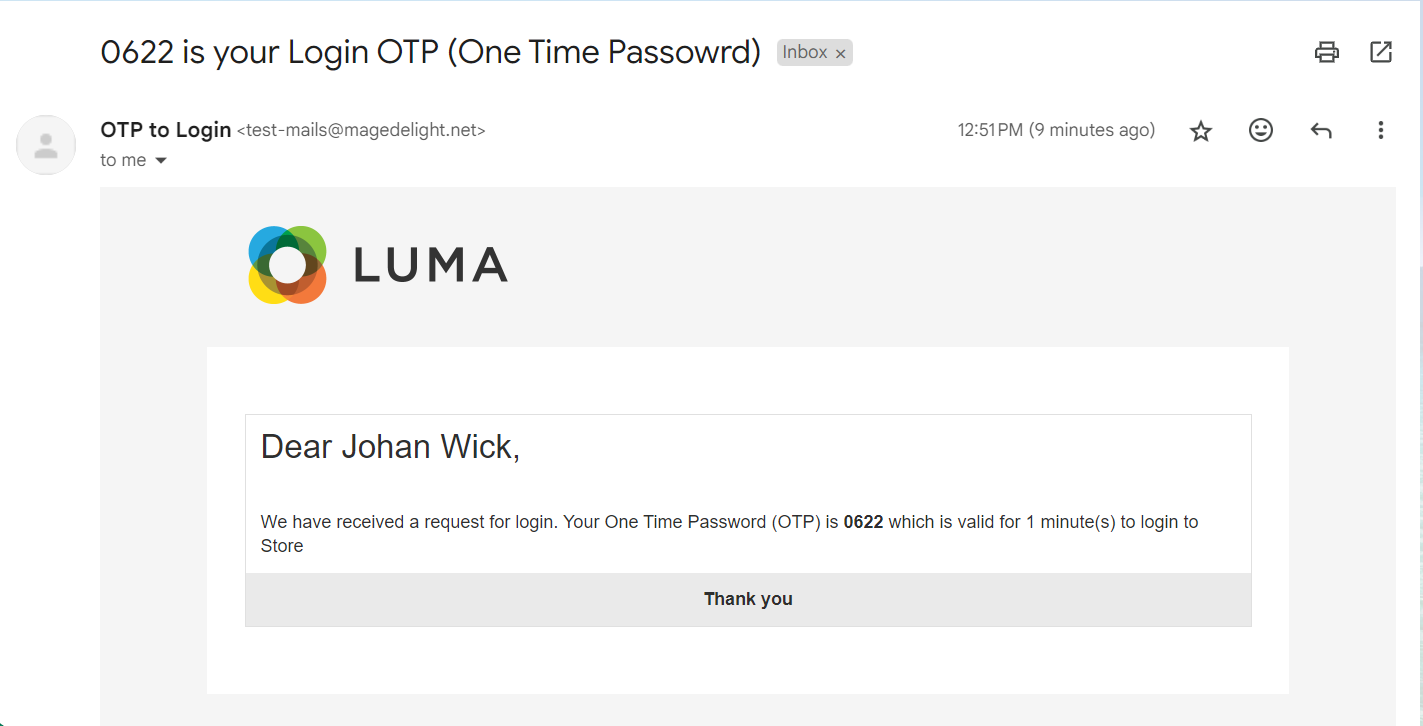
- This is a sample OTP (One-Time Password) email sent to a customer during the login process. The email includes a unique OTP code (
0622) and informs the recipient, Johan Wick, that the code is valid for 1 minute. It serves as a secure, time-sensitive authentication method for logging into the store without a password.
Sample OTP SMS
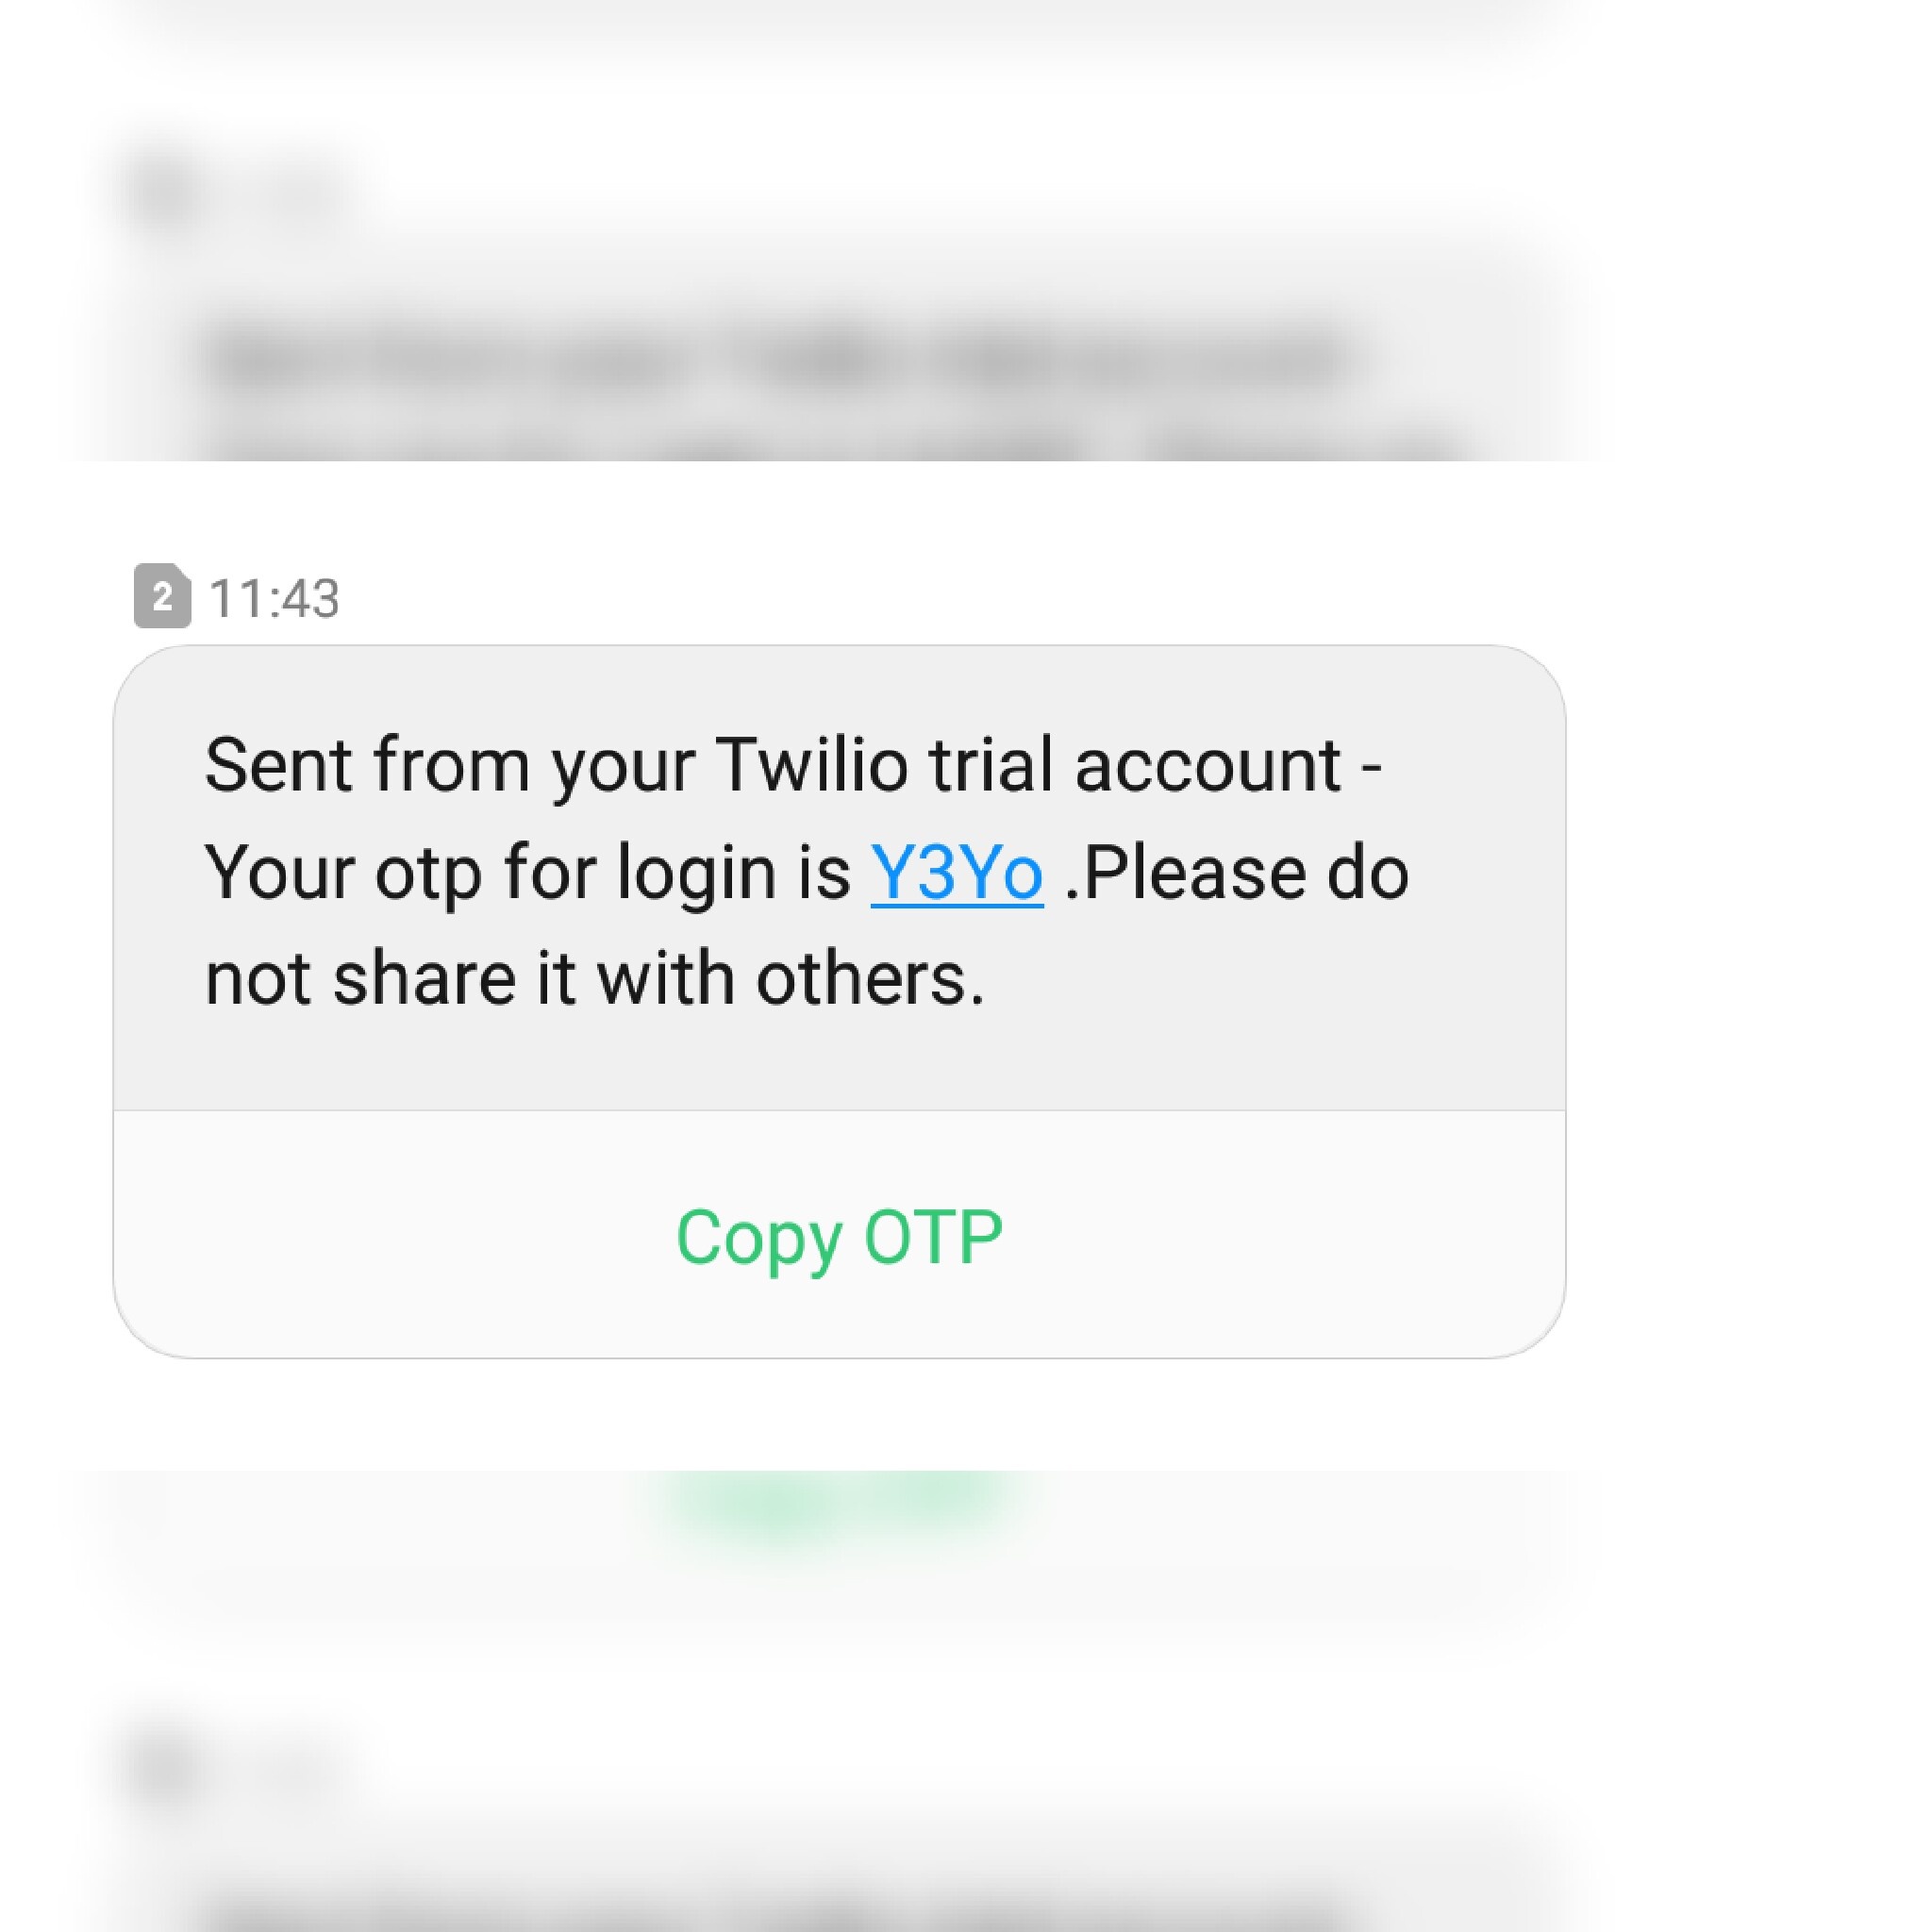
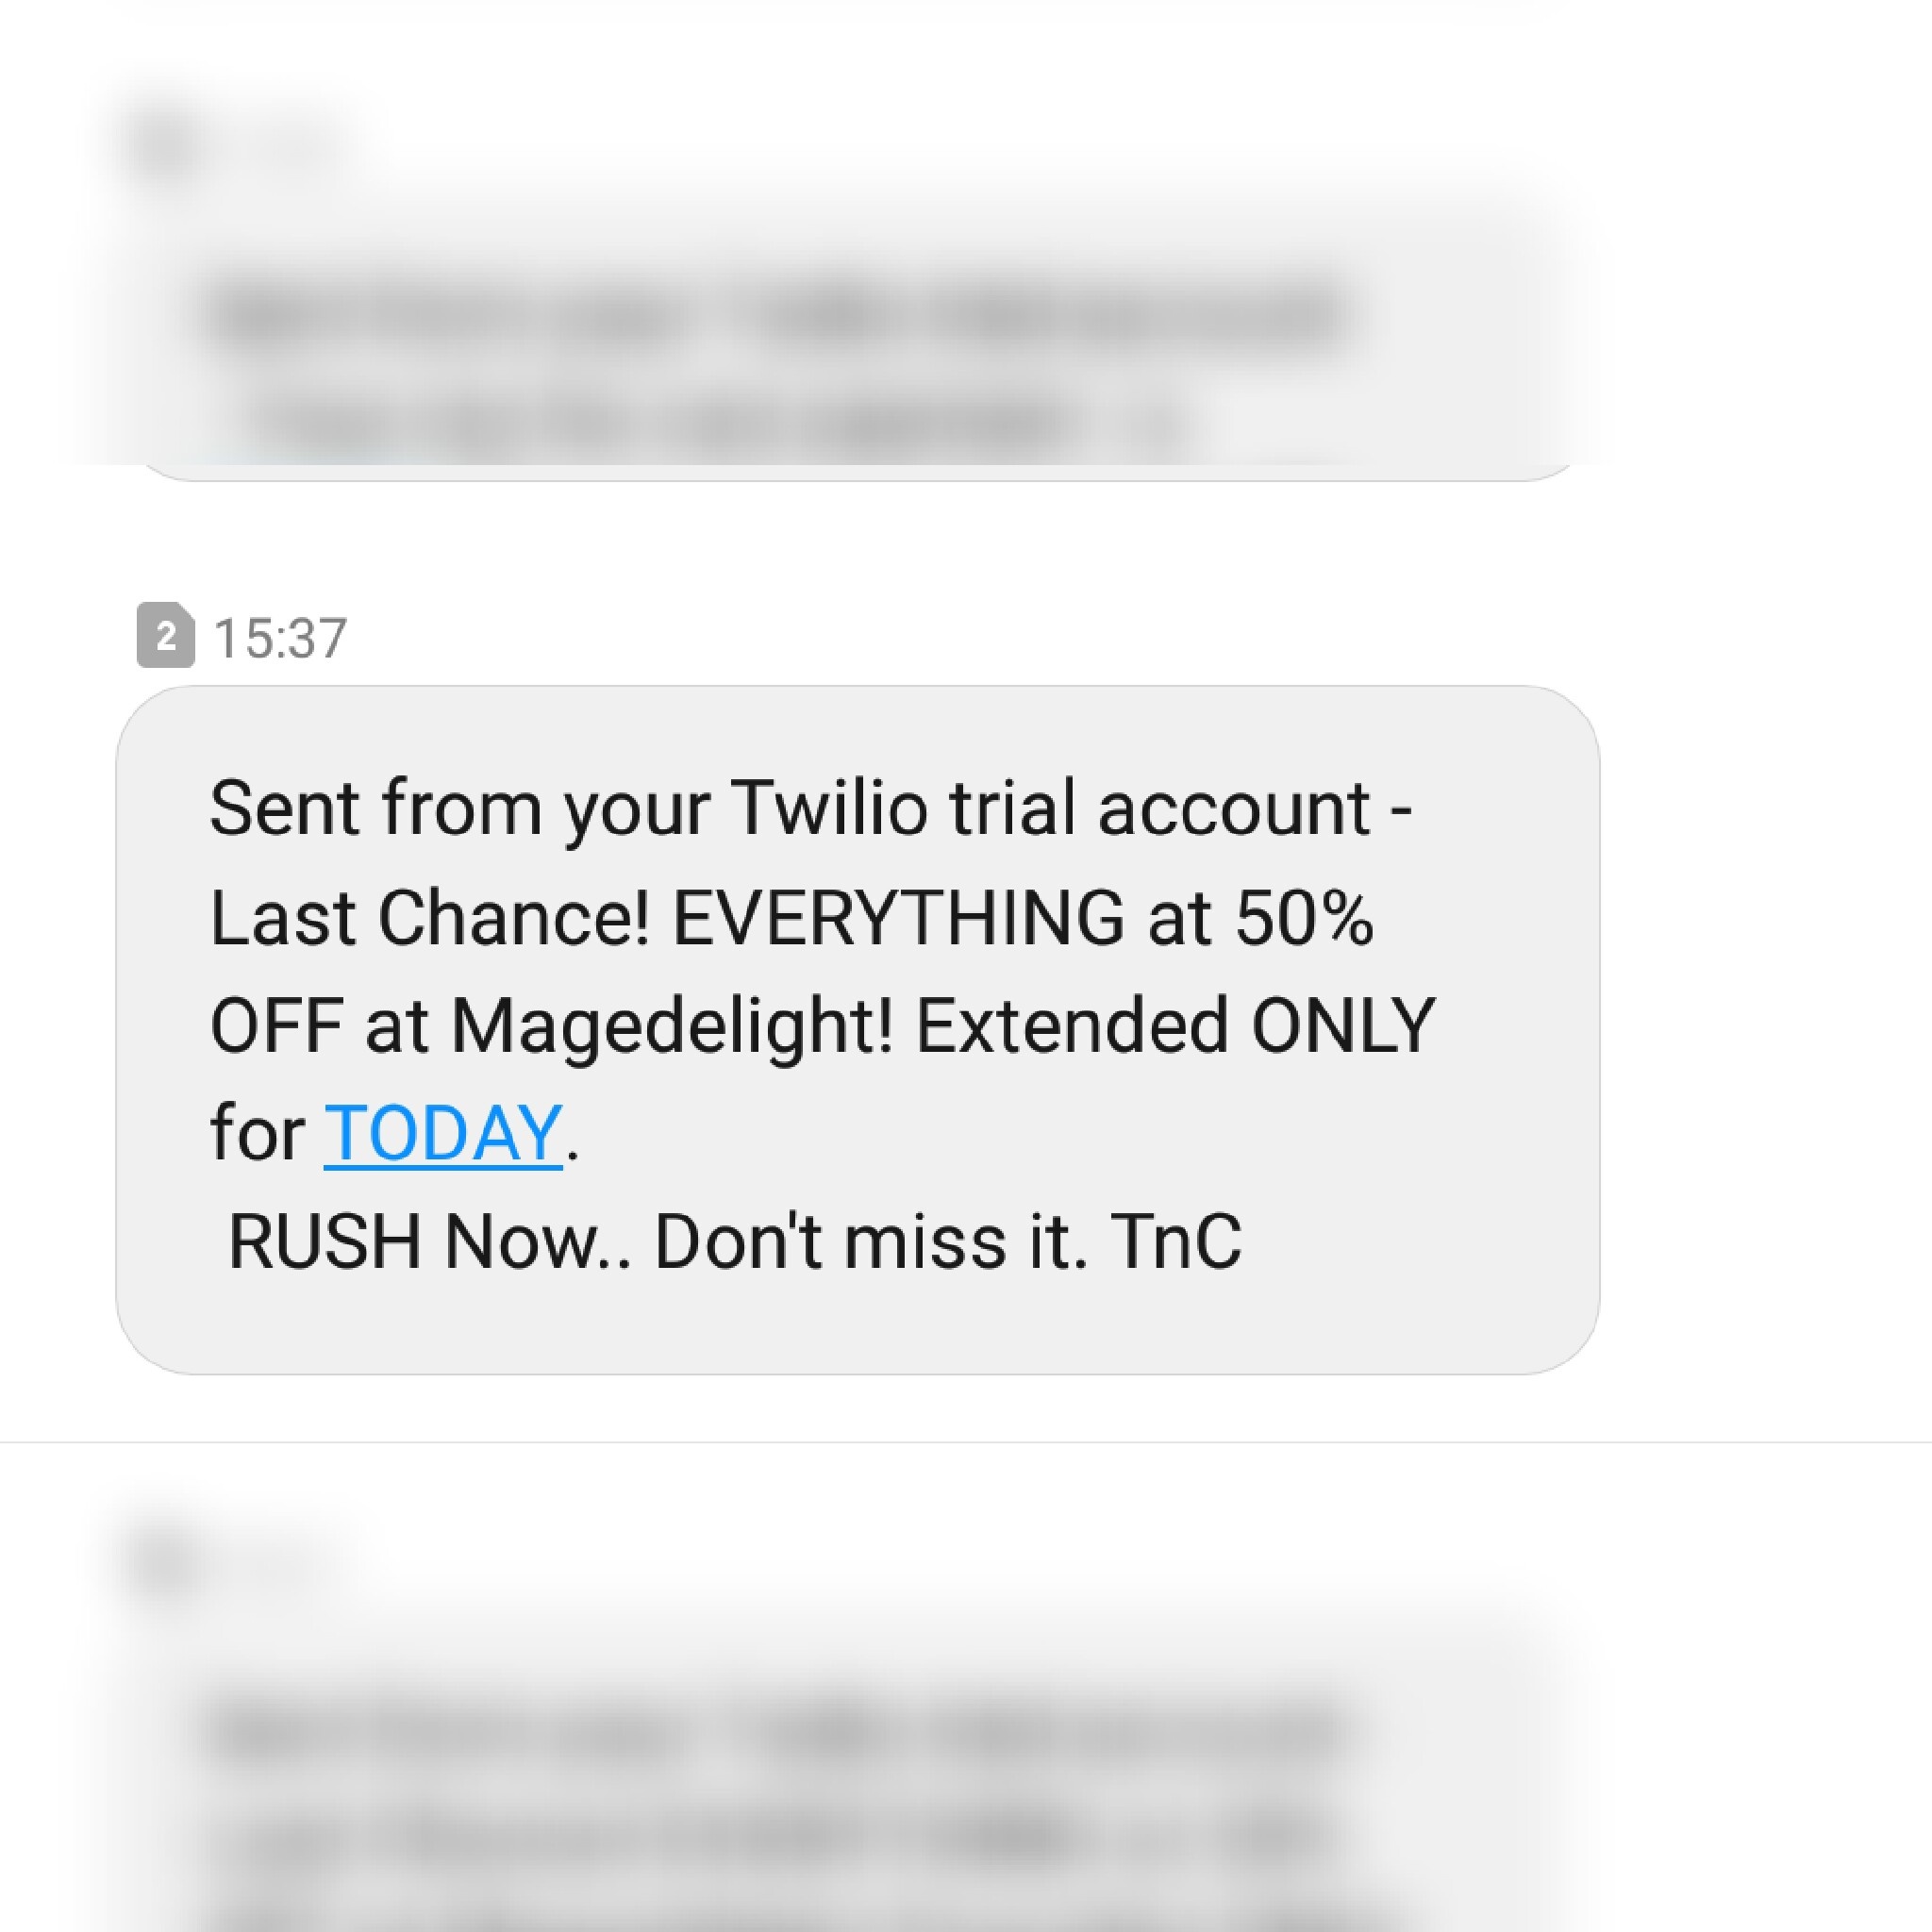
- Sample OTP message and Promotional message.
API
Please use SWAGGER to get detailed information on parameters.
https://mobileotplogin.m2.demo.magedelight.com/swagger
Send/resend OTP - GraphQL: rest/V1/
sendotp
Sample Data
Customer login with OTP Only - GraphQL: customertoken
Sample Data
Customer login with OTP and Password - GraphQL: customertokenwithotpandpassword
Sample Data
Customer account created with OTP : customersignupwithotp
Sample Data
Customer account edit with OTP : customereditwithotp
Sample Data
Send reset password link in mail with OTP - GraphQL: passwordwithotp
Sample Data
Guest place order with payment information saving for COD - GraphQL: guestcheckoutwithotpforcod/:cartId
Sample Data
My place order with payment information saving - GraphQL: carts/mine/checkoutwithotpforcod
Sample Data
Thank you for choosing MageDelight!