Installation
You will require to install MageDelight Base Extension first. If it is not installed then please download it from https://www.magedelight.com/pub/extensions/magedelight-base.zip and unzip the package file into the root folder of your Magento 2 installation.
Before installing the extension, please make sure to Backup your web directory and store database
- Unzip the extension package file into the root folder of your Magento 2 installation.
- Connect to SSH console of your server:
- Navigate to the root folder of your Magento 2 setup
Run command as per below sequence,
php -f bin/magento setup:upgrade
php -f bin/magento module:enable Magedelight_EWallet
php -f bin/magento setup:static-content:deploy
- Flush store cache
- log out from the backend and log in again
Backend Configuration (Admin side)
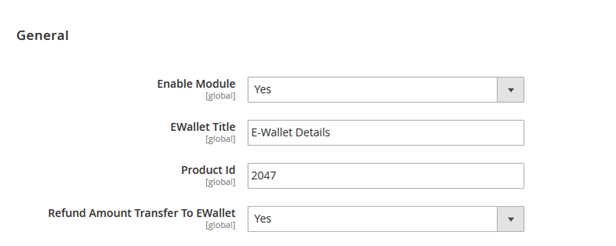
- Enable: To enable/disable E-wallet extension from here. It has two options, select “Yes” to enable and “No” to disable this feature.
- E-wallet Title: This title will appear on frontend checkout page.
- Product Id: It comes automatically on installing the extension. If admin delete the product “E-wallet” then it is required to create a new virtual product as “E-wallet” and write that product id here.
- Refund Amount Transfer To E-wallet: If set to yes then it will automatically transfer the refund amount when admin creates credit memo for the customer to their wallet and if set to no then refund cannot be transferred to customer E-wallet.
- Receive Notification: If set to “YES” then it will send email notification to admin and customer and if set to “NO” then it will not send any notification.
- Wallet Email Template: Select email template to be sent to customers for any transaction made by them.
Backend Functionality
Wallet Transactions
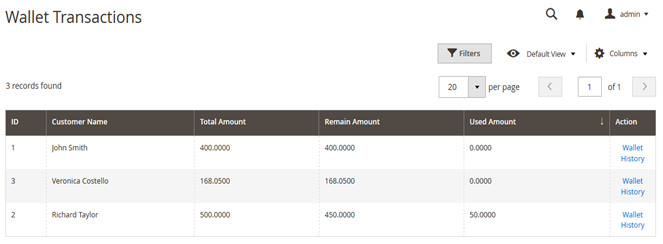
- Wallet Transactions: Admin can view list of wallet transactions customer wise.
- Wallet History: On click of the link it will open details of each transactions of particular customer.
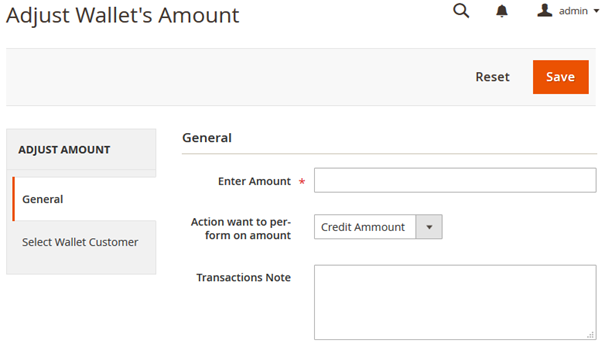
- Enter Amount: Admin can enter amount which would either get credited to or deducted from customer wallet as per the selection of next field “Action want to perform on amount”.
- Action want to perform on amount:
- Credit amount: This would credit the amount written in “Enter Amount” textbox to the customer wallet.
- Debit Amount: This would debit the amount written in “Enter Amount” textbox from the customer wallet. (The amount should be equal or less than the wallet balance)
- Transaction Note: Admin can write note about the transaction being made on customer wallet.
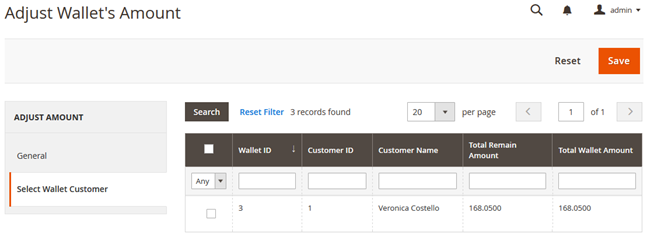
- Select Wallet Customer: To credit or debit the amount admin needs to select the customer. On selecting customer from the list it will perform transaction as per amount and operation selected in “General” tab.
- Save: This will save the adjustment of the wallet performed by admin
Frontend Functionality
E-wallet on Checkout
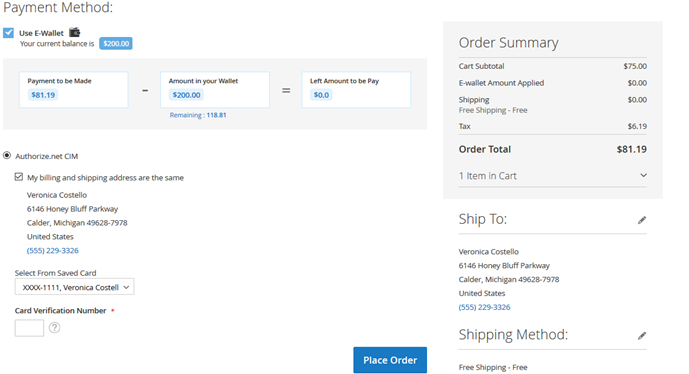
As shown in above figure customers can select E-wallet as a payment option and pay whole or part payment from the cash of E-wallet.
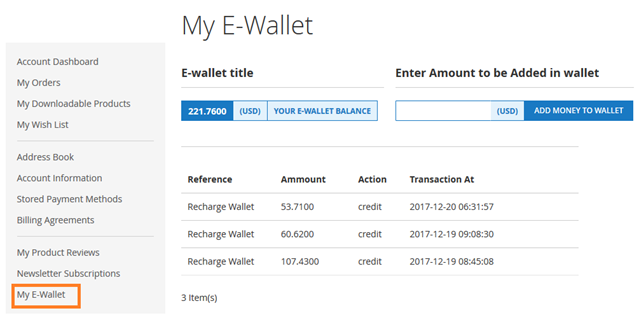
As shown in above figure, customers can view the details and transactions made using their E-wallet. It will show remaining amount and last recharge history as well.
Add Money to Wallet
Customer can recharge wallet from account only. They only need to enter the amount they want to credit to their wallet and click on “Add Money to Wallet” button. It will redirect them to checkout page where they can make payment and recharge the wallet.
API
Please use SWAGGER to get detailed information of parameters.
https://ewallet.m2.demo.magedelight.com/swagger
Customer Balance: rest/V1/magedelight-ewallet/
ewallet/customer
Sample Data
All Bank Request List: ewallet/bankRequest
Sample Data
Bank Request By ID: ewallet/:bankId
Sample Data
Bank Transfer Amount: ewallet/bankSave
Sample Data
Search By E-wallet: ewallet/search
Sample Data
Buy Product Using E-wallet: ewallet/order
Sample Data
customer/token(Using default Magento customer token Api)
Purchase E-wallet Balance: ewallet
Sample Data
customer/token(Using default Magento customer token Api)
Thank you for choosing MageDelight!

