
Installation
You will require to install MageDelight Base Extension first. If it is not installed then please download it from https://www.magedelight.com/pub/extensions/magedelight-base.zip and unzip the package file into the root folder of your Magento 2 installation.
Before installing the extension, please make sure to Backup your web directory and store database
You will require to install MageDelight Base Extension first. If it is not installed then please download it from https://www.magedelight.com/pub/extensions/magedelight-base.zip and unzip the package file into the root folder of your Magento 2 installation.
Root Directory is - "app/code/magedelight/#YourExtensionName#"
- Unzip the extension package file into the root folder of your Magento 2 installation.
- Connect to SSH console of your server:
- Navigate to the root folder of your Magento 2 setup
Run command as per below sequence,
php bin/magento setup:upgrade
php bin/magento setup:di:compile
php bin/magento setup:static-content:deploy
php bin/magento cache:clean
- log out from the backend and log in again
If you are using Magento 2.3 or later then you do not need to activate license. Extension will be activated with silent activation mechanism and does not require activation keys to be entered manually.
License Configuration
MageDelight License activation is not required for extension purchased from Magento Marketplace.
After successful installation of #ExtensionName# extension, you are now required to configure the license key in the admin configuration section. You can set it from:
Step 1: Go to, Admin Control Panel > Magedelight > #ExtensionName# > Configuration >License Configuration.
You will find two text boxes asking for Serial Key and Activation Key, which you received on email upon the purchase of extension. See screenshot below:
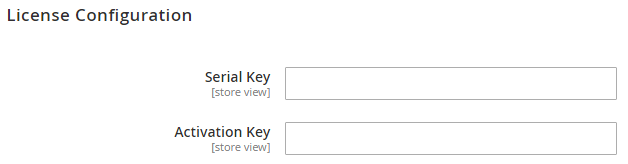
- Serial Key: Enter Serial Key
- Activation Key: Enter Activation Key
Step 2: Expand “General Configuration” tab, you will find a list of domains for which license is purchased and configured, now select the domain you are going to use, you can select multiple domains by clicking “Ctrl + Select”.
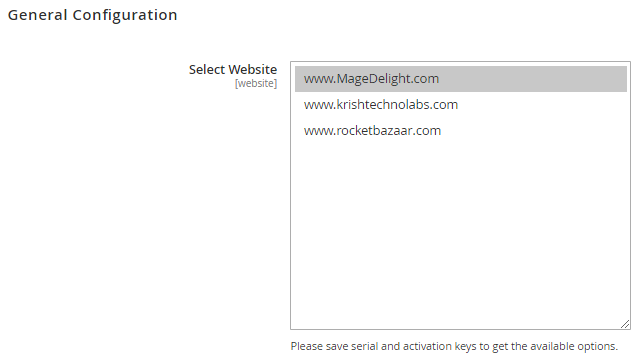
Step 3: Now, select “Yes” from “Enable Module” to enable extension and again click on “Save Config” button on the top right.

Backend Configuration (Admin side)

The extension allows admins to receive real-time email notifications for cron activities, including cron failures. To configure email notifications, go to Stores → Configuration → MageDelight Extensions → Cron Scheduler.
| Field | Description |
|---|---|
| Enable Email Notifications | Enables or disables email notifications for cron job activities. When set to Yes, the system sends email alerts based on the selected cron notification events. |
| Notification Recipients | Allows the admin to enter the email addresses that should receive cron notification alerts. Multiple email addresses can be added using a comma-separated format. |
| CC | Allows the admin to add CC email recipients for cron notification emails. Multiple CC email addresses can be entered using a comma-separated format. |
| Notify on CRON Start | Sends an email notification when a selected cron job starts running. |
| Notify on CRON Success | Sends an email notification when a selected cron job completes successfully. |
| Notify on CRON Failure | Sends an email notification when a selected cron job fails during execution. |
| Sender Email | Defines the store email identity used as the sender for cron notification emails, such as General Contact. |
| Selected CRON Jobs for Notifications | Allows the admin to select specific cron jobs for which notifications should be sent. If left empty, notifications will be sent for all cron jobs based on the configured notification settings. |
Backend Functionality
CRON Scheduler Management

- Path: MageDelight → Cron Health Summary → CRON Scheduler Management
- The CRON Scheduler Management section allows administrators to monitor, manage, and control Magento cron jobs from a centralized grid.
- View all available cron jobs with their job code, module, group, schedule, last status, last run time, and next run time.
- Quickly identify cron job health using the Last Status column, such as Success, Failed, Missed, or Pending.
- Manually execute a cron job using the Quick Run action when immediate execution is required.
- Edit, stop, enable, or disable cron jobs directly from the Action dropdown.
- Use filters, columns, pagination, and refresh status options to review cron activity more efficiently.
| Field | Description |
|---|---|
| Job Code | Displays the unique cron job code configured in Magento. This helps identify the specific cron task. |
| Module | Shows the module or cron class responsible for executing the cron job. |
| Group | Displays the cron group assigned to the job, such as default. |
| Schedule | Shows the cron schedule expression that defines when the job is set to run. |
| Last Status | Displays the most recent execution status of the cron job, such as Success, Failed, Missed, or Pending. |
| Manual Status | Indicates whether the cron job is currently enabled or disabled for manual control. |
| Last Run At | Shows the date and time when the cron job was last executed. |
| Next Run At | Shows the next scheduled execution date and time for the cron job. |
| Action | Provides available actions for the selected cron job, such as Edit CRON, Quick Run, Stop CRON, and Disable Job. |
| Refresh Status | Refreshes the cron activity status and updates the latest cron health information. |
| Filters | Allows administrators to filter cron jobs based on available grid columns. |
| Columns | Allows administrators to show or hide columns in the cron management grid. |
| Pagination | Allows navigation between multiple pages when many cron jobs are available. |
Edit CRON Schedule

- The Edit CRON Schedule option allows administrators to modify the schedule and group configuration of a selected cron job directly from the CRON Scheduler Management grid.
- Click Select in the Action column and choose Edit CRON to open the cron schedule edit popup.
- View the selected cron job code before making any changes.
- Update the cron group or create a new cron group if required.
- Modify the cron schedule using the standard five-value cron format.
- Save the changes to apply the updated cron schedule for future executions.
| Field | Description |
|---|---|
| Job Code | Displays the selected cron job code. This is shown for reference and helps identify which cron job is being edited. |
| CRON Group | Allows the admin to select the cron group under which the selected cron job should run. |
| Create New Group | Allows the admin to create a new cron group if the required group is not available in the dropdown. |
| Schedule | Allows the admin to define or update the cron schedule using the standard cron expression format. |
| Minute | Defines the minute value of the cron schedule. Allowed values are 0–59 or *. |
| Hour | Defines the hour value of the cron schedule. Allowed values are 0–23 or *. |
| Day | Defines the day of the month for the cron schedule. Allowed values are 0–31 or *. |
| Month | Defines the month value of the cron schedule. Allowed values are 0–12 or *. |
| Weekday | Defines the weekday value of the cron schedule. Allowed values are 0–7 or *. |
| Save | Saves the updated cron schedule and group configuration. |
| Cancel | Closes the edit popup without saving any changes. |
Cron Timeline

- Path: MageDelight → Cron Health Summary → Cron Timeline
- The Cron Timeline section provides a visual timeline view of cron execution records, helping administrators monitor cron job activity and identify execution behavior quickly.
- View cron execution records in a timeline format with the latest records displayed at the top.
- Filter cron records by Job Code and Status to quickly locate specific cron activity.
- Review cron status counts such as Pending, Running, Success, Missed, and Error.
- Check detailed cron execution information, including scheduled time, start time, end time, duration, memory usage, CPU usage, and database queries.
- Easily identify successful, missed, or failed cron executions for faster troubleshooting.
| Field | Description |
|---|---|
| Job Code | Allows the admin to filter cron timeline records by a specific cron job code. |
| Status | Allows the admin to filter cron records based on execution status, such as Pending, Running, Success, Missed, or Error. |
| Apply Filters | Applies the selected filter values and updates the cron timeline results. |
| Reset | Clears the applied filters and restores the default timeline view. |
| Records | Displays the total number of cron schedule records available in the current timeline view. |
| Pending | Shows the number of cron jobs that are scheduled but not yet executed. |
| Running | Shows the number of cron jobs that are currently in progress. |
| Success | Shows the number of cron jobs that have completed successfully. |
| Missed | Shows the number of cron jobs that were scheduled but missed execution. |
| Error | Shows the number of cron jobs that failed during execution. |
| Timeline View | Displays cron execution records visually based on their scheduled and execution time. |
| Cron Detail Card | Shows detailed information for a selected cron execution, including job code, record ID, status, and execution timing. |
| Schedule Date Time | Displays the date and time when the cron job was scheduled to run. |
| Start Date Time | Displays the date and time when the cron job started execution. |
| End Date Time | Displays the date and time when the cron job completed execution. |
| Delay By Minutes | Shows the delay between the scheduled time and actual start time of the cron job. |
| Duration | Displays the total time taken by the cron job to complete execution. |
| Memory | Shows the memory consumed during cron execution. |
| CPU | Displays CPU usage recorded during cron execution. |
| DB Queries | Shows the number of database queries executed during the cron process. |
| Triggered By | Indicates whether the cron was triggered automatically by cron or manually by an admin action. |
Purchase
Click here to purchase from MageDelight.
Click here to purchase from Magento Marketplace. (Composer installation supported)
Thank you for choosing MageDelight!