
Installation
You will require to install MageDelight Base Extension first. If it is not installed then please download it from https://www.magedelight.com/pub/extensions/magedelight-base.zip and unzip the package file into the root folder of your Magento 2 installation.
Before installing the extension, please make sure to Backup your web directory and store database
You will require to install MageDelight Base Extension first. If it is not installed then please download it from https://www.magedelight.com/pub/extensions/magedelight-base.zip and unzip the package file into the root folder of your Magento 2 installation.
Root Directory is - "app/code/magedelight/#YourExtensionName#"
- Unzip the extension package file into the root folder of your Magento 2 installation.
- Connect to SSH console of your server:
- Navigate to the root folder of your Magento 2 setup
Run command as per below sequence,
php bin/magento setup:upgrade
php bin/magento setup:di:compile
php bin/magento setup:static-content:deploy
php bin/magento cache:clean
- log out from the backend and log in again
If you are using Magento 2.3 or later then you do not need to activate license. Extension will be activated with silent activation mechanism and does not require activation keys to be entered manually.
License Configuration
MageDelight License activation is not required for extension purchased from Magento Marketplace.
After successful installation of #ExtensionName# extension, you are now required to configure the license key in the admin configuration section. You can set it from:
Step 1: Go to, Admin Control Panel > Magedelight > #ExtensionName# > Configuration >License Configuration.
You will find two text boxes asking for Serial Key and Activation Key, which you received on email upon the purchase of extension. See screenshot below:
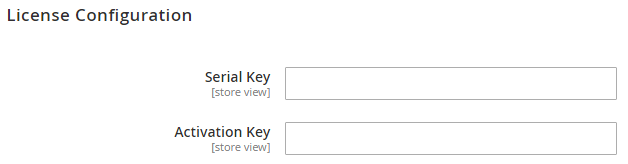
- Serial Key: Enter Serial Key
- Activation Key: Enter Activation Key
Step 2: Expand “General Configuration” tab, you will find a list of domains for which license is purchased and configured, now select the domain you are going to use, you can select multiple domains by clicking “Ctrl + Select”.
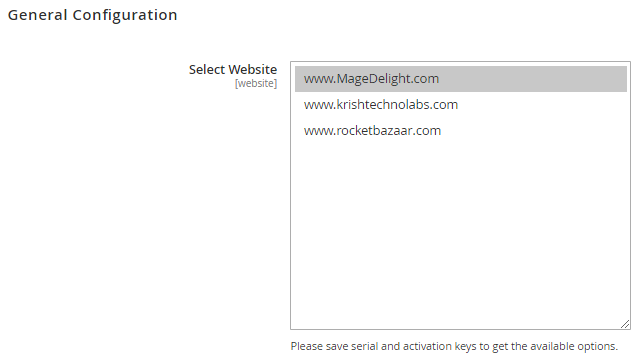
Step 3: Now, select “Yes” from “Enable Module” to enable extension and again click on “Save Config” button on the top right.

Backend Configuration (Admin side)
.

| Field | Description |
|---|---|
| Scope | Defines the configuration scope (e.g., Default Config, Website, Store View). Changes applied here will affect the selected scope level. |
| Category Import Export | Section used to configure settings related to importing and exporting category -product associations. |
| Import/Export Categories with | Dropdown to select the identifier type for category import/export operations. Users can choose between Product SKUs or Product IDs. |
| Product SKUs | When selected, category import/export will be processed using product SKUs as the reference identifier. |
| Product IDs | When selected, category import/export will be processed using product IDs as the reference identifier. |
| Use system value | Checkbox to inherit the default system configuration value. Uncheck to set a custom value for the selected scope. |
| Save Config | Saves the current configuration settings for the selected scope. |
Backend Functionality
Export Categories

| Field | Description |
|---|---|
| Export From Store | Allows the admin to select the store view from which category data will be exported. This ensures that store-specific category information is included in the export. |
| Export All Categories | Provides a button to export all categories from the selected store view. On clicking, a CSV file is generated containing complete category data. |
| Success Message | Displays a confirmation message (e.g., “Categories Exported Successfully”) after the export process is completed successfully. |
| Export Records Grid | Displays a list of previously exported category files along with details such as ID and file name for easy tracking and management. |
| ID | Represents the unique identifier for each exported category file record. |
| Name | Shows the generated CSV file name, typically including store and timestamp details for reference. |
| Download (Action) | Provides options to manage exported files. Includes: - Download: Download the exported CSV file - Delete: Remove the exported file record from the system |
| Select Dropdown (Action Column) | Allows the admin to choose actions (Download/Delete) for each exported file. |
| Pagination | Enables navigation through multiple export records and control over the number of records displayed per page. |
Import Categories

| Field | Description |
|---|---|
| Export Sample File | Allows the admin to download a sample CSV file. This file provides the correct format and structure required for importing categories. |
| Check Data | Validates the uploaded CSV file before import. Ensures the data format and required fields are correct to prevent errors during import. |
| Upload File | Enables the admin to upload a CSV file containing category data. Only CSV file format is supported. |
| File Preview | Displays the uploaded file name and size for confirmation before processing. |
| General Information Section | Contains all the necessary options related to uploading and validating the import file. |
| Import Records Grid | Displays a list of previously imported files along with their status and details for tracking purposes. |
| ID | Represents the unique identifier for each import record. |
| File Name | Shows the name of the uploaded CSV file used for category import. |
| Status | Indicates the result of the import process (e.g., completed, pending, failed). |
| Download (Action) | Provides options to manage imported files: - Download: Download the uploaded/imported CSV file - Delete: Remove the import record from the system |
| Select Dropdown (Action Column) | Allows the admin to choose actions such as download or delete for each import record. |
| Pagination | Enables navigation through multiple import records and control over the numbe r of records displayed per page. |
Sample Categories

| Point | Description |
|---|---|
| Category Image Path | Ensure that all images referenced in the CSV file are already uploaded to the directory pub/media/catalog/category/. Only the image file name should be mentioned in the CSV. |
| Creating Child Category | To create a new child category under an existing category, provide the correct category_path along with the name of the new category. Thecategory_id is not required for new entries. |
| Creating Root Level Category | For creating a new root-level category, provide the category_path as the category name itself (e.g., “New Category”) and set the name accordingly. The category_id is not required. |
| Updating Existing Category | To update an existing category, you must provide the correct category_id. The system will update the category data based on this ID. |
| Category Path Accuracy | Ensure the category_path is correctly defined to maintain proper category hierarchy. Incorrect paths may lead to wrong category placement. |
| CSV Format Compliance | The CSV file must follow the required format and column structure as per the sample file to ensure successful import. |
Do’s And Don’ts for Category Import
Do’s
- Ensure all category images are uploaded to
pub/media/catalog/category/before import - Use the correct CSV format and column structure as per the sample file
- Provide the correct category_path to maintain proper hierarchy
- Use category_id only when updating existing categories
- Verify data using the “Check Data” option before import
- Ensure unique and meaningful category names for better organization
Don’ts
- Do not provide category_id for new categories
- Do not use incorrect or incomplete category_path values
- Do not upload unsupported file formats (only CSV is allowed)
- Do not reference images that are not available in the specified folder
- Do not modify or remove required columns from the CSV file
- Do not import without validating the data first
Validation Rules for Category Import
| Field | Validation Rule |
|---|---|
| category_id | Required only for updating existing categories. Must be a valid existing ID. |
| category_path | Mandatory for creating categories. Must follow correct hierarchy format. |
| store | Must contain a valid store view code (e.g., default). |
| name | Required field. Cannot be empty. Defines the category name. |
| image | Optional. If provided, image must exist in pub/media/catalog/category/. |
| is_active | Accepts values 1 (enabled) or 0 (disabled). |
| is_anchor | Accepts values 1 (anchor) or 0 (non-anchor). |
| include_in_menu | Accepts values 1 (yes) or 0 (no). |
| meta_title | Optional field. Should not exceed recommended character limits. |
| meta_keywords | Optional. Can contain comma-separated keywords. |
| meta_description | Optional. Should follow SEO best practices. |
| display_mode | Accepts predefined values such as PRODUCTS, PAGE, or PRODUCTS_AND_PAGE. |
| custom attributes | Must follow expected data type and format as per configuration. |
| products | Accepts only comma-separated product IDs. SKU values are not supported currently; using SKUs will result in failure. |
| File Format | Only .csv files are allowed. |
| File Structure | Must match the sample file structure without missing required columns. |
Frontend Functionality
Category Structure (Before Update)

- Before applying any updates, the category structure appears as a standard hierarchical menu. For example, under the Men category, subcategories such as Tops and Bottoms are displayed, and further nested categories like Jackets, Hoodies & Sweatshirts, Tees, and Tanks are shown in a dropdown format.
- This structure represents the default Magento category navigation, where categories are organized in a multi-level hierarchy without any enhancements or modifications.
Category Structure (After Update)

- After adding a new subcategory, the category structure is updated dynamically within the navigation menu. The newly added subcategory (e.g., T-Shirts) is now visible under the relevant parent category (Tops) along with existing subcategories such as Jackets, Hoodies & Sweatshirts, Tees, and Tanks.
- This reflects that any newly created subcategory is automatically integrated into the existing hierarchy and displayed in the frontend menu without requiring additional configuration.
Purchase
Click here to purchase from MageDelight.
Click here to purchase from Magento Marketplace. (Composer installation supported)
Thank you for choosing MageDelight!