
Installation
You will require to install MageDelight Base Extension first. If it is not installed then please download it from https://www.magedelight.com/pub/extensions/magedelight-base.zip and unzip the package file into the root folder of your Magento 2 installation.
Before installing the extension, please make sure to Backup your web directory and store database
You will require to install MageDelight Base Extension first. If it is not installed then please download it from https://www.magedelight.com/pub/extensions/magedelight-base.zip and unzip the package file into the root folder of your Magento 2 installation.
Root Directory is - "app/code/magedelight/#YourExtensionName#"
- Unzip the extension package file into the root folder of your Magento 2 installation.
- Connect to SSH console of your server:
- Navigate to the root folder of your Magento 2 setup
Run command as per below sequence,
php bin/magento setup:upgrade
php bin/magento setup:di:compile
php bin/magento setup:static-content:deploy
php bin/magento cache:clean
- log out from the backend and log in again
If you are using Magento 2.3 or later then you do not need to activate license. Extension will be activated with silent activation mechanism and does not require activation keys to be entered manually.
License Configuration
License activation is not required for extension purchased from Magento Marketplace.
After successful installation of Advanced Layered Navigation extension, you are now required to configure the license key in the admin configuration section. You can set it from:
Step 1: Go to, Admin Control Panel > Stores > Configuration > Magedelight > Layered Navigation > License Configuration.
You will find two text boxes asking for Serial Key and Activation Key, which you received on email upon the purchase of extension. See screenshot below:
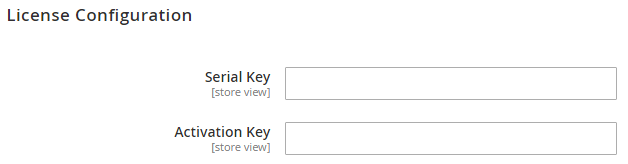
- Serial Key: Enter Serial Key
- Activation Key: Enter Activation Key
Step 2: Expand “General Configuration” tab, you will find a list of domains for which license is purchased and configured, now select the domain you are going to use, you can select multiple domains by clicking “Ctrl + Select”.

Step 3: Now, select “Yes” from “Enable Module” to enable extension and again click on “Save Config” button on the top right.

Backend Configuration (Admin side)

- General: Enable/disable the Advanced Layered Navigation on frontend
- Select Filters For Expand: Select the filters from given default list to display on front end. These filters would remain expanded in navigation side bar by default.
- Add Vertical Scrolling to Filter Blocks Higher Than: Set the size of filter options (vertically). If options occupies more size than specified then scroll bar will appear.
- Submit Filters: two ways admin can allow users to get the filtered result on front end.
- Instantly: This will display the filtered result as soon as user selects the option from navigation bar.
- Button Click: Once user finishes the filter selection then on clicking submit button, the filtered products will get displayed.

- Enabled: Enable/disable out of stock filter on frontend.
- Filter Label: Write out of stock filter name here.
- Position: There are 3 positions to adjust out of stock filter in navigation bar.
- At the top of the bar
- At the bottom of the bar
- After category filter

- Enabled: Enable/disable product rating filter on frontend.
- Filter Label: Write product rating filter name here.
- Position: There are 3 positions to adjust product rating filter in navigation bar.
- At the top of the bar
- At the bottom of the bar
- After category filter

- Enabled: Enable/disable new product filter on frontend.
- Filter Label: Write New Product filter name here.
- Position: There are 3 positions to adjust new stock filter in navigation bar.
- At the top of the bar
- At the bottom of the bar
- After category filter
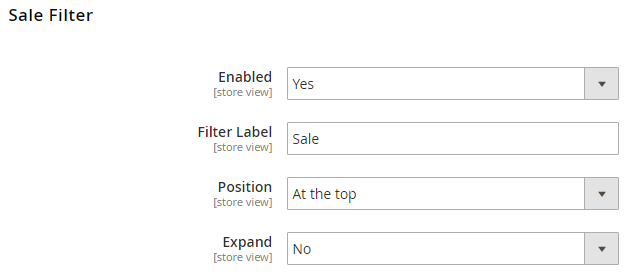
- Enabled: Enable/disable sale filter on frontend.
- Filter Label: Write sale filter name here.
- Position: There are 3 positions to adjust sale filter in navigation bar.
- At the top of the bar
- At the bottom of the bar
- After category filter

- Enabled: Enable/disable out of SEO Friendly URLs on frontend.
- Filter Option Separator: Select filter option separator.
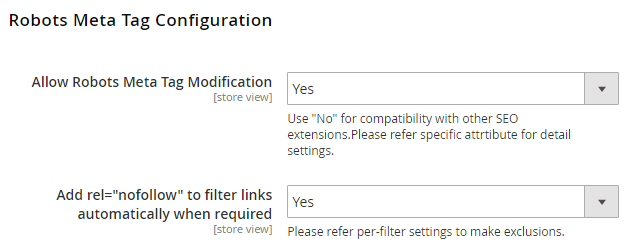
- Allow Robots Meta Tag Modification: Select “Yes” to allow Robots Meta Tag Modification
- Add rel="nofollow" to filter links automatically when required: Select “Yes” to add rel="nofollow" to filter links automatically when required

- Canonical URL for Category pages: Select below options for canonical URL configurations,
- Keep current URL: Select if you want to keep Canonical URL as current URL
- URL without Filters: Select if you want to keep Canonical URL without filters
- First attribute Value: Select if you want to keep Canonical URL with first attribute value only
- Current URL without Get parameters: Select if you want to keep current URL without GET parameters for Canonical URL
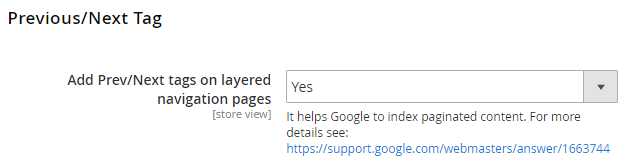
- Add Prev/Next tags on layered navigation pages: Select “Yes” if you want to add previous and next tags link on layered navigation pages.
Backend Functionality
Attribute Configuration
Please move to below path, to set configuration options
Store >> Product >> Select Attribute Name >> Storefront Properties
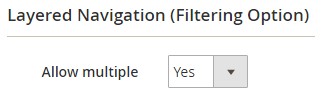
- Allow multiple: Select “Yes” to allow multiple selection for layered navigation filter options. Default option is “No” and it will allow single selection for the attribute values
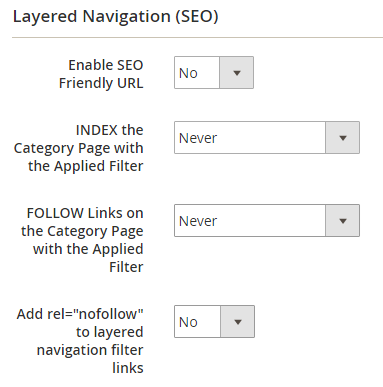
- Enable SEO Friendly URL: Select “Yes” to allow enable SEO Friendly URL
- INDEX the Category Page with the Applied Filter: Select from given options to index the category page with the applied filter
- Never: Select “Never” to restrict indexing of the category page with filter
- Always: Select “Always” to allow indexing of category page with filter
- Single Select Only: Select “Single Select Only” to allow indexing of category page with single select attribute only
- FOLLOW Links on the Category Page with the Applied Filter: Select “Yes” to allow enable SEO Friendly URL
- Never: Select “Never” to restrict follow link of the category page with applied filter
- Always: Select “Always” to allow follow link of category page with applied filter
- Single Select Only: Select “Single Select Only” to allow follow link of category page with single select attribute only
- Add rel="nofollow" to layered navigation filter links: Select “Yes” to add rel="nofollow" to layered navigation filter

- Tree Depth: Specify the max level number for category tree.
E.g. Specify 1 to display main category only, specify 2 to display main category with sub category
Tree depth only available for “Category” attribute, Please move to following path to set value,
Store >> Product >> category_ids >> Storefront Properties >> Layered Navigation (SEO)
Frontend Functionality
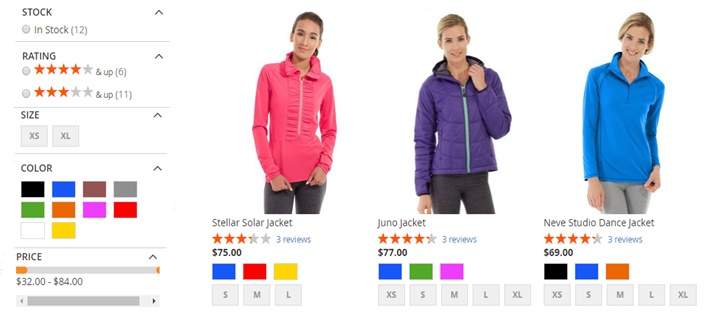
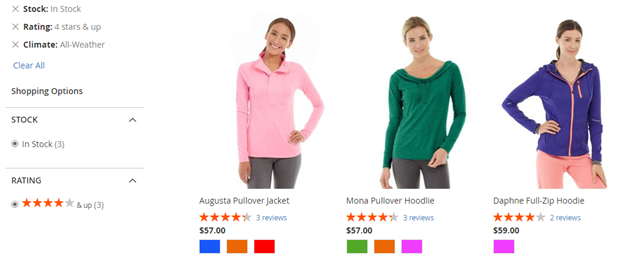
Multiple filter selection
Demo
Click here to visit product detail page.
Click here to visit frontend.
Click here to visit backend admin panel.
Thank you for choosing MageDelight!