Versions Compared

Key

  • This line was added.
  • This line was removed.
  • Formatting was changed.

...

Section


Column
width60%

Table of Contents
maxLevel3


Column
width30%


Image Removed

Section

Installation


Info

Md base module
NameBase Module


Include Page
Installation Steps
Installation Steps

Section

License Configuration

Note

License activation is not required for extension purchased from Magento Marketplace.

After successful installation of Stripe Payment Module extension, you are now required to configure the license key in the admin configuration section. You can set it from:

Step 1: Go to, Admin Control Panel > Stores Configuration > Magedelight > Stripe Payment > License Configuration. 

You will find two text boxes asking for Serial Key and Activation Key, which you received on email upon the purchase of extension. See screenshot below:

Panel

Image Removed

  • Serial Key: Enter Serial Key
  • Activation Key: Enter Activation Key

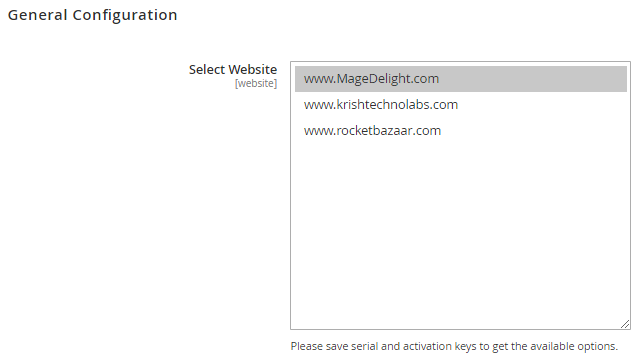
Step 2: Expand “General Configuration” tab, you will find a list of domains for which license is purchased and configured, now select the domain you are going to use, you can select multiple domains by clicking “Ctrl + Select”.

Panel

Image Removed

Step 3: Now, select “Yes” from “Enable Module” to enable extension and again click on “Save Config” button on the top right.

Panel


Section

Backend Configuration (Admin side)


Panel
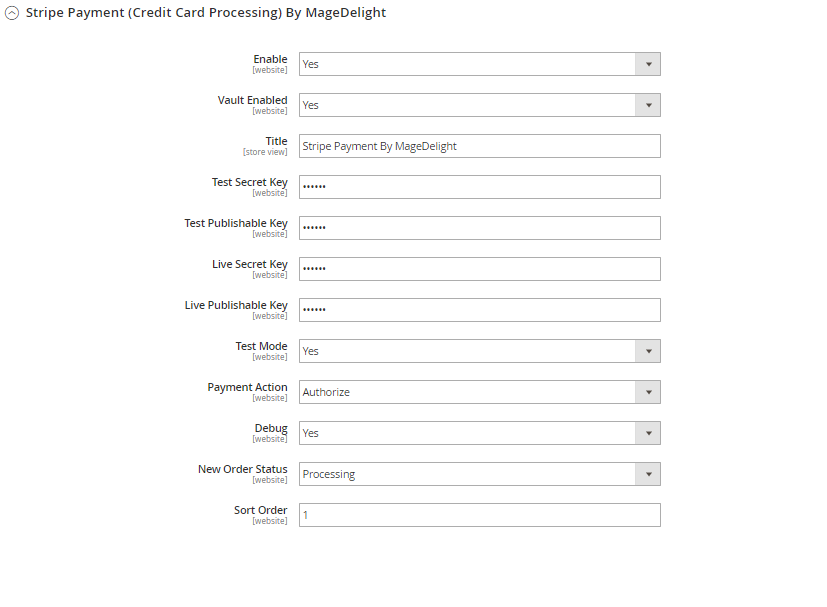
  • Enabled: This can enable/disable the Stripe Payment method.
  • Vault Enable : This can enable / disable Default Magento Vault
  • Title: Here you can define the label for Stripe Payment method that will display in
    1. Payment section of one page checkout.
    2. Payment information of order, invoice, credit memo and shipment section.
  • Test Secret Key : If test mode is enable for development/test, define test secret key here.
  • Test Public Key: If test mode is enable for development/test, define test public key here.
  • Live Secret Key: Set real account secret key here, while web-shop is on live mode.
  • Live Public Key: Set real account secret key here, while web-shop is on live mode.
  • Test Mode: Admin can define the mode of Stripe Payment method of web shop. Merchant can set either “Yes”/ “No” for this option depends on the environment of web shop (Production or Development).
  • Payment Action: Admin can define the payment action that would take on successful order placed by user. Admin can choose,
    1. Authorize and Capture: This payment action will directly capture the requested amount from the customer credit card on placing an order from frontend or backend. Invoice will automatically create when user successfully place an order.
    2. Authorize Only: This payment action will only authorize the requested amount on the credit card of customer on placing an order from frontend or backend.

In this payment action invoice will not be created after order creation successfully. Admin will have to manually create invoice from backend from order management section.

  • Debug: This option defines the debugging mode of Stripe payment method. Admin can choose “Yes / No” depending on the Production / Development environment if web site. Normally this option should only enabled for development environment.
  • New Order Status: his option defines the order status after successful processing the order.
  • Sort Order: This option defined the sort order of payment method on the payment step on checkout one page of frontend.

Panel
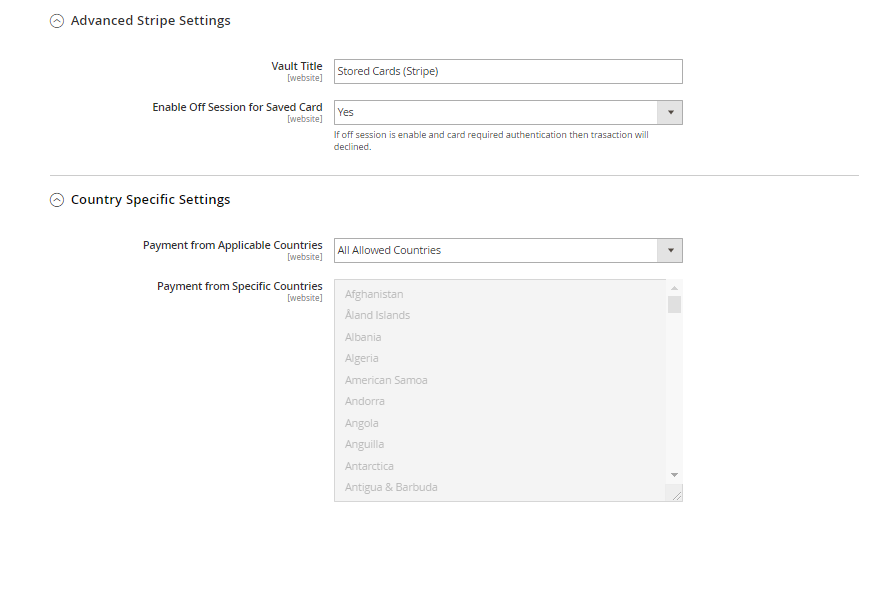
  • Vault Title : Here you can define the label for the Vault Title
  • Enable Off Session For Saved Card : Set off_session to "Yes" to indicate that the customer is not in your checkout flow during this payment attempt. This causes the Payment Intent to throw an error if authentication is required.
  • Payment from Applicable Countries: You can allow all countries or specific county to capture payment from using Stripe Payment Gateway
  • Payment from Specific Countries: Select countries you want to allow for Stripe Payment Gateway

...