Installation
You will require to install MageDelight Base Extension first. If it is not installed then please download it from https://www.magedelight.com/pub/extensions/magedelight-base.zip and unzip the package file into the root folder of your Magento 2 installation.
Before installing the extension, please make sure to Backup your web directory and store database
You will require to install MageDelight Base Extension first. If it is not installed then please download it from https://www.magedelight.com/pub/extensions/magedelight-base.zip and unzip the package file into the root folder of your Magento 2 installation.
Root Directory is - "app/code/magedelight/#YourExtensionName#"
- Unzip the extension package file into the root folder of your Magento 2 installation.
- Connect to SSH console of your server:
- Navigate to the root folder of your Magento 2 setup
Run command as per below sequence,
php bin/magento setup:upgrade
php bin/magento setup:di:compile
php bin/magento setup:static-content:deploy
php bin/magento cache:clean
- log out from the backend and log in again
If you are using Magento 2.3 or later then you do not need to activate license. Extension will be activated with silent activation mechanism and does not require activation keys to be entered manually.
License Configuration
MageDelight License activation is not required for extension purchased from Magento Marketplace.
After successful installation of #ExtensionName# extension, you are now required to configure the license key in the admin configuration section. You can set it from:
Step 1: Go to, Admin Control Panel > Magedelight > #ExtensionName# > Configuration >License Configuration.
You will find two text boxes asking for Serial Key and Activation Key, which you received on email upon the purchase of extension. See screenshot below:
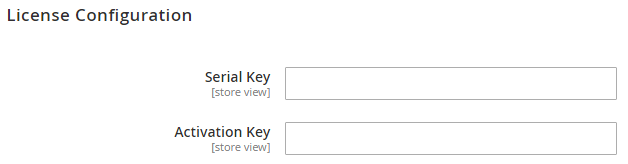
- Serial Key: Enter Serial Key
- Activation Key: Enter Activation Key
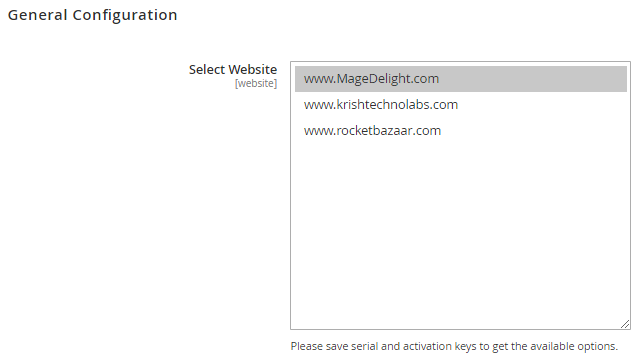
Step 2: Expand “General Configuration” tab, you will find a list of domains for which license is purchased and configured, now select the domain you are going to use, you can select multiple domains by clicking “Ctrl + Select”.
Step 3: Now, select “Yes” from “Enable Module” to enable extension and again click on “Save Config” button on the top right.

Backend Configuration (Admin side)
Google XML Sitemap
General
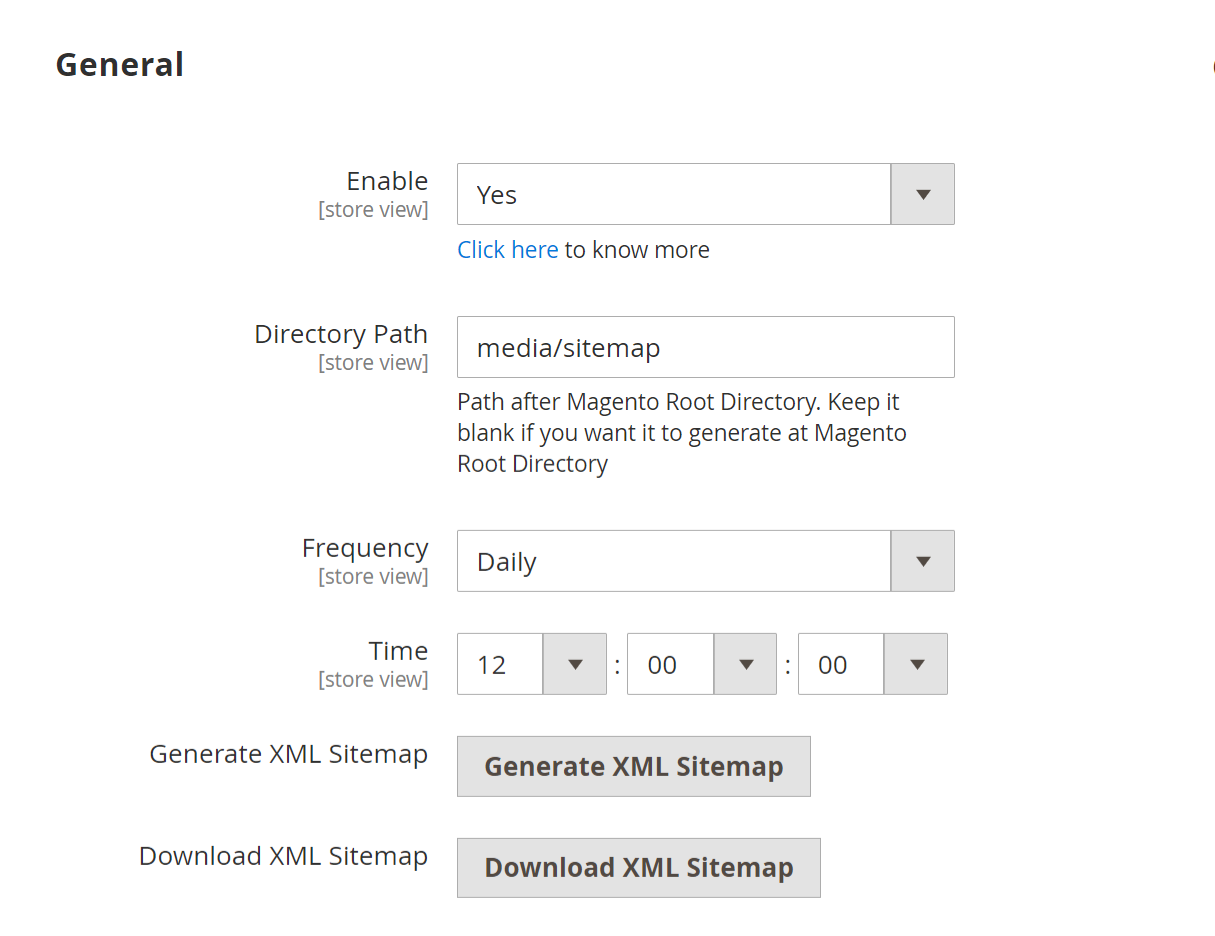
- Enable: Select "Yes" to enable Google XML sitemap generation.
- Directory Path: Provide a directory path to save XML sitemap.
- Frequency: Select frequency to generate XML sitemap. You can select either daily, weekly, or monthly from given options.
- Time: Select time to generate XML sitemap automatically.
- Generate XML Sitemap: Click to generate XML sitemap manually.
- Download XML Sitemap: Click to download XML sitemap manually.
Category
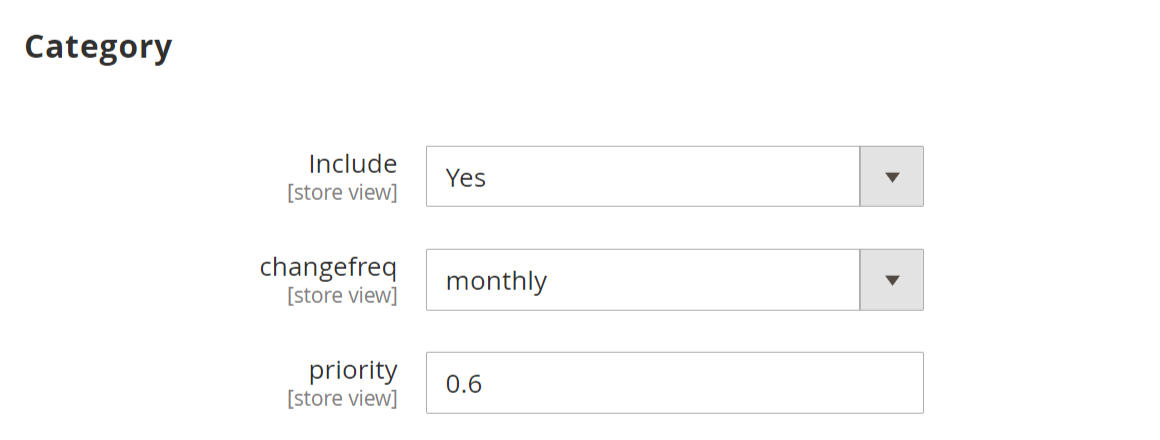
- Include: Select "Yes" to include a category for XML sitemap.
- changefreq: Select frequency to refresh category for sitemap. You can select options from below,
- Always
- Hourly
- Daily
- Weekly
- Monthly
- Yearly
- Never
- System defined
- priority: Provide manual priority for the category for the XML sitemap.
Product
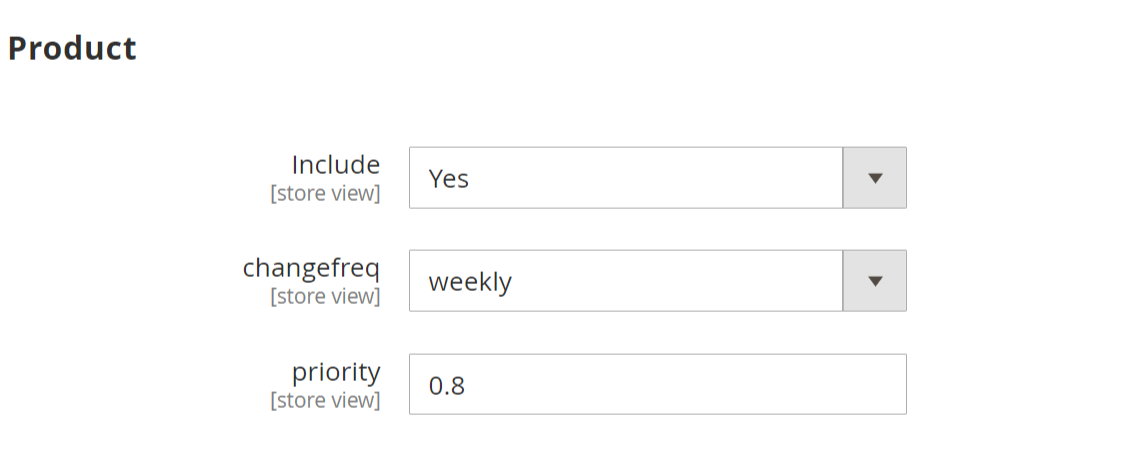
- Include: Select "Yes" to include products for XML sitemap.
- changefreq: Select frequency to refresh products for sitemap.
- priority: Provide manual priority for the product for XML sitemap.
CMS
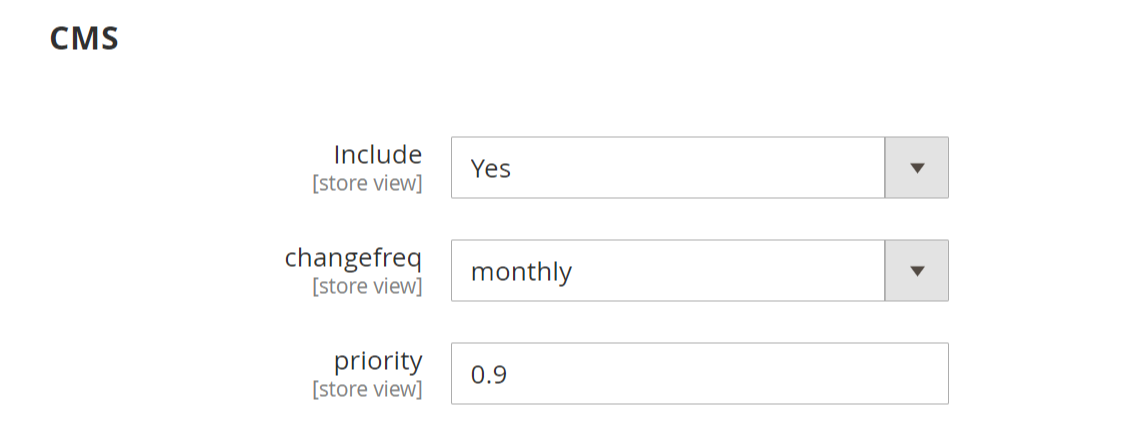
- Include: Select "Yes" to include CMS page for XML sitemap.
- changefreq: Select frequency to refresh CMS pages for sitemap.
- priority: Provide priority for the CMS page for XML sitemap.
Additional Links
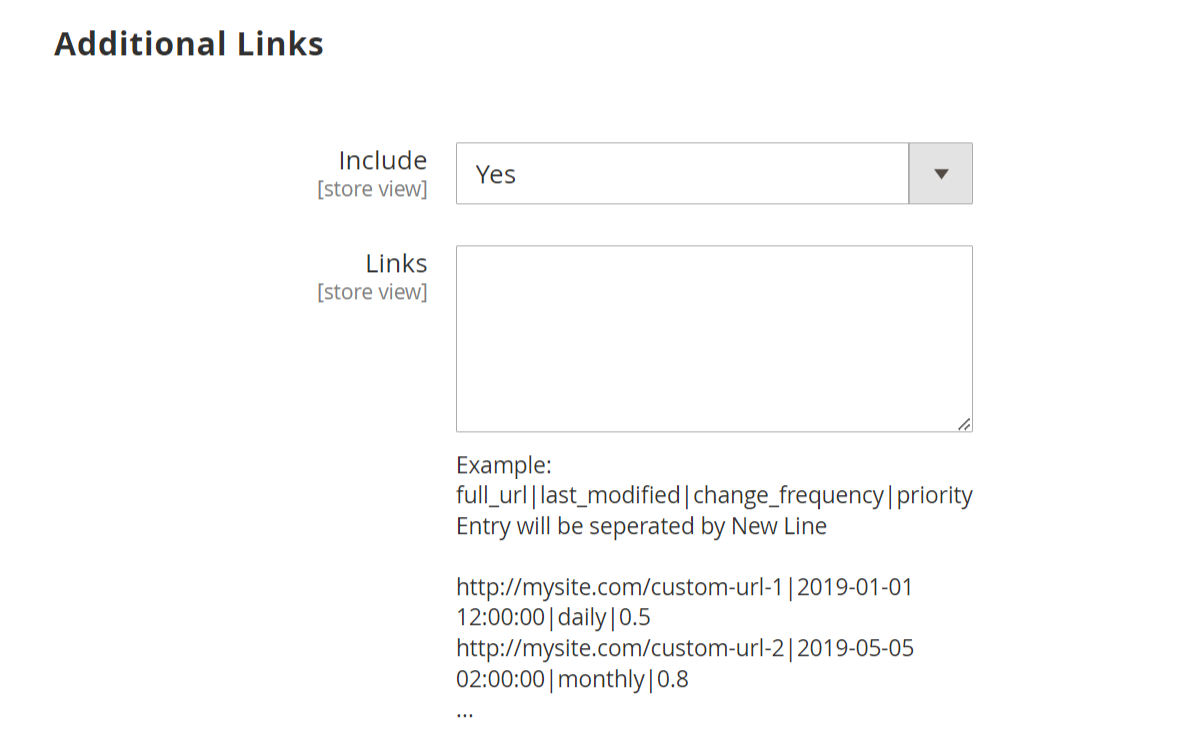
- Include: Select "Yes" to include additional URLs to the XML sitemap.
- Links: Provide links into a specific given format for the XML sitemap
HTML Sitemap
General
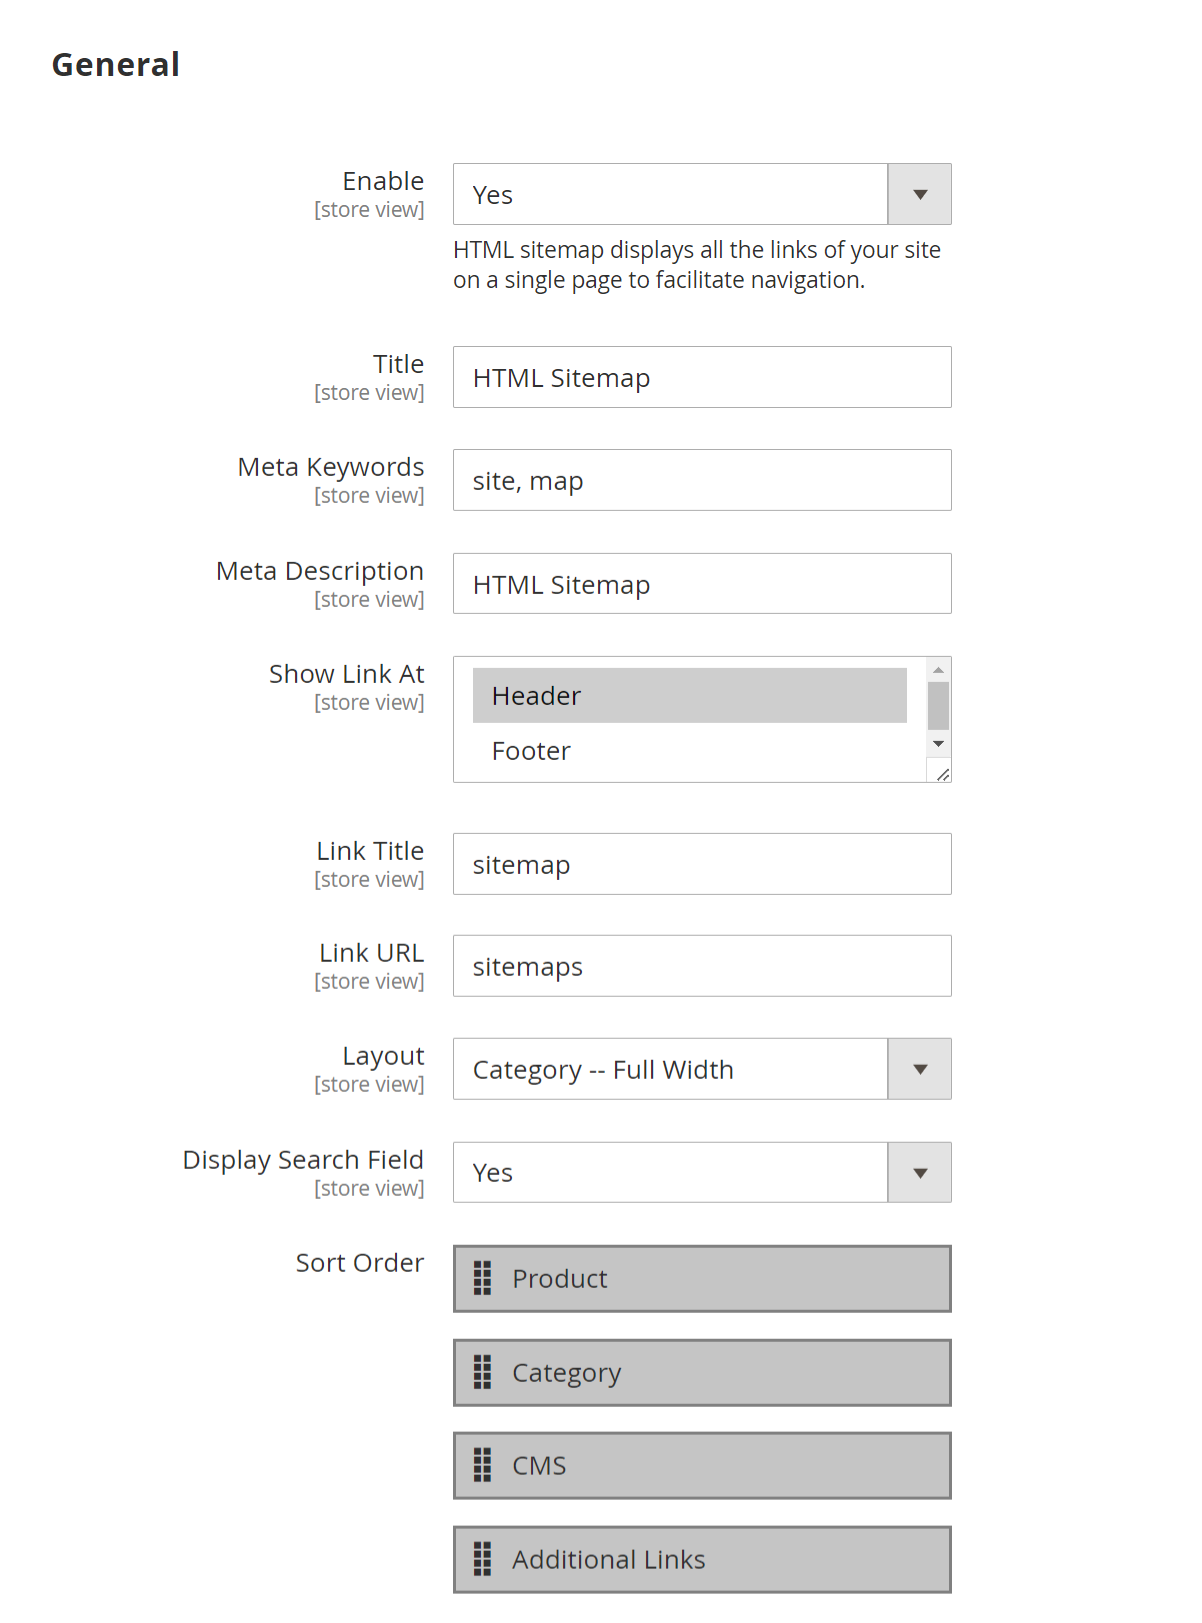
- Enable: Select "Yes" to enable the HTML sitemap.
- Title: Provide a title for an HTML sitemap.
- Meta Keywords: Provide meta keywords for the HTML sitemap.
- Meta Description: Provide meta description for HTML sitemap.
- Show Link At: Select options to display sitemap links of HTML sitemap.
- Link Title: Provide a link title for the HTML sitemap.
- Link URL: Provide the URL for the HTML sitemap.
- Layout: Select the page layout of the HTML sitemap.
- Display Search Field: Select "Yes" to enable search on the sitemap page.
- Sort Order: Select the sorting order of the category, products, CMS pages, and additional links. You can drag and drop the sorting items.
Category
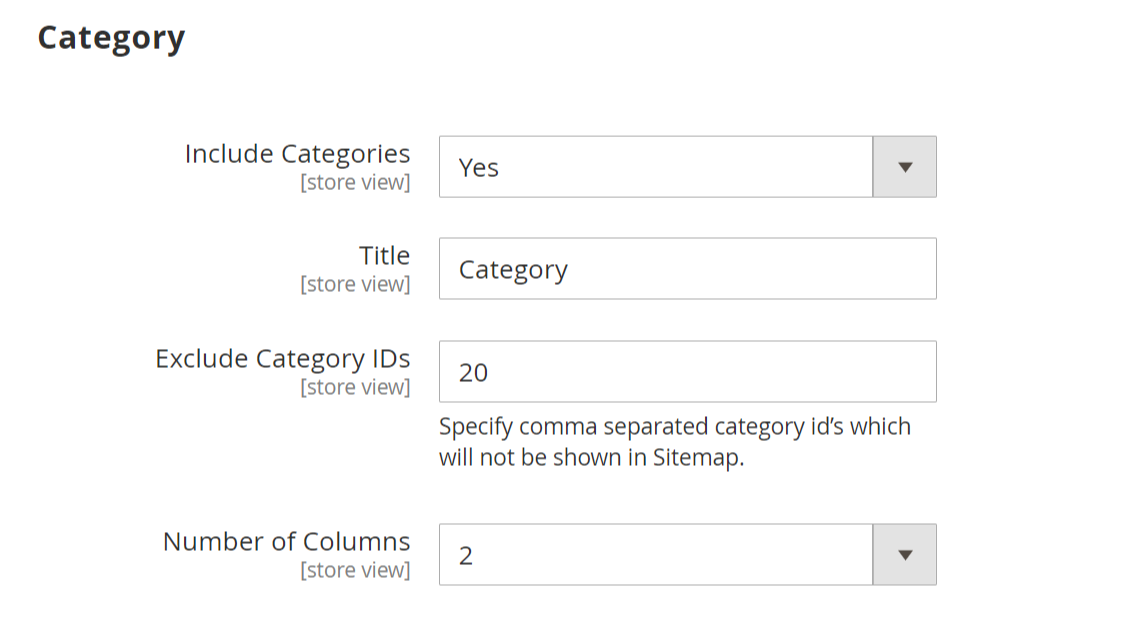
- Include Categories: Select "Yes" to enable the category to be included in the HTML sitemap.
- Title: Provide the title of the category section.
- Exclude Category IDs: Provide comma-separated category IDs to exclude from the list.
- Number of Columns: Select the number of columns for the category section.
Product
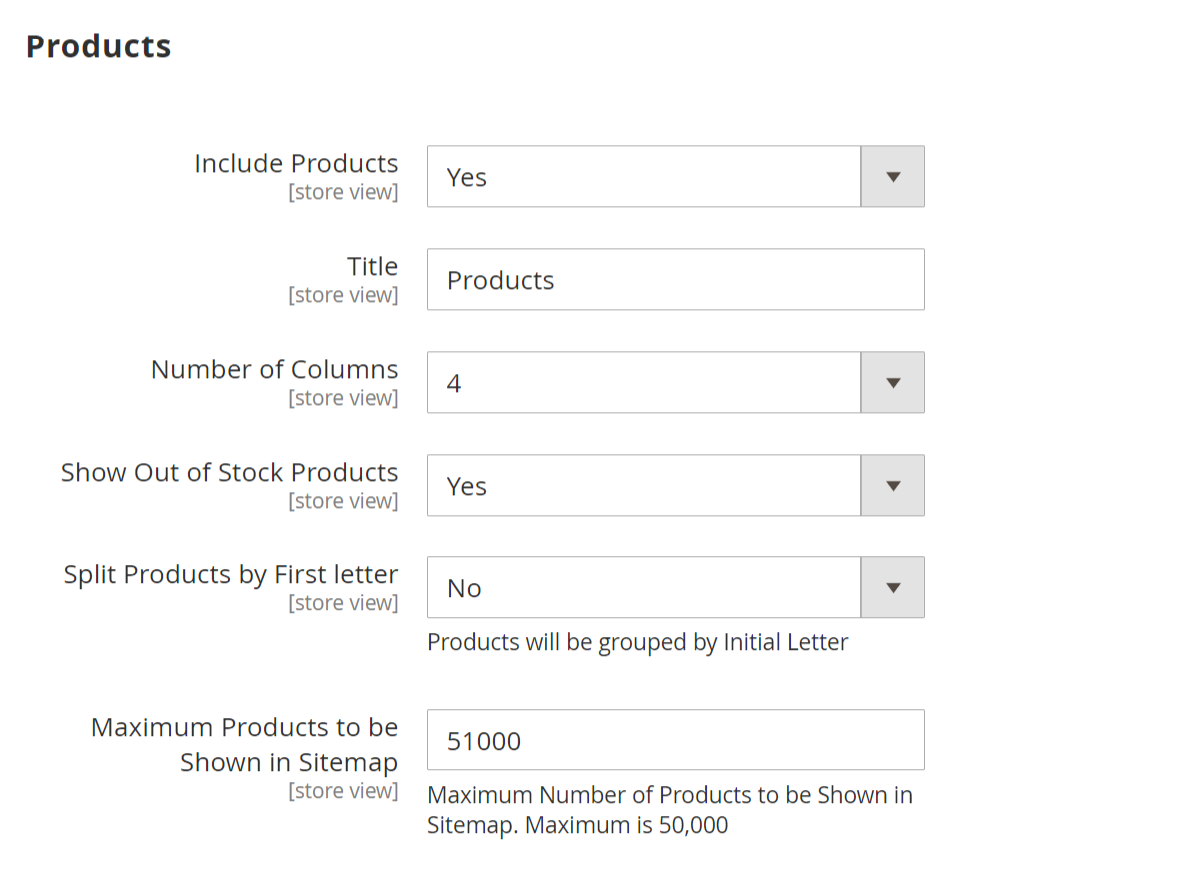
- Include Products: Select "Yes" to enable the product section for the HTML sitemap page.
- Title: Provide the title of the product section.
- Number of Columns: Provide the number of columns for the product section.
- Show Out of Stock Products: Select "Yes" to include our stock products.
- Split Products by First Letter: Select "Yes" to split products by first letter.
- Maximum Products to be Shown in Sitemap: Select the maximum number of products to display on the product section of the sitemap.
CMS
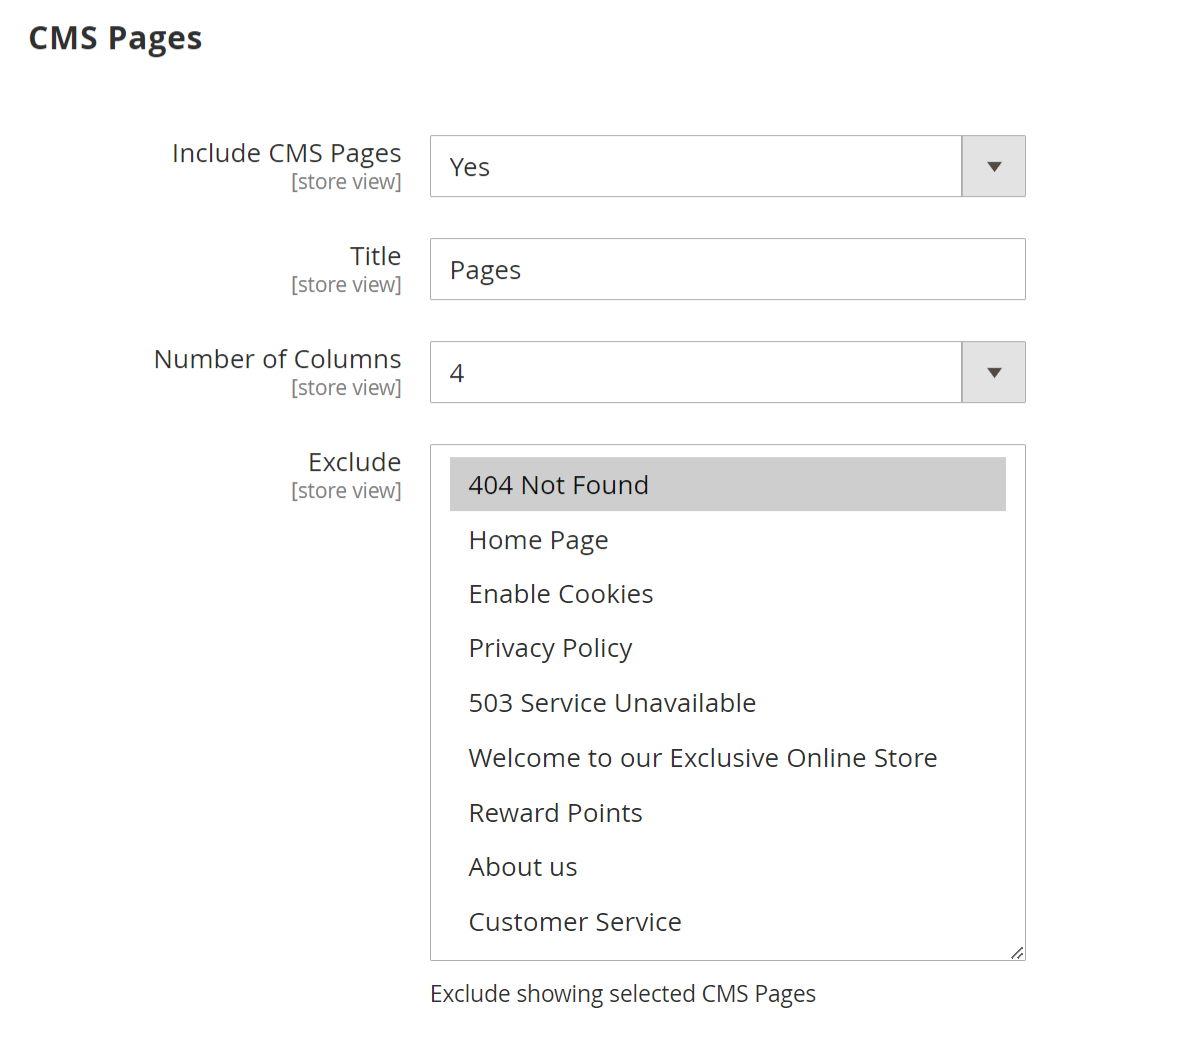
- Include CMS Pages: Select "Yes" to include CMS pages on the HTML sitemap page.
- Title: Provide the title of the CMS page section.
- Number of Columns: Select the number of columns for the CMS page section.
- Exclude: Select the page to exclude from the sitemap page.
Additional Links
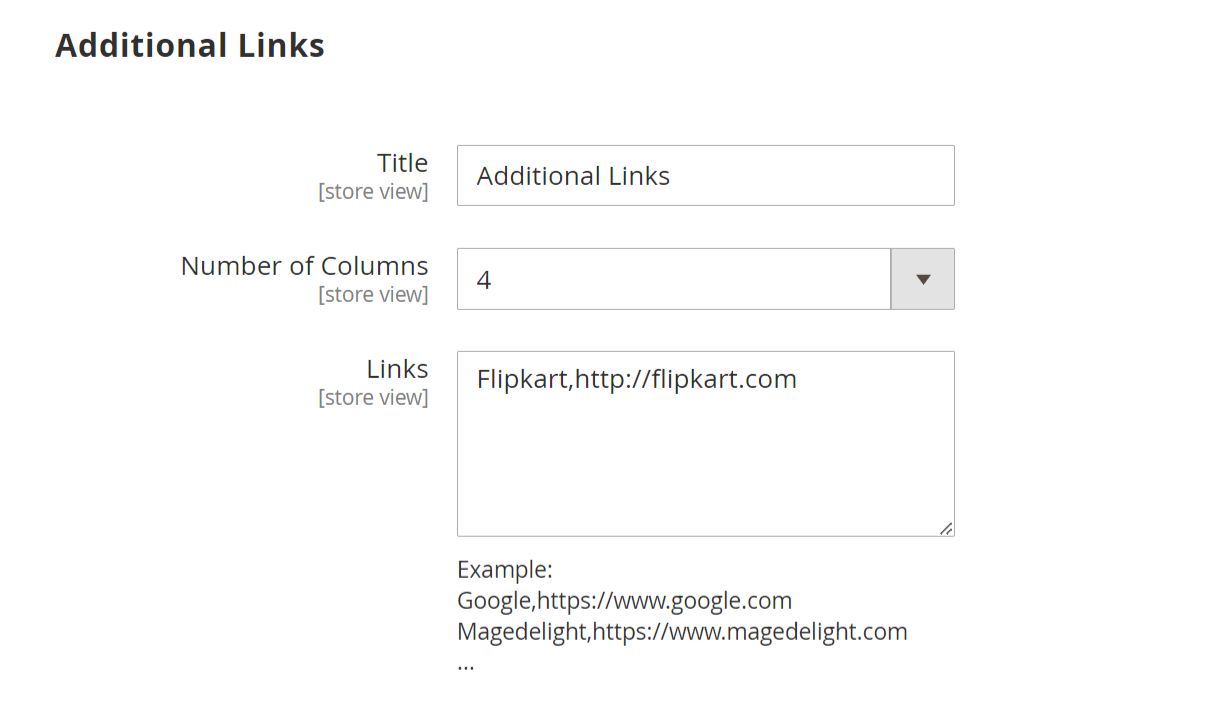
- Title: Provide a title for the additional links section of the sitemap page.
- Number of Columns: Select the number of columns for the sitemap section.
- Links: Provide comma-separated additional links in said format.
Backend Functionality
Frontend Functionality
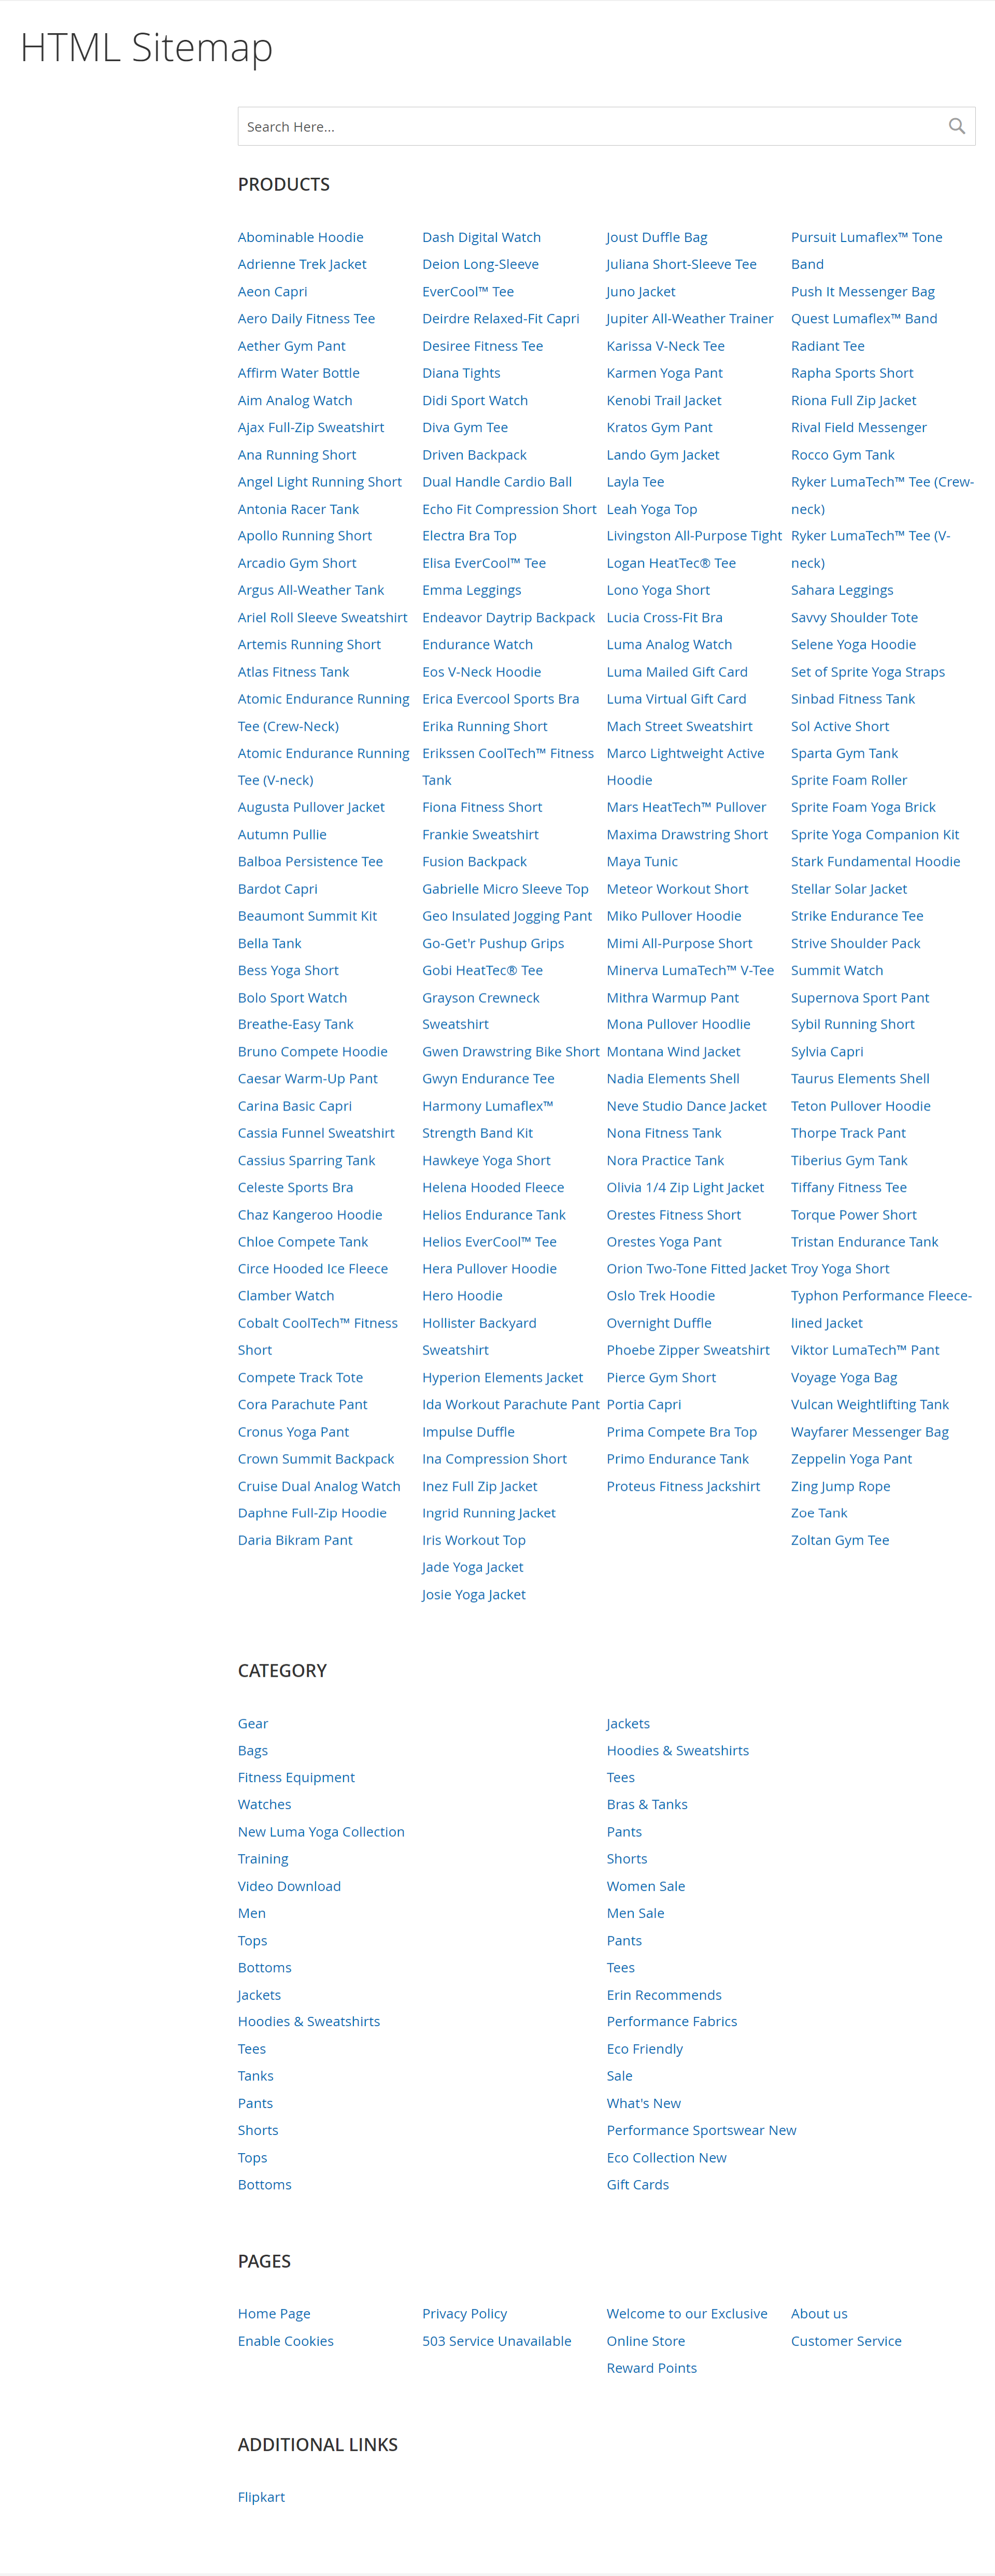
- Display HTML Sitemap Links for Products, Category, Pages, and Additional Links.
Sample Data
Purchase
Click here to purchase from MageDelight.
Click here to purchase from Magento Marketplace. (Composer installation supported)
Thank you for choosing MageDelight!