
Installation
You will require to install MageDelight Base Extension first. If it is not installed then please download it from https://www.magedelight.com/pub/extensions/magedelight-base.zip and unzip the package file into the root folder of your Magento 2 installation.
Before installing the extension, please make sure to Backup your web directory and store database
You will require to install MageDelight Base Extension first. If it is not installed then please download it from https://www.magedelight.com/pub/extensions/magedelight-base.zip and unzip the package file into the root folder of your Magento 2 installation.
Root Directory is - "app/code/magedelight/#YourExtensionName#"
- Unzip the extension package file into the root folder of your Magento 2 installation.
- Connect to SSH console of your server:
- Navigate to the root folder of your Magento 2 setup
Run command as per below sequence,
php bin/magento setup:upgrade
php bin/magento setup:di:compile
php bin/magento setup:static-content:deploy
php bin/magento cache:clean
- log out from the backend and log in again
If you are using Magento 2.3 or later then you do not need to activate license. Extension will be activated with silent activation mechanism and does not require activation keys to be entered manually.
Backend Configuration (Admin side)
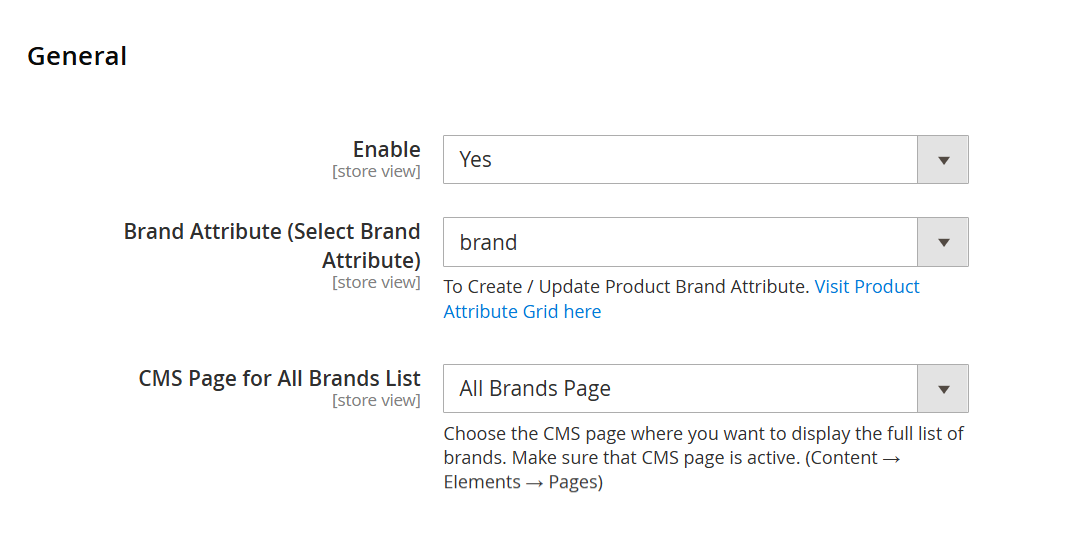
| Field | Description |
|---|---|
| Enable | Enable or disable the Shop by Brand functionality for the selected store view. Set to Yes to activate brand-related features on the storefront. |
| Brand Attribute (Select Brand Attribute) | Select the product attribute that will be used as the Brand. The dropdown lists all available product attributes in the system (for example: custom brand attributes). The selected attribute is used to group products, generate brand pages, and display brand-based navigation on the storefront. |
| CMS Page for All Brands List | Select the CMS page where the All Brands list will be displayed. The dropdown shows all active CMS pages available in the store (such as Home Page, About Us, or a custom All Brands Page). Ensure the selected CMS page is enabled under Content → Elements → Pages and is intended to display the full list of brands. |
If multiple store views are configured and the All Brands CMS Page option is disabled for one store view, it will be automatically disabled for other store views as well. In such cases, the administrator must manually navigate to each individual store view and reselect the appropriate CMS page for the All Brands listing from the available options.
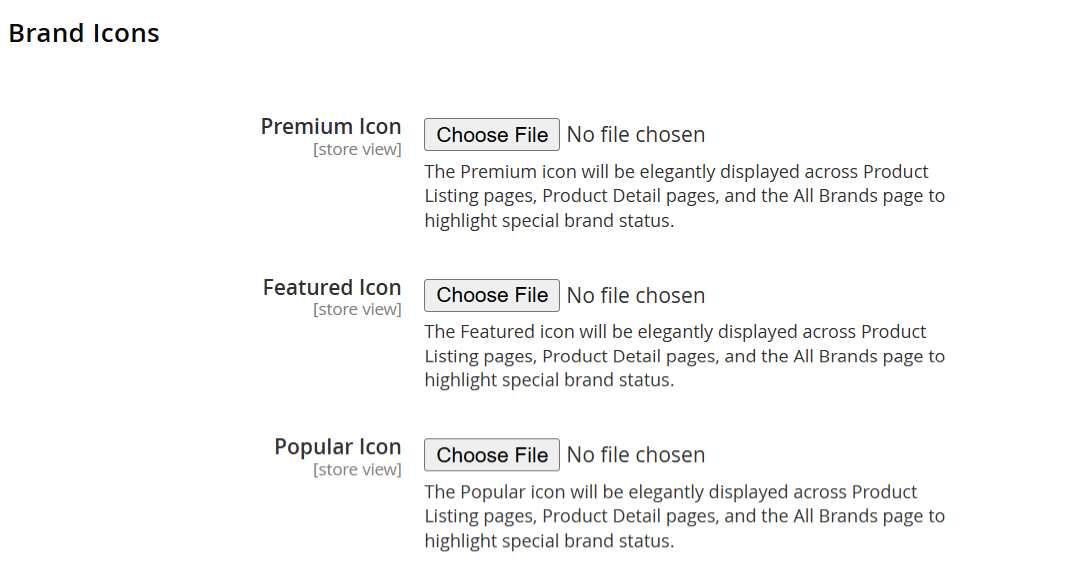
| Field | Description |
|---|---|
| Premium Icon | Allows the admin to upload a Premium badge icon for a brand at the store-view level. This icon is displayed on Product Listing Pages, Product Detail Pages, and the All Brands page to highlight premium brand status. |
| Featured Icon | Enables the admin to upload a Featured badge icon for a brand at the store-view level. The icon appears across Product Listing Pages, Product Detail Pages, and the All Brands page to visually emphasize featured brands. |
| Popular Icon | Allows the admin to upload a Popular badge icon for a brand at the store-view level. This icon is shown on Product Listing Pages, Product Detail Pages, and the All Brands page to indicate popular or high-demand brands. |
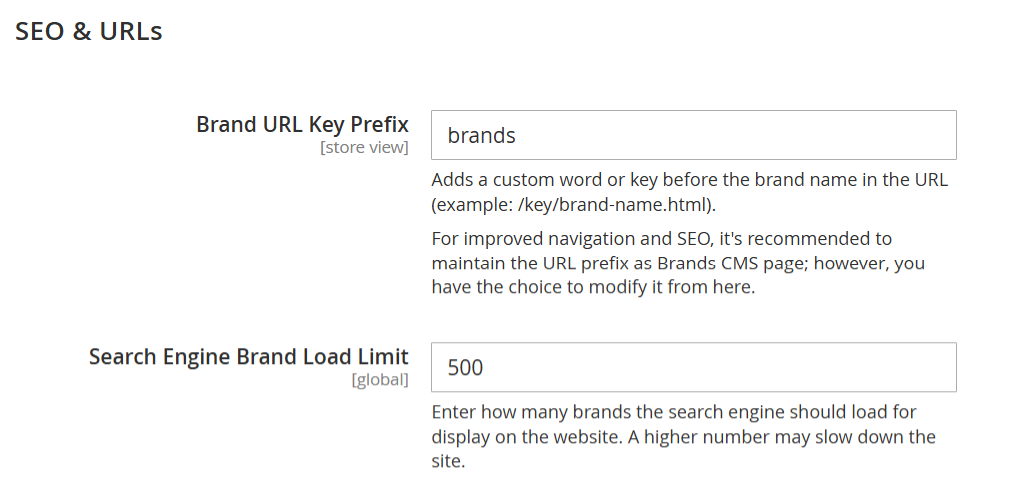
| Field | Description |
|---|---|
| Brand URL Key Prefix | Specify a custom URL prefix that will appear before the brand name in brand page URLs. For example: and SEO. It is recommended to keep this value aligned with the Brands CMS page URL, though it can be customized as required. updated by the extension. This is a built-in feature to ensure correct and consistent brand URLs. The prefix is fully customizable, allowing the administrator to modify it manually if required. |
| Search Engine Brand Load Limit | Define the maximum number of brands that the search engine should load for display on the storefront. A higher value allows more brands to be loaded but may impact website performance. Adjust this value based on catalog size and performance requirements. |
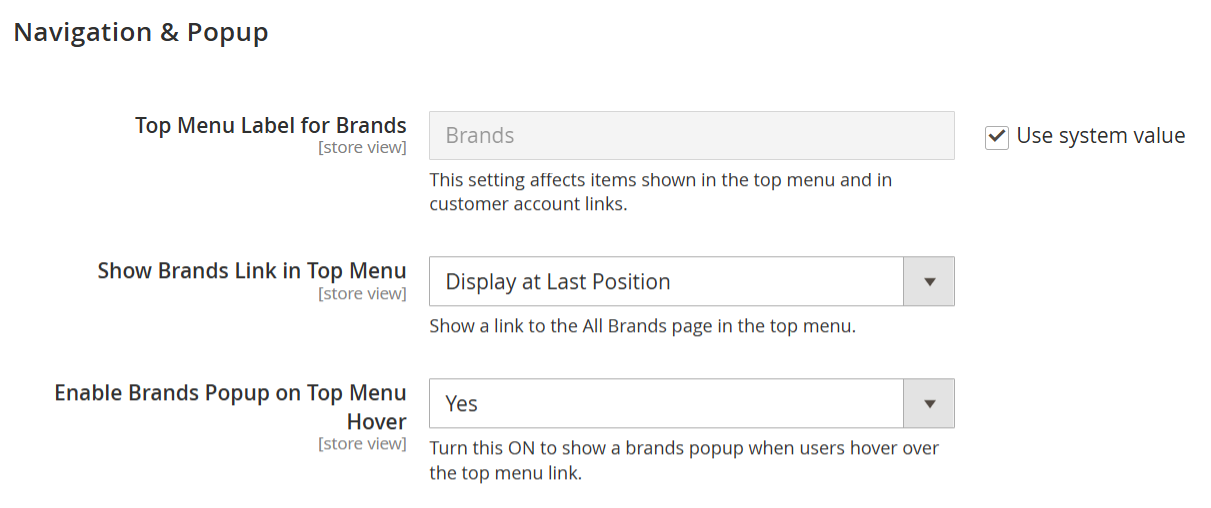
| Field | Description |
|---|---|
| Top Menu Label for Brands | Specify the label text for the Brands link displayed in the top navigation menu and in customer account links. You may use the system default value or enter a custom label based on your storefront requirements. |
| Show Brands Link in Top Menu | Control whether the Brands link is displayed in the top navigation menu. Available options include No, Display at First Position, and Display at Last Position. Selecting a display position determines where the Brands link appears in the menu order. |
| Enable Brands Popup on Top Menu Hover | Enable this option to display a Brands popup when customers hover over the Brands link in the top navigation menu. The popup provides quick access to the brand list and improves navigation usability. |
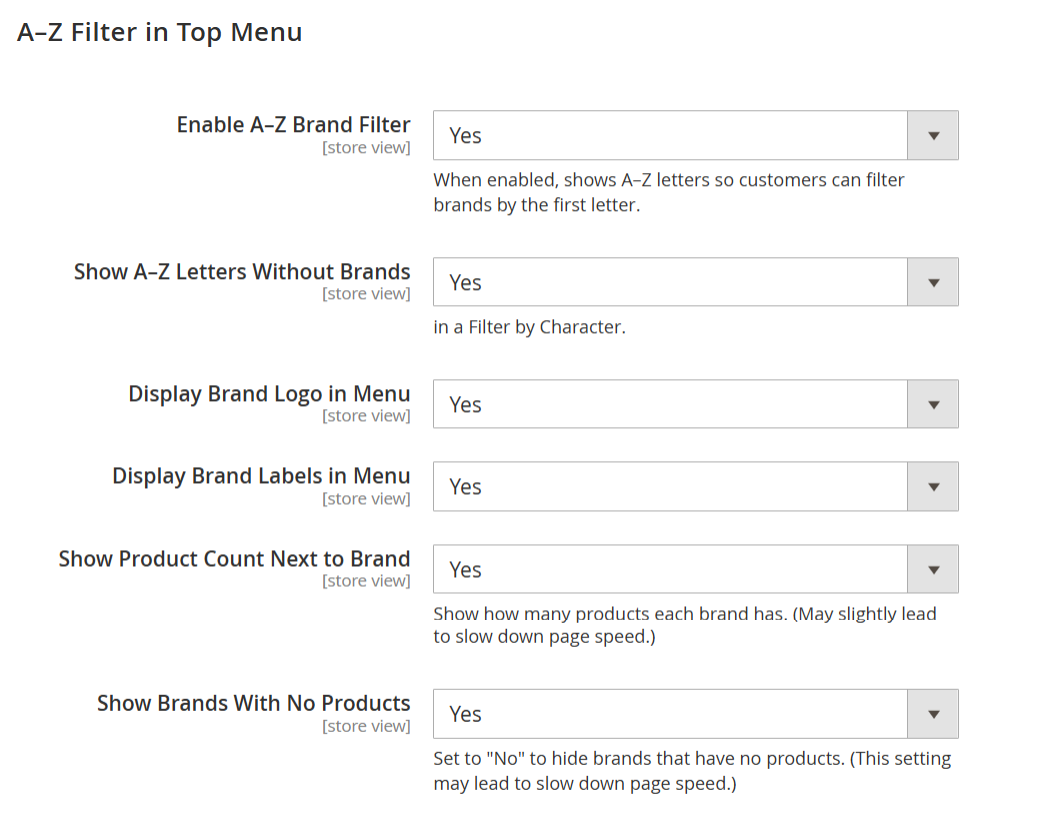
| Field | Description |
|---|---|
| Enable A–Z Brand Filter | Enable this option to display A–Z letters in the Brands menu, allowing customers to filter brands by their starting letter. |
| Show A–Z Letters Without Brands | When enabled, all alphabet letters (A–Z) are displayed even if no brands are associated with certain letters. Disable this option to show only letters that have at least one brand assigned. |
| Display Brand Logo in Menu | Enable this option to display brand logos within the Brands menu for improved visual recognition and navigation. |
| Display Brand Labels in Menu | Enable this option to display brand names (text labels) alongside or instead of brand logos in the Brands menu. |
| Show Product Count Next to Brand | Enable this option to display the number of products associated with each brand in the menu. Note that enabling this option may slightly impact page performance on large catalogs. |
| Show Brands With No Products | Enable this option to display brands that currently have no products assigned. Set to No to hide such brands. Please note that this setting may slightly affect page performance. |
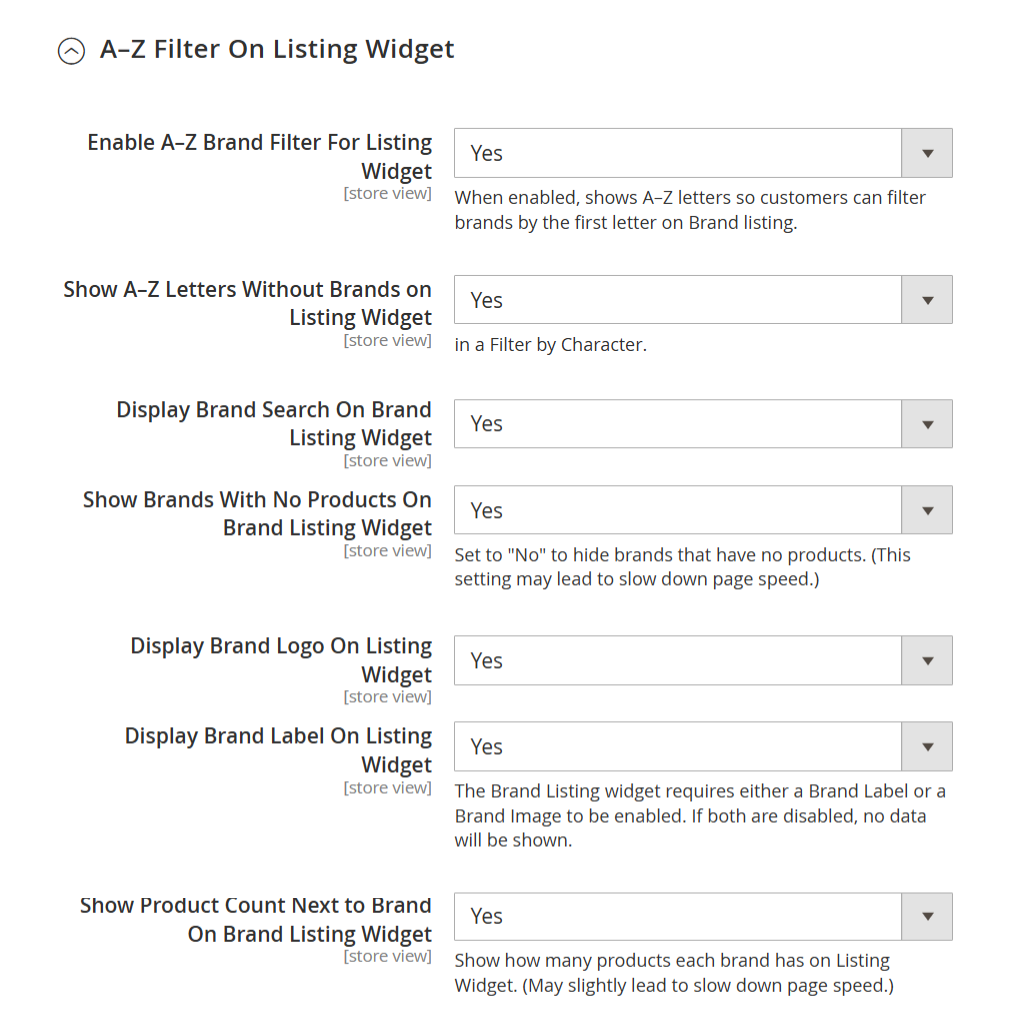
| Field | Description |
|---|---|
| Enable A–Z Brand Filter for Listing Widget | Enable this option to display A–Z letters on the Brand Listing widget, allowing customers to filter brands by the first letter on brand listing pages. |
| Show A–Z Letters Without Brands on Listing Widget | When enabled, all alphabet letters (A–Z) are displayed even if no brands are associated with certain letters. Disable this option to show only letters that have brands assigned. |
| Display Brand Search on Brand Listing Widget | Enable this option to display a search box on the Brand Listing widget, allowing customers to quickly search for brands by name. |
| Show Brands With No Products on Brand Listing Widget | Enable this option to display brands that currently have no products assigned on the Brand Listing widget. Set to No to hide such brands. Note that this setting may slightly impact page performance. |
| Display Brand Logo on Listing Widget | Enable this option to display brand logos within the Brand Listing widget for improved visual recognition. |
| Display Brand Label on Listing Widget | Enable this option to display brand names (labels) in the Brand Listing widget. At least one of Brand Label or Brand Logo must be enabled; otherwise, the widget will not display any data. |
| Show Product Count Next to Brand on Brand Listing Widget | Enable this option to display the number of products associated with each brand in the Brand Listing widget. Enabling this option may slightly affect page performance on large catalogs. |
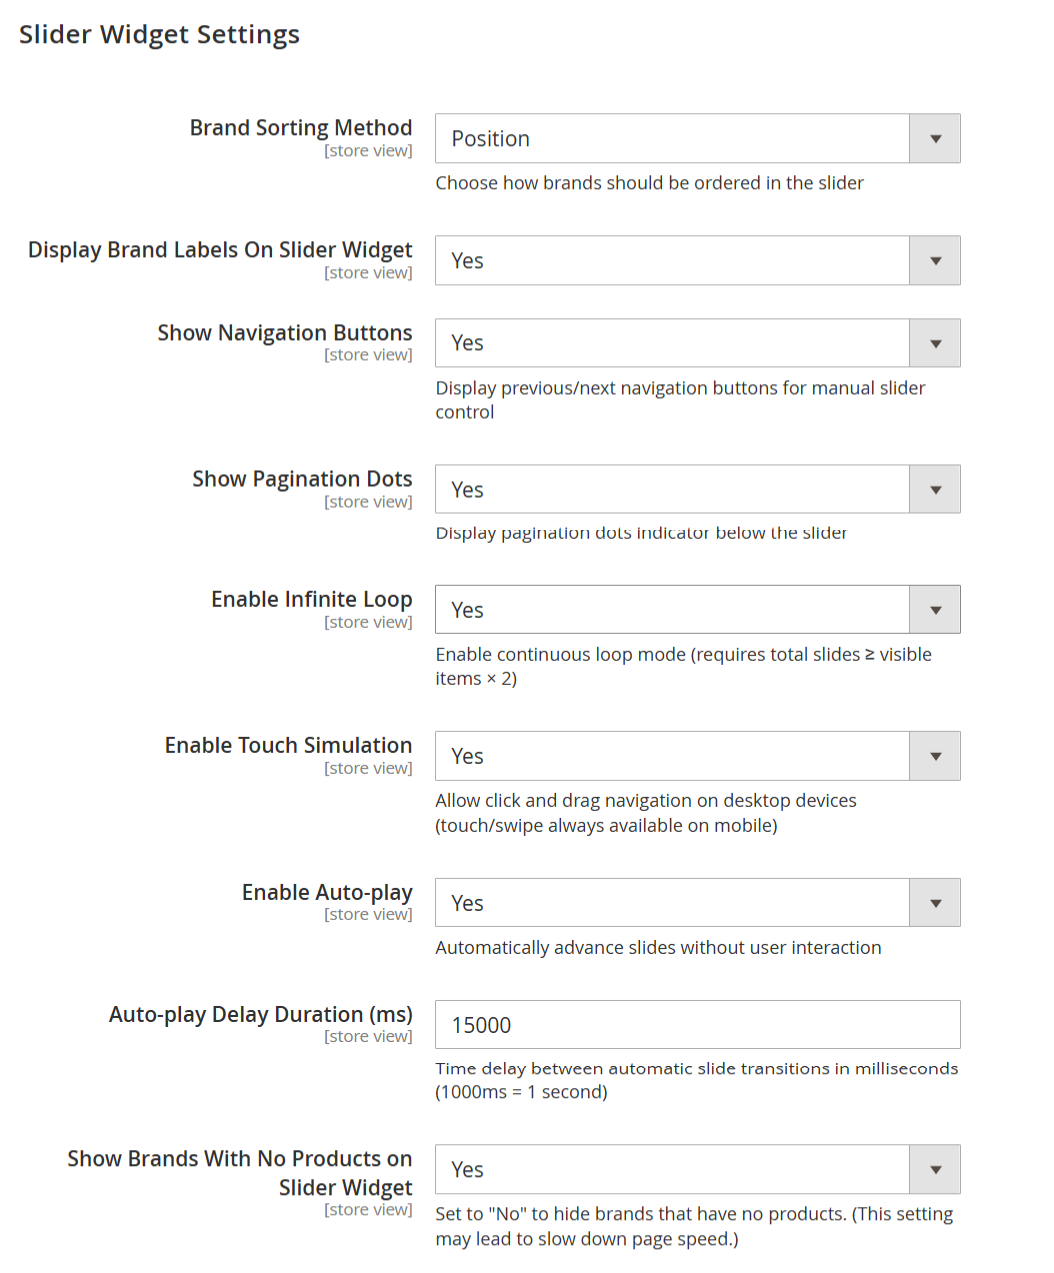
| Field | Description |
|---|---|
| Brand Sorting Method | Select how brands should be ordered in the slider. Available options determine the sequence in which brand items appear (for example, by position or name). |
| Display Brand Labels on Slider Widget | Enable this option to display brand names (labels) along with brand logos in the slider widget. |
| Show Navigation Buttons | Enable this option to display previous/next navigation buttons, allowing customers to manually control slider movement. |
| Show Pagination Dots | Enable this option to display pagination dots below the slider, indicating the total number of slides and the currently active slide. |
| Enable Infinite Loop | Enable continuous slider looping so that the slider restarts automatically after the last slide. This requires the total number of slides to be at least twice the number of visible items. |
| Enable Touch Simulation | Enable click-and-drag navigation on desktop devices. Touch and swipe gestures are always available on mobile devices. |
| Enable Auto-play | Enable automatic slide transitions without user interaction. Slides will advance automatically based on the configured delay duration. |
| Auto-play Delay Duration (ms) | Specify the time interval (in milliseconds) between automatic slide transitions. For reference, 1000 ms = 1 second. |
| Show Brands With No Products on Slider Widget | Enable this option to display brands that currently have no products assigned in the slider. Set to No to hide such brands. Note that enabling this option may slightly impact page performance. |
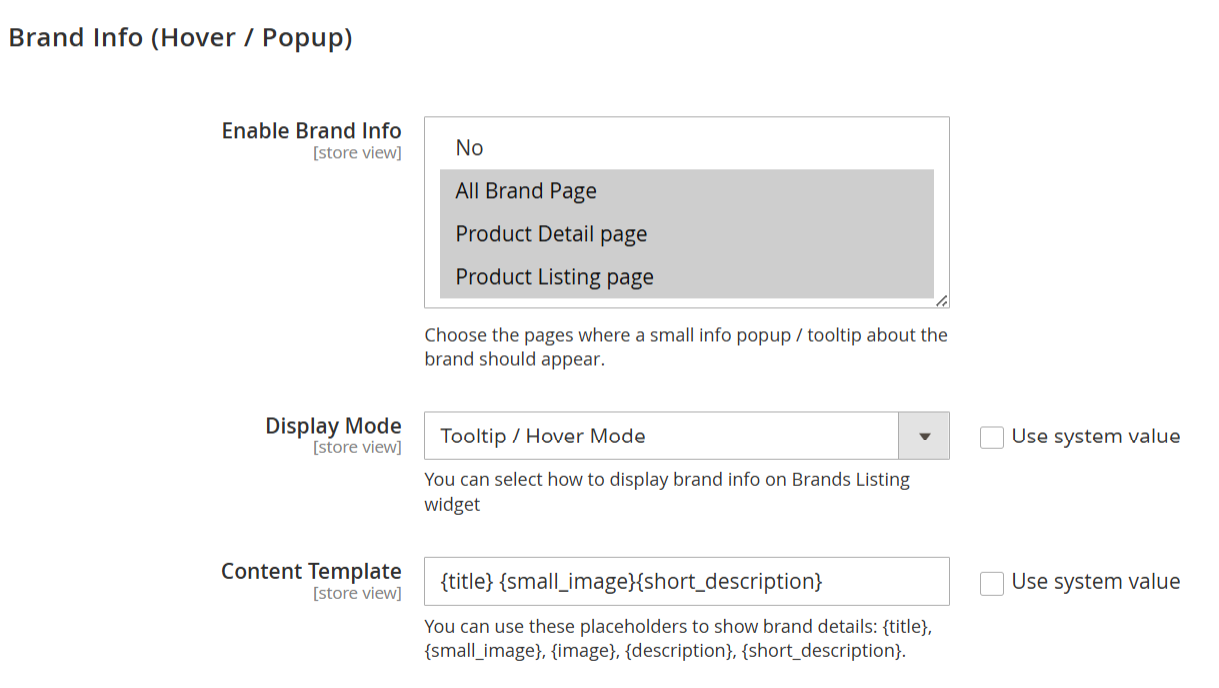
| Field | Description |
|---|---|
| Enable Brand Info | Enable this option to display a brand information popup or tooltip on selected pages. You can choose where the brand info should appear, such as the All Brands Page, Product Detail Page, and Product Listing Page. |
| Display Mode | Select how the brand information should be displayed on the storefront. Available options include Tooltip / Hover Mode or other supported display modes. This setting controls the user interaction behavior for viewing brand details. |
| Content Template | Define the content layout for the brand info popup using supported placeholders. You can use variables such as to dynamically display brand information in the popup. |
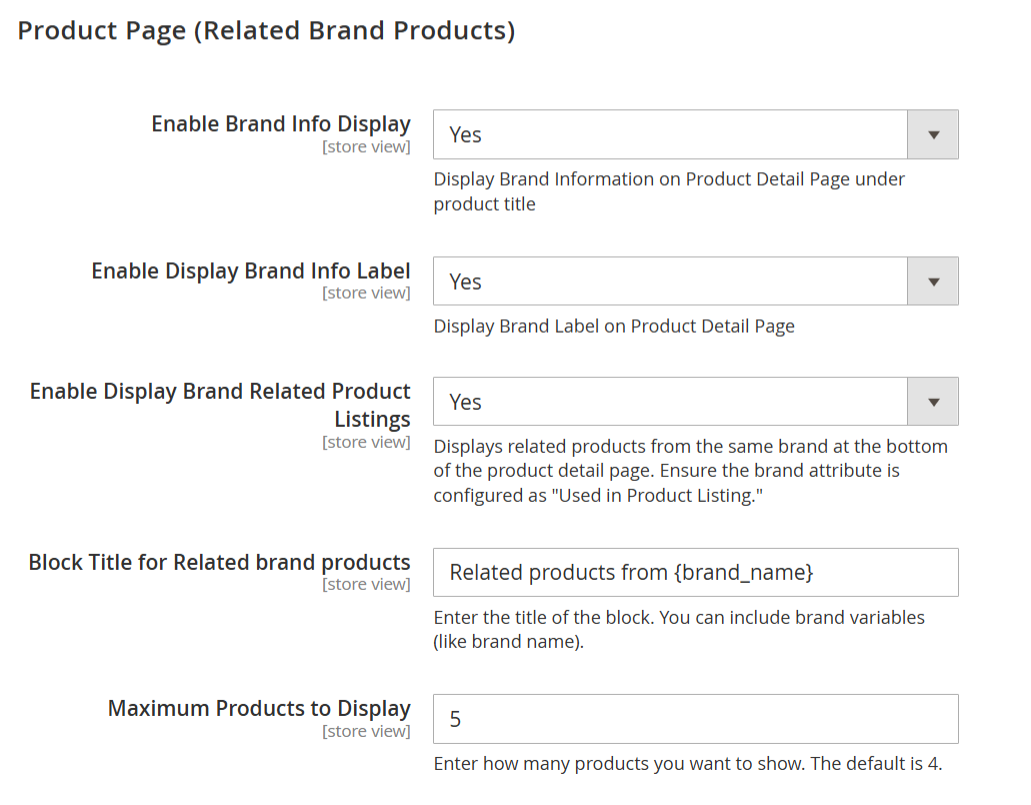
| Field | Description |
|---|---|
| Enable Brand Info Display | Enable this option to display brand information on the Product Detail page, positioned under the product title. |
| Enable Display Brand Info Label | Enable this option to display the brand label (brand name) on the Product Detail page. |
| Enable Display Brand Related Product Listings | Enable this option to display related products from the same brand at the bottom of the Product Detail page. Ensure that the selected Brand attribute is configured as Used in Product Listing for proper functionality. |
| Block Title for Related Brand Products | Specify the title for the related brand products block. You may include brand variables such as the brand name (for example, brand in the block title. |
| Maximum Products to Display | Define the maximum number of related brand products to display in the block. The default value is 4. |
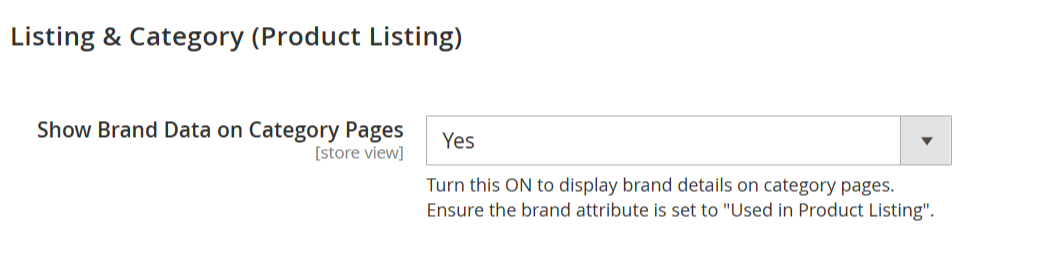
| Field | Description |
|---|---|
| Show Brand Data on Category Pages | Enable this option to display brand information on category (product listing) pages. Ensure that the selected Brand attribute is configured as Used in Product Listing for the brand data to appear correctly. |
Backend Functionality
Attribute Properties (Brand Attribute)
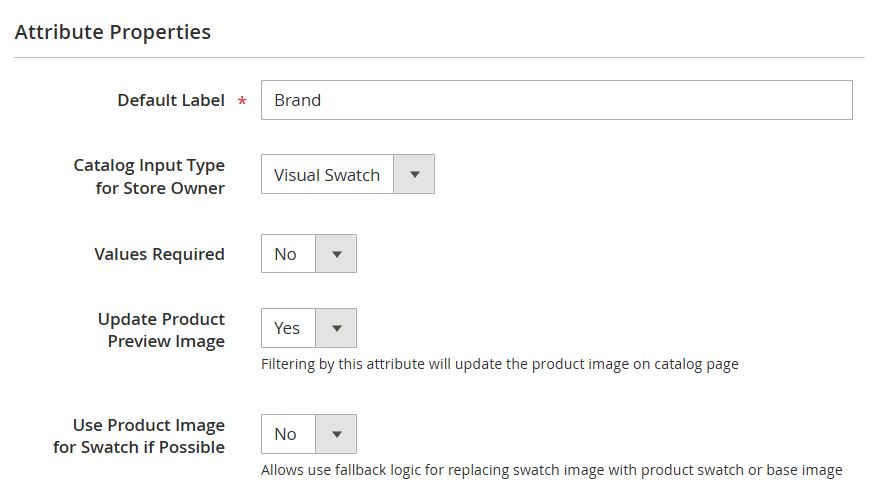
- To add new brands and Brand attribute settings, navigate to: Stores → Products → Attributes → Product → Brand
| Field | Description |
|---|---|
| Default Label | Specify the default label for the Brand attribute as it appears in the Admin and storefront. This value is required and typically set to Brand. |
| Catalog Input Type for Store Owner | Select how the Brand attribute should be displayed and managed in the Admin. Available options include Dropdown, Visual Swatch, and Text Swatch. The selected input type determines how brands are assigned to products and displayed on the storefront. |
| Values Required | Set to Yes to make the Brand attribute mandatory when creating or editing products. Set to No to allow products without an assigned brand. |
| Update Product Preview Image | Enable this option to update the product image dynamically on category (catalog) pages when filtering by the Brand attribute. This improves visual feedback during layered navigation. |
| Use Product Image for Swatch if Possible | Enable this option to use the product image as a fallback for the brand swatch when a specific swatch image is not available. This ensures consistent visual representation. |
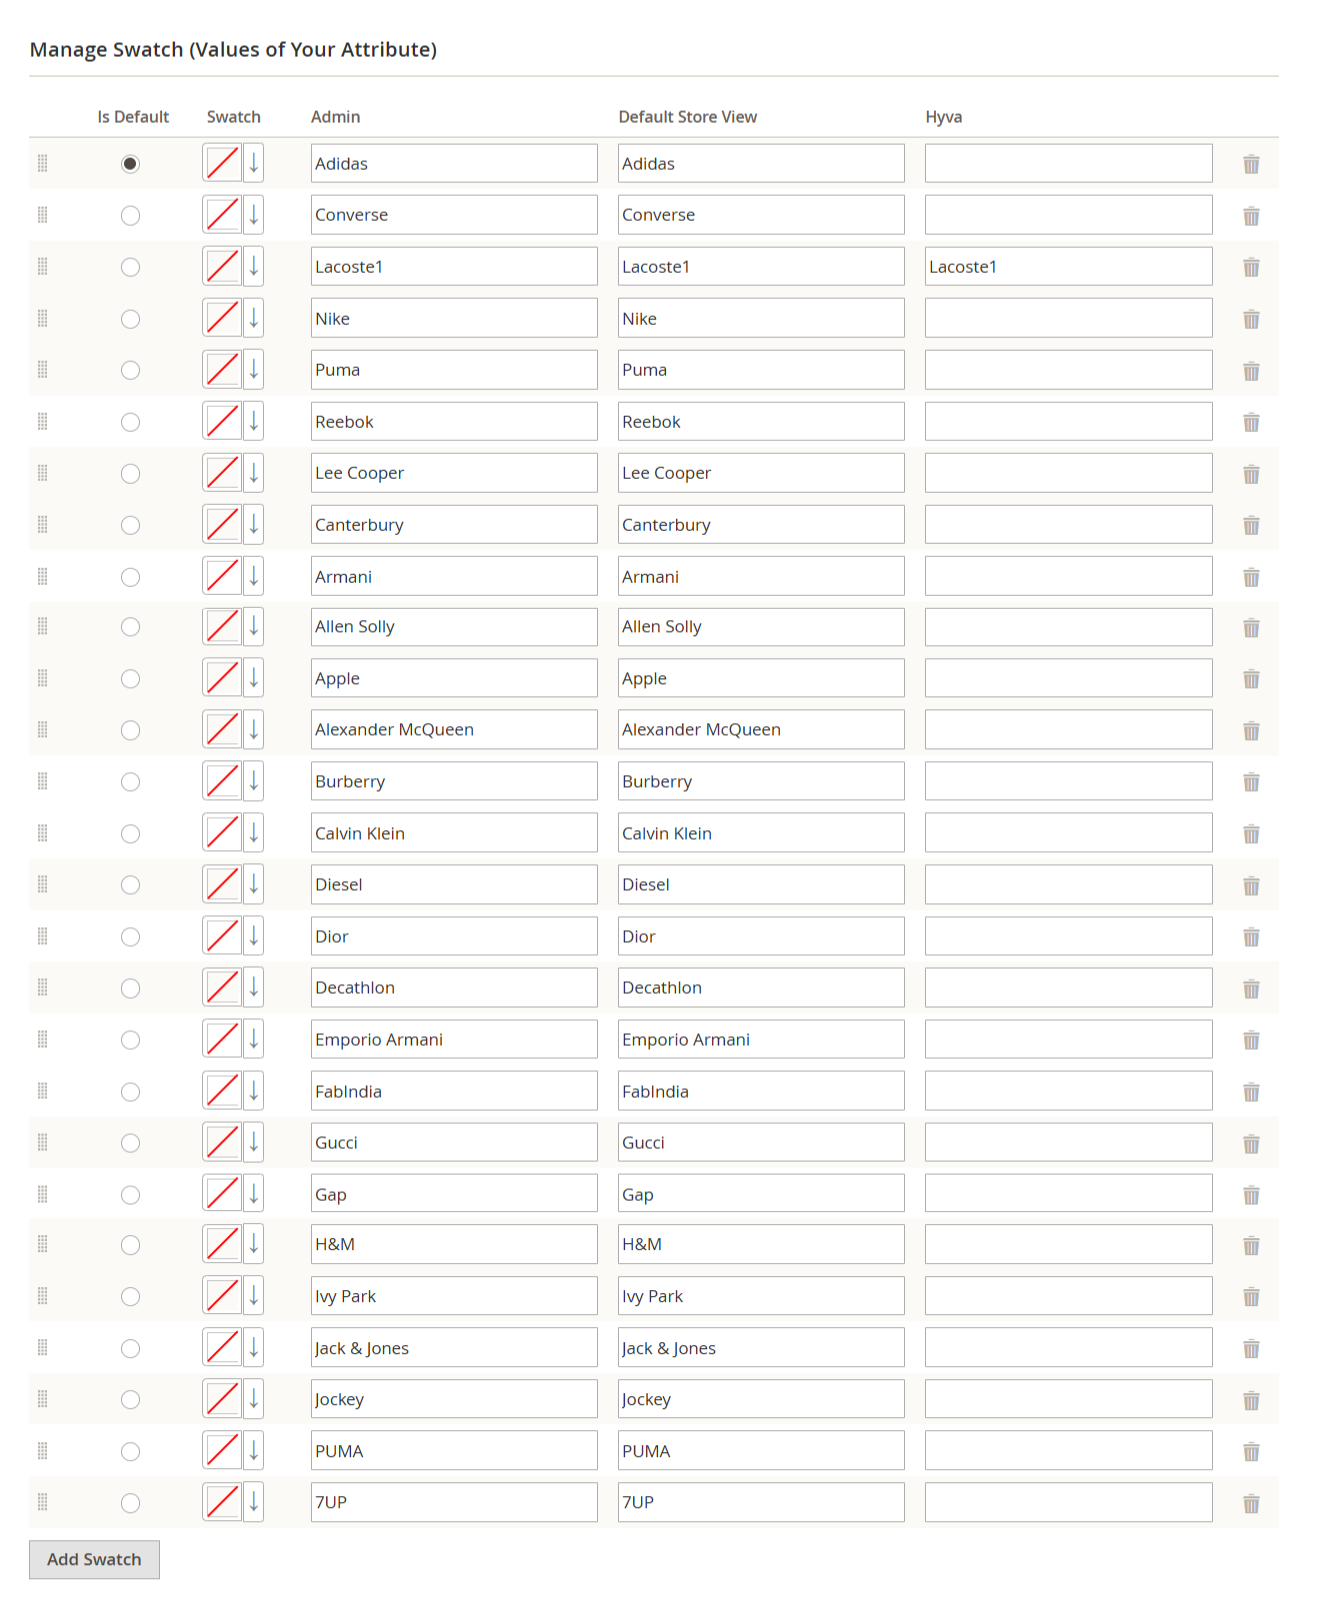
- This section allows you to add and delete brand values for the Brand attribute. Each value represents a brand that can be assigned to products and displayed across the storefront.
| Column / Field | Description |
|---|---|
| Is Default | Select this option to set a brand as the default value for the Brand attribute. Only one brand can be marked as default at a time. |
| Swatch | Upload or assign a visual swatch (image or color) for the brand. This swatch is used when the Brand attribute input type is set to Visual Swatch and is displayed on the storefront where applicable. |
| Admin | Enter the brand name as it appears in the Admin panel. This value is used internally for product management and attribute assignment. |
| Default Store View | Specify the brand label as it appears on the storefront for the default store view. This value is customer-facing. |
| Hyvä | Enter the brand label specifically for the Hyvä theme store view, if applicable. Leave empty to use the Default Store View value. |
| Delete (Trash Icon) | Remove the brand value from the attribute. Deleting a brand will also remove its association from any products using this value. |
| Add Swatch | Click this button to add a new brand value to the attribute. You can then configure its swatch, labels, and store-view–specific values. |
Brand values can be reordered using drag-and-drop to control display order in listings and sliders (when sorting by position).
For Visual Swatch input types, it is recommended to upload high-quality, optimized images.
If a store-view–specific label is left empty, Magento will fall back to the Default Store View value.
- Administrators can add or delete brand values. Editing an existing brand name from this section is not supported.
Brand Management
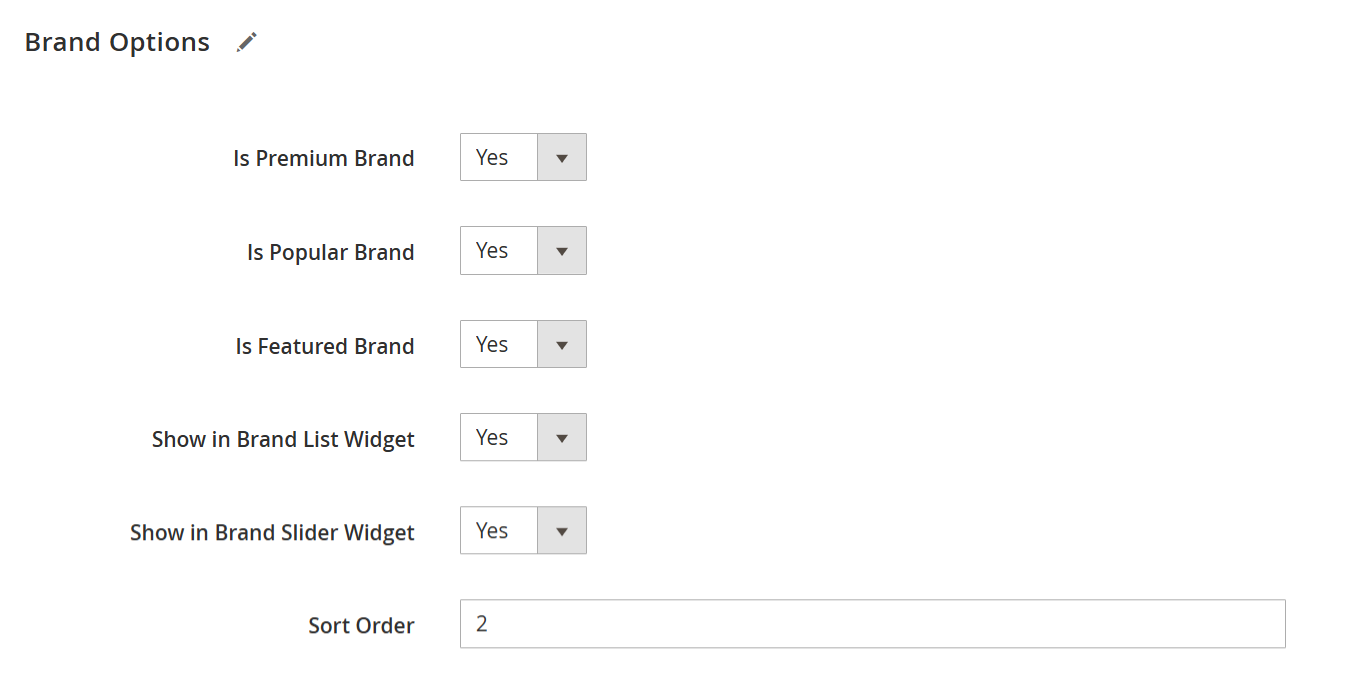
- This section allows you to control how an individual brand is classified and displayed across brand widgets and sliders on the storefront.
- Path: MageDelight → Shop By Brand → Brand Management → Manage Brand Attribute Options
| Field | Description |
|---|---|
| Is Premium Brand | Set to Yes to mark the brand as a Premium brand. Premium brands can be visually highlighted on the storefront using the configured Premium icon. |
| Is Popular Brand | Set to Yes to mark the brand as a Popular brand. Popular brands can be highlighted using the Popular icon where enabled. |
| Is Featured Brand | Set to Yes to mark the brand as Featured. |
| Show in Brand List Widget | Enable this option to display the brand in the Brand List widget on the storefront. |
| Show in Brand Slider Widget | Enable this option to display the brand in the Brand Slider widget. Only brands with this option enabled will appear in sliders. |
| Sort Order | Specify the display position of the brand in widgets and sliders. Lower numbers appear first. This value is used when sorting is set to Position. |
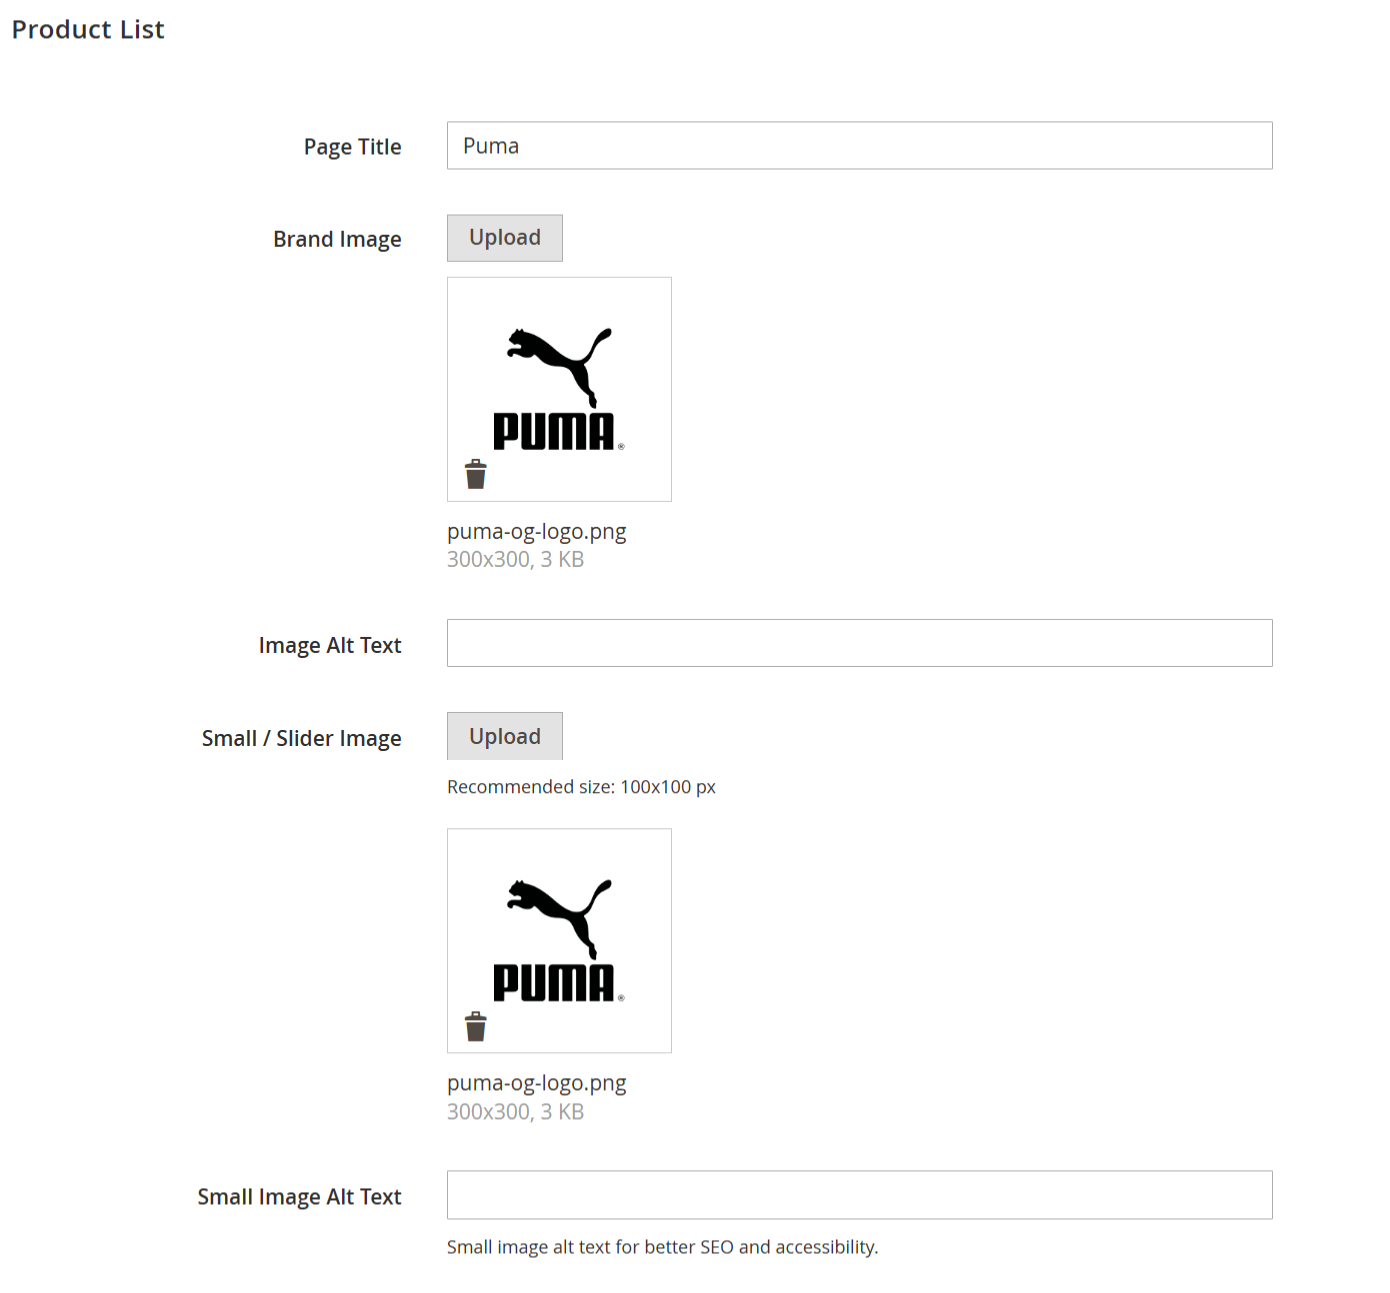
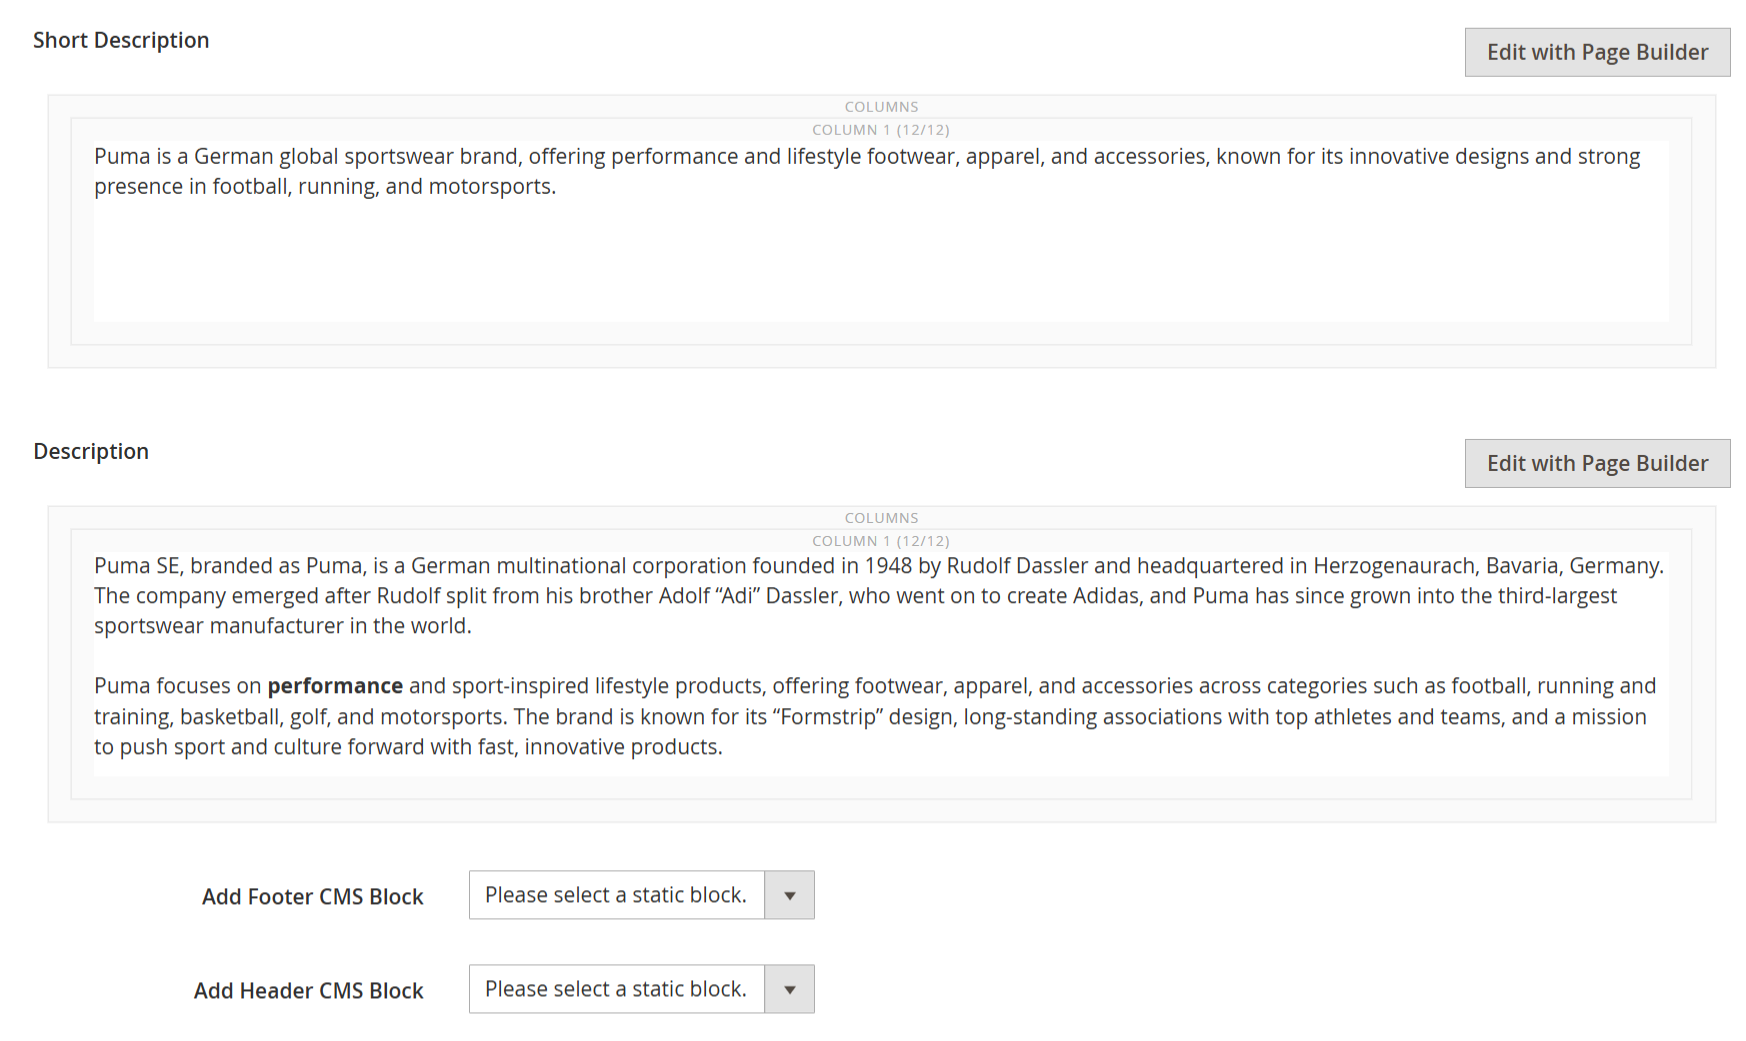
- This section allows you to manage the visual content, branding, and descriptive information displayed on an individual Brand landing page.
| Field | Description |
|---|---|
| Page Title | Enter the title of the Brand page. This title is displayed on the storefront and is also used as the main heading for the brand product listing page. |
| Brand Image | Upload the main brand image or logo to be displayed on the Brand page. This image is typically shown at the top of the brand listing and helps visually identify the brand. |
| Image Alt Text | Specify alternative text for the Brand Image. This improves SEO and accessibility for screen readers and search engines. |
| Small / Slider Image | Upload a small brand image used in sliders, widgets, and compact brand listings. The recommended image size is 100 × 100 px for optimal display and performance. |
| Small Image Alt Text | Enter alternative text for the Small / Slider Image. This improves accessibility and helps search engines understand the image context. |
| Short Description | Enter a brief description of the brand. This content is typically displayed near the top of the Brand page and provides a quick overview of the brand for customers. Page Builder can be used to format content. |
| Description | Enter the detailed brand description. This content appears on the Brand page and can include rich text, images, and layout elements using Page Builder. |
| Add Footer CMS Block | Select a CMS static block to display additional content below the brand product listing. This can be used for banners, promotional content, or informational sections. |
| Add Header CMS Block | Select a CMS static block to display additional content above the brand product listing. This is useful for hero banners, brand storytelling, or marketing messages. |
Page Builder can be used in Short Description and Description fields to create rich, engaging brand content.
Optimized images and meaningful alt text are recommended for better SEO and performance.
Header and Footer CMS blocks allow flexible content placement without modifying templates.
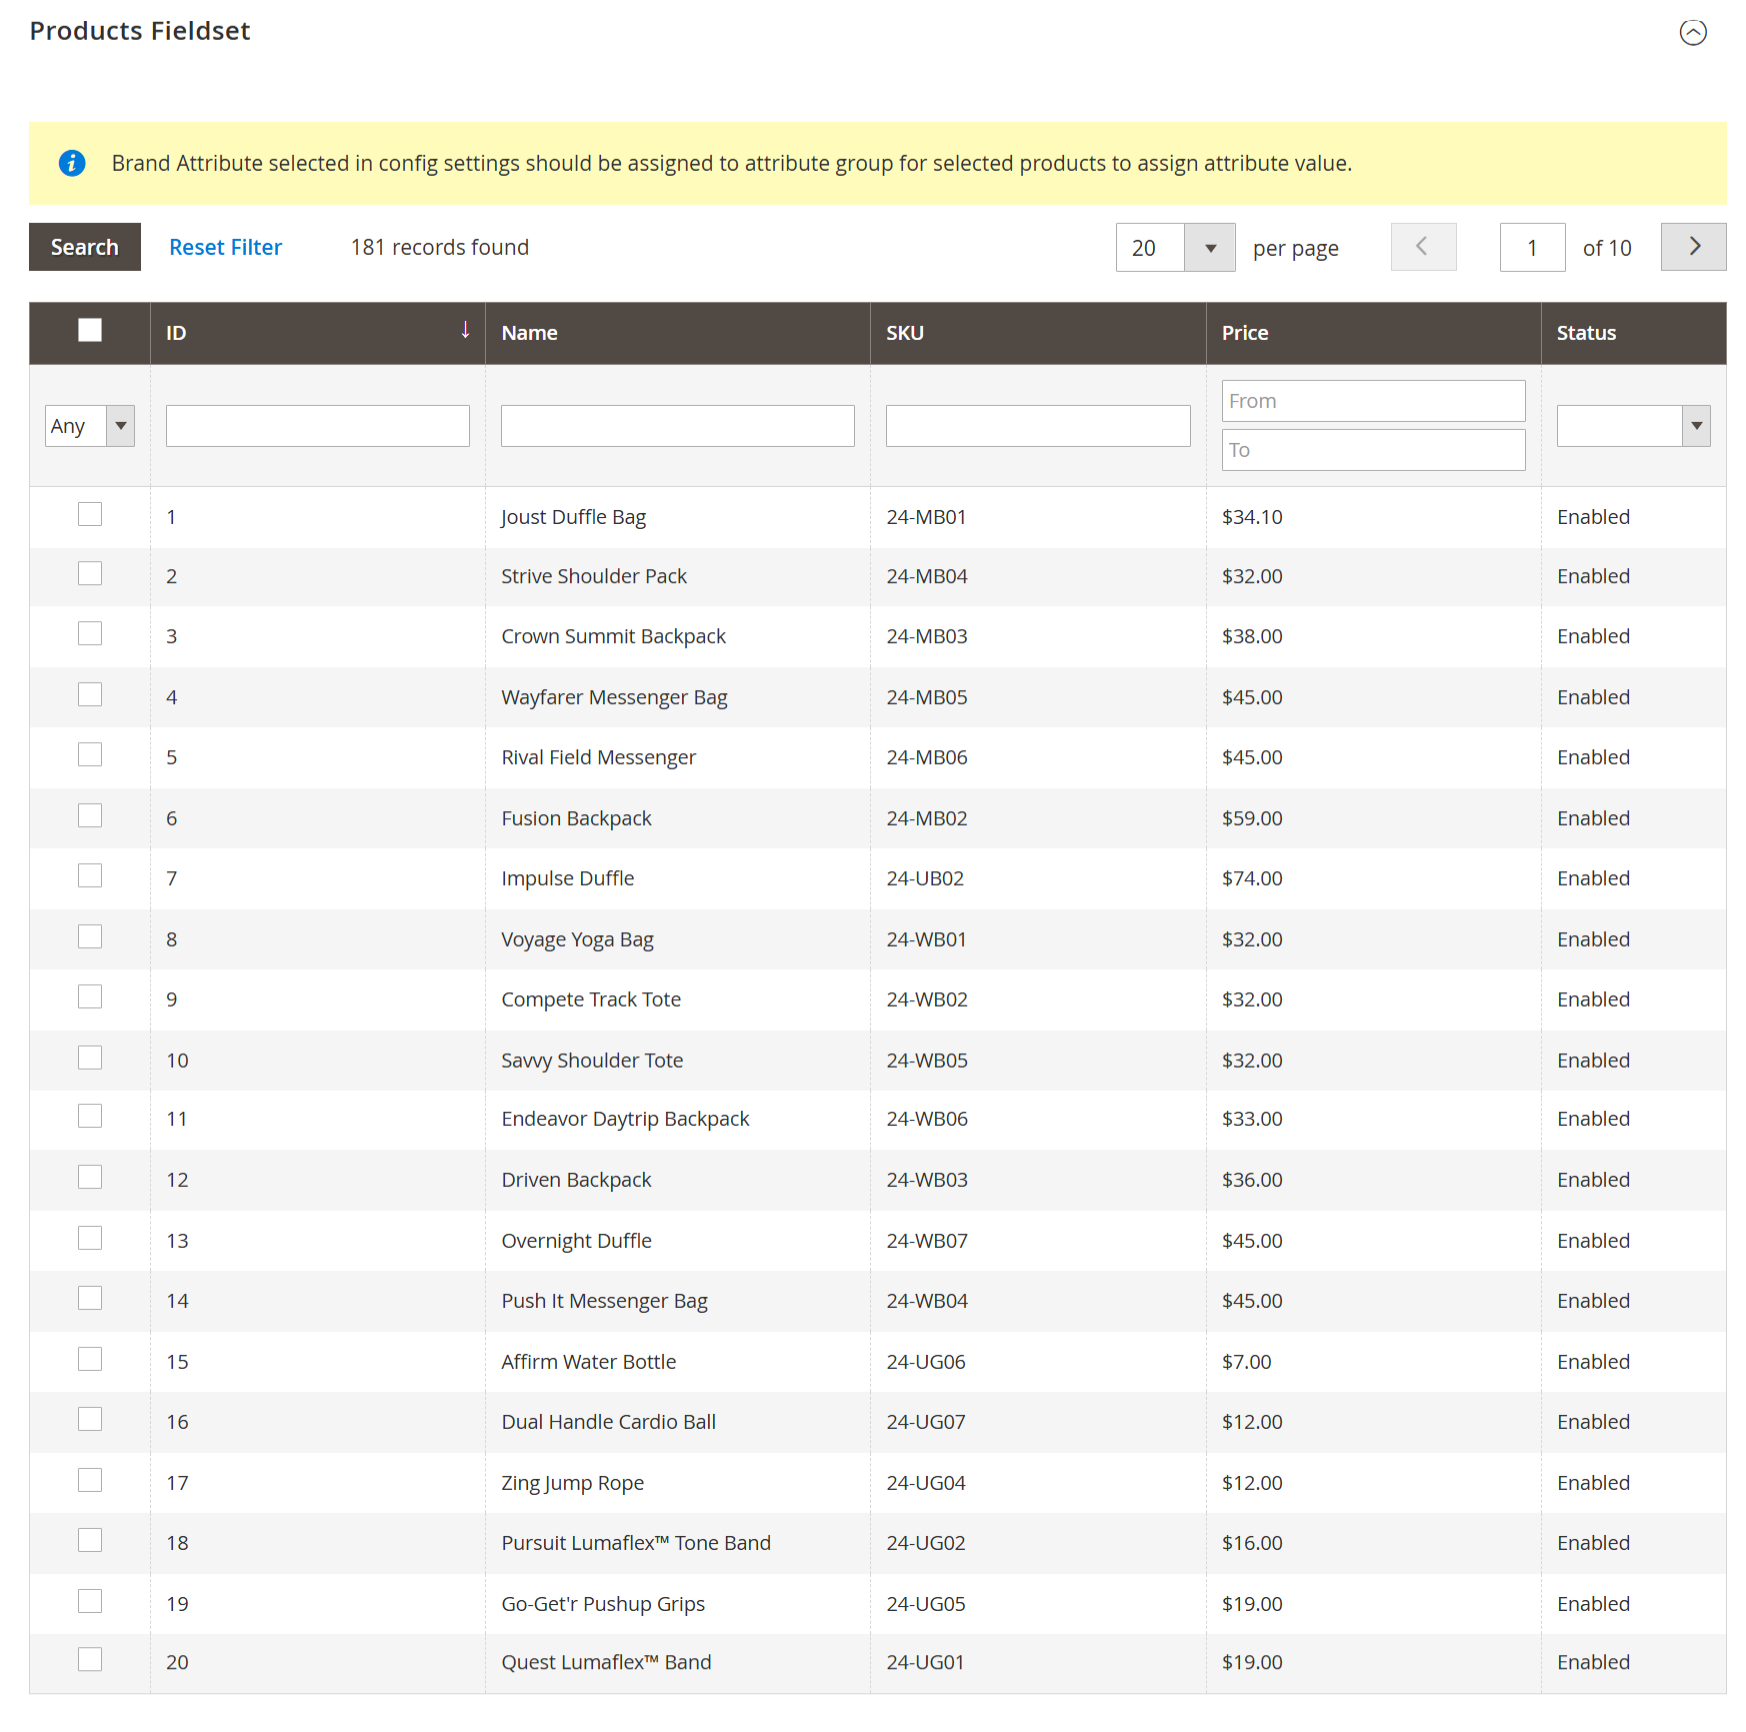
- This section allows you to assign brand values to products by ensuring that the selected Brand attribute is available and applied to the relevant products.
- The Brand attribute selected in the Shop by Brand configuration must be assigned to the product attribute set and attribute group in order to assign brand values to products.
| Element | Description |
|---|---|
| Information Message | Displays a reminder that the selected Brand attribute must be assigned to the appropriate attribute group for products to allow brand assignment. |
| Product Grid | Lists all available products in the catalog, showing key details such as ID, Name , SKU, Price, and Status. |
| Search & Filters | Use the search fields and filters at the top of each column to quickly locate specific products by name, SKU, price range, or status. |
| Product Selection Checkbox | Allows selection of one or more products to assign or manage brand values. |
| Pagination Controls | Navigate through large product lists and control the number of products displayed per page. |
Ensure the Brand attribute is included in the product’s attribute set; otherwise, it will not appear on the product edit page.
Once assigned, brand values can be selected directly from the product edit screen.
Bulk selection helps streamline brand assignment for large catalogs.
- If the Brand attribute used in the Product Fieldset is configured with Scope set to Global in the Advanced Attribute Properties, any value assigned to this attribute while saving a product will be applied across all store views. The attribute value cannot be customized per individual store view when the scope is global.
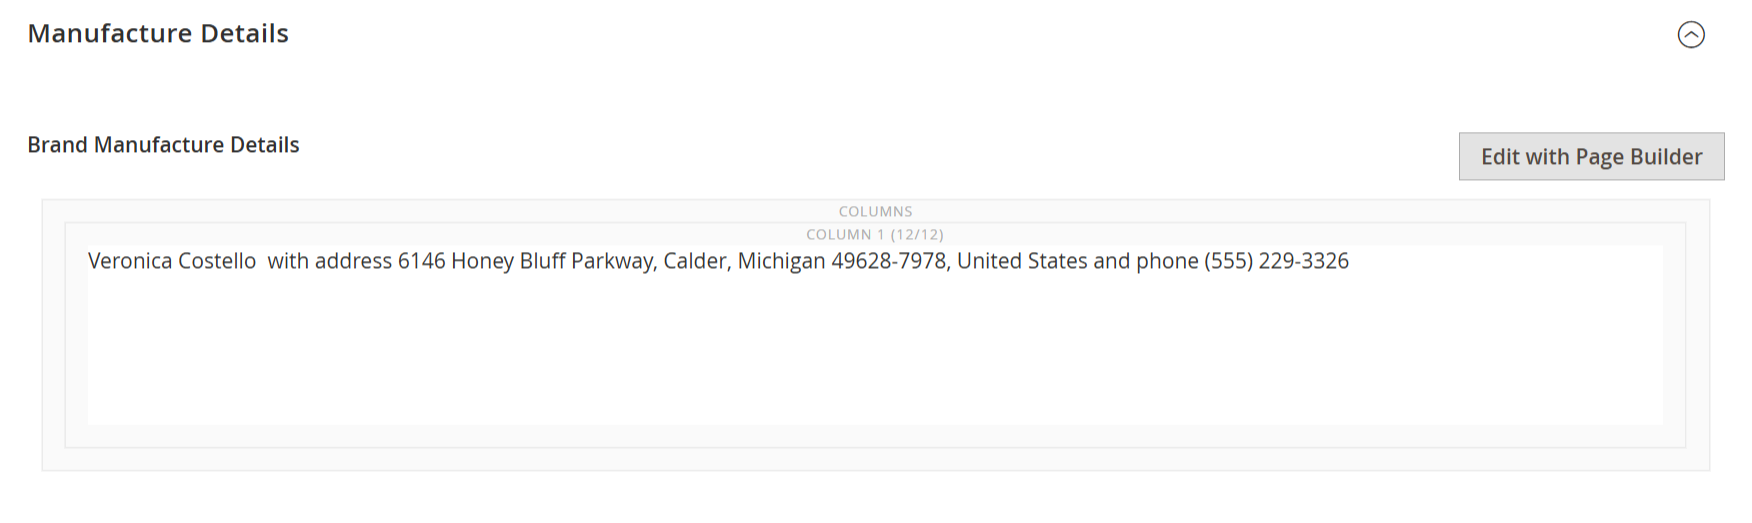
- This section allows you to manage and display manufacturer or brand manufacturer information associated with a brand. The content entered here can be used to meet regulatory, informational, or compliance requirements and is displayed on the storefront where configured.
This section is commonly used to display manufacturer or responsible person details, which may be required for compliance (for example, EU product safety regulations).
Content can include manufacturer name, address, phone number, and other contact information.
Page Builder can be used to format the content, add links, or structure the information clearly.
| Field | Description |
|---|---|
| Brand Manufacture Details | Enter the manufacturer information related to the brand, such as manufacturer name, postal address, country, and contact details. This information can be edited using Page Builder, allowing rich text formatting if required. |
- All brand manufacturer details will be displayed on the Product Detail Page (PDP) under the “About Brand” section for the associated brand.
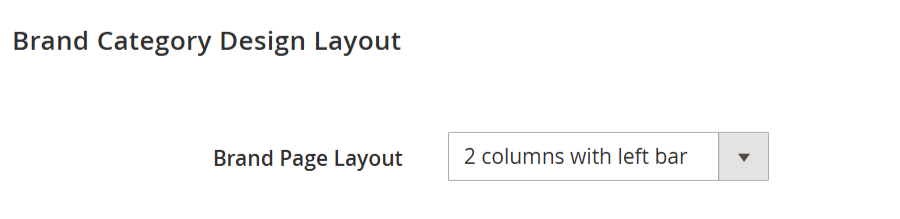
- This section allows you to control the layout structure of the Brand category (Brand listing) pages on the storefront.
Choosing a two-column layout allows filters or additional content to appear in the sidebar.
A one-column layout provides a cleaner, distraction-free brand browsing experience.
Layout selection should align with your storefront theme and navigation strategy.
| Field | Description |
|---|---|
| Brand Page Layout | Select the layout structure for Brand pages. Available options typically include 1 column, 2 columns with left bar, 2 columns with right bar, and other supported layouts. The selected layout determines how filters, sidebars, and content are displayed on the Brand category page. |
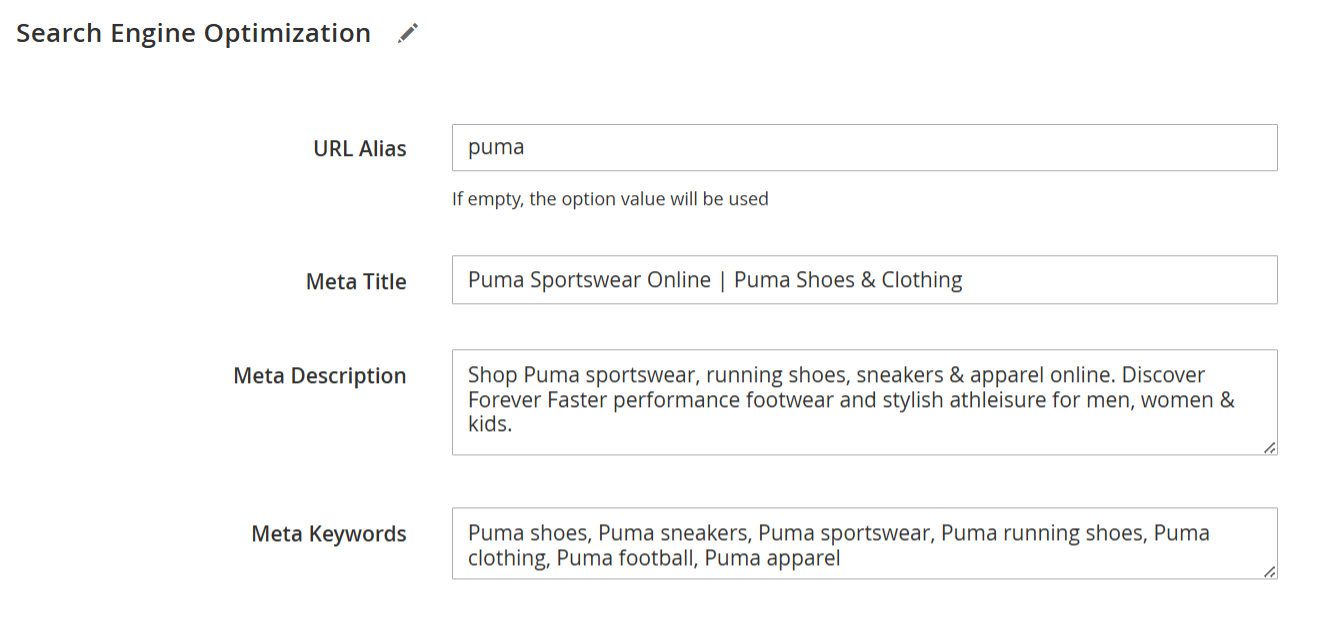
- This section allows you to configure SEO-related settings for individual Brand pages, helping improve visibility in search engines and control how brand pages appear in search results.
Keep the Meta Title within 50–60 characters for optimal display in search results.
Write Meta Descriptions that are concise, keyword-rich, and user-focused.
Use URL Aliases that are short, readable, and match the brand name.
| Field | Description |
|---|---|
| URL Alias | Define a custom URL key for the Brand page. If left empty, the system will automatically use the brand option value. This field helps create clean, SEO-friendly URLs. |
| Meta Title | Enter the meta title for the Brand page. This title appears in browser tabs and search engine result pages (SERPs). It is recommended to include the brand name and relevant keywords. |
| Meta Description | Enter the meta description for the Brand page. This description is displayed in search engine results and should clearly describe the brand and its products to encourage click-throughs. |
| Meta Keywords | Enter relevant meta keywords for the Brand page. Although modern search engines rely less on this field, it can still be useful for internal search or legacy SEO purposes. |
All Brands CMS Page Settings
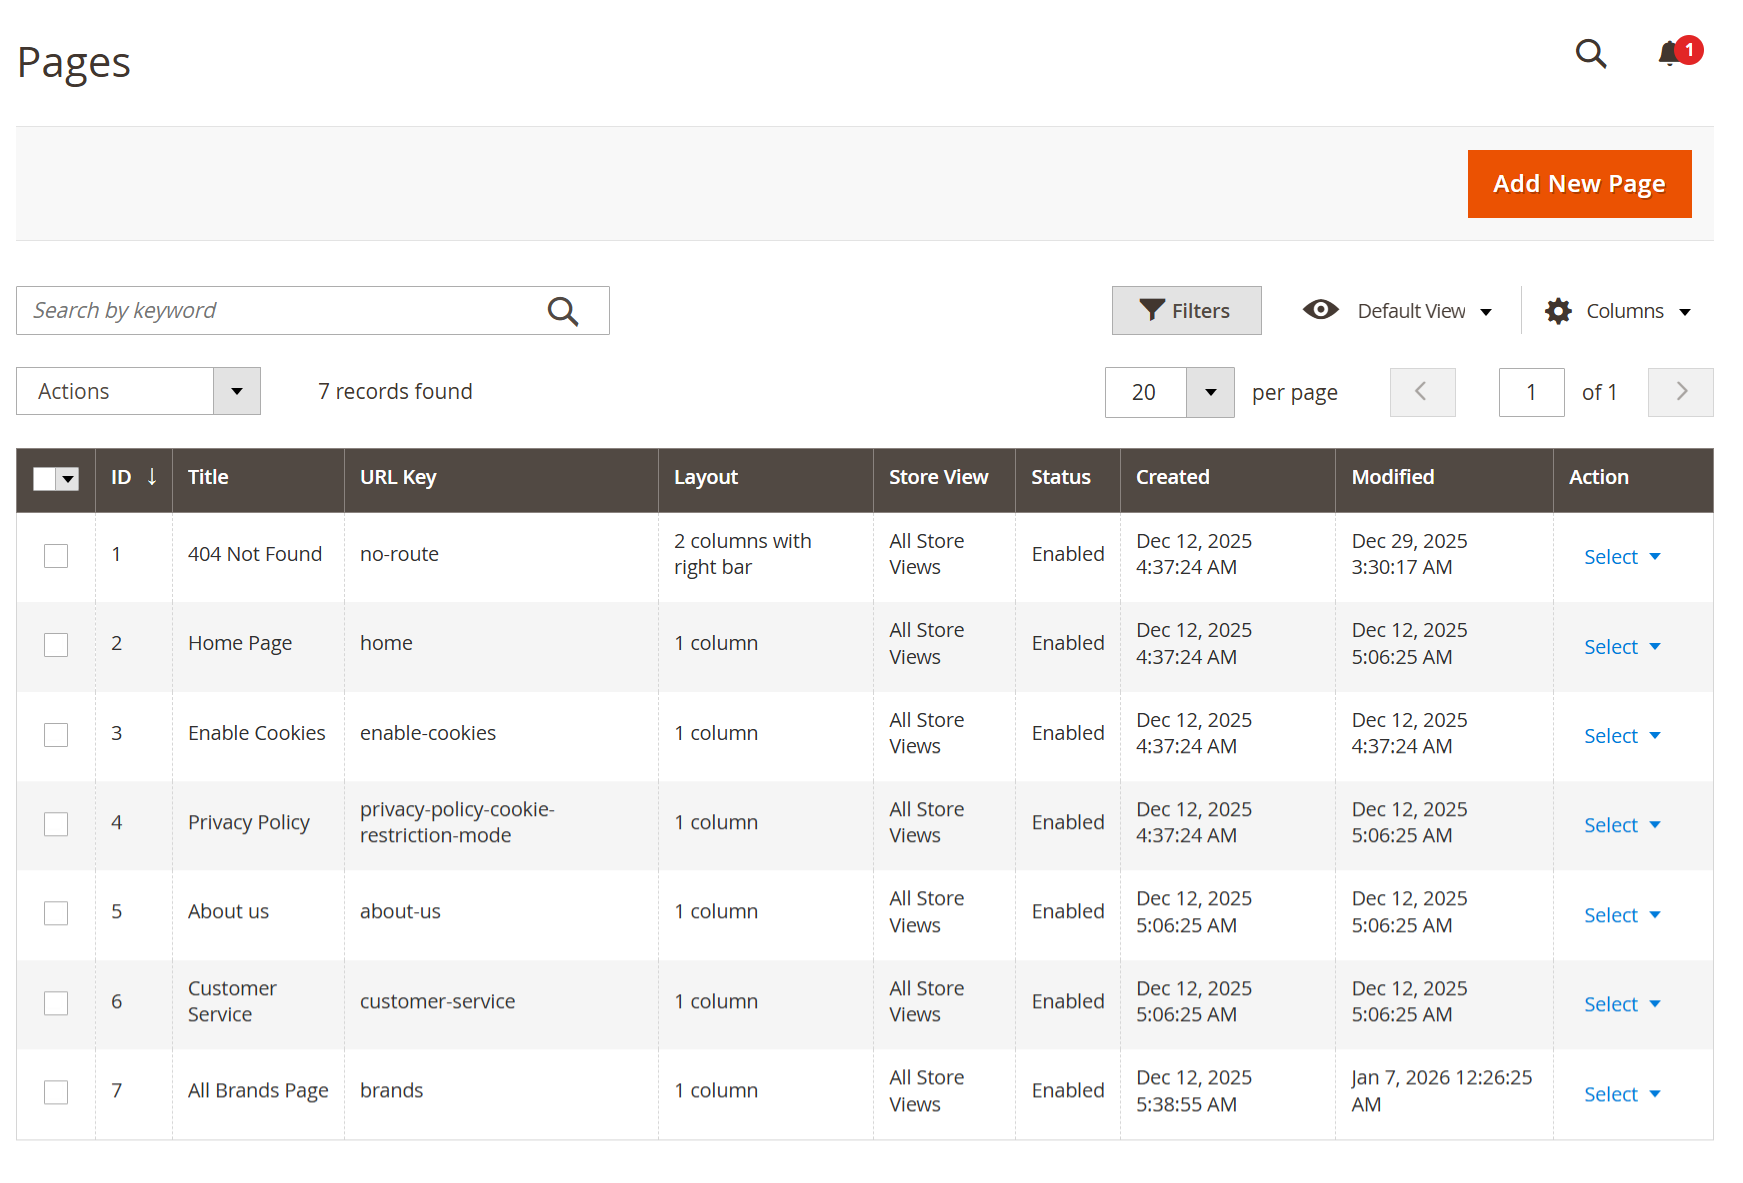
- The All Brands Page displays a complete list of all available brands in alphabetical order, allowing customers to browse brands easily from a single page.
- Navigation Path: Content → Elements → Pages
| Field | Description |
|---|---|
| Open Pages Section | Navigate to Content → Elements → Pages in the Admin panel to manage CMS pages. |
| Add New Page | Click the Add New Page button to create a new CMS page. |
| Page Title | Enter a suitable title such as All Brands Page. This title is displayed on the storefront. |
| URL Key | Enter a URL key (for example: brands). This URL is used for accessing the All Brands page. |
| Page Content | Add the Shop by Brand widget or layout that displays the list of all brands in alphabetical order. |
| Enable Page | Ensure the page status is set to Enabled and assigned to the required store view(s). |
| Save Page | Click Save Page to publish the All Brands page. |
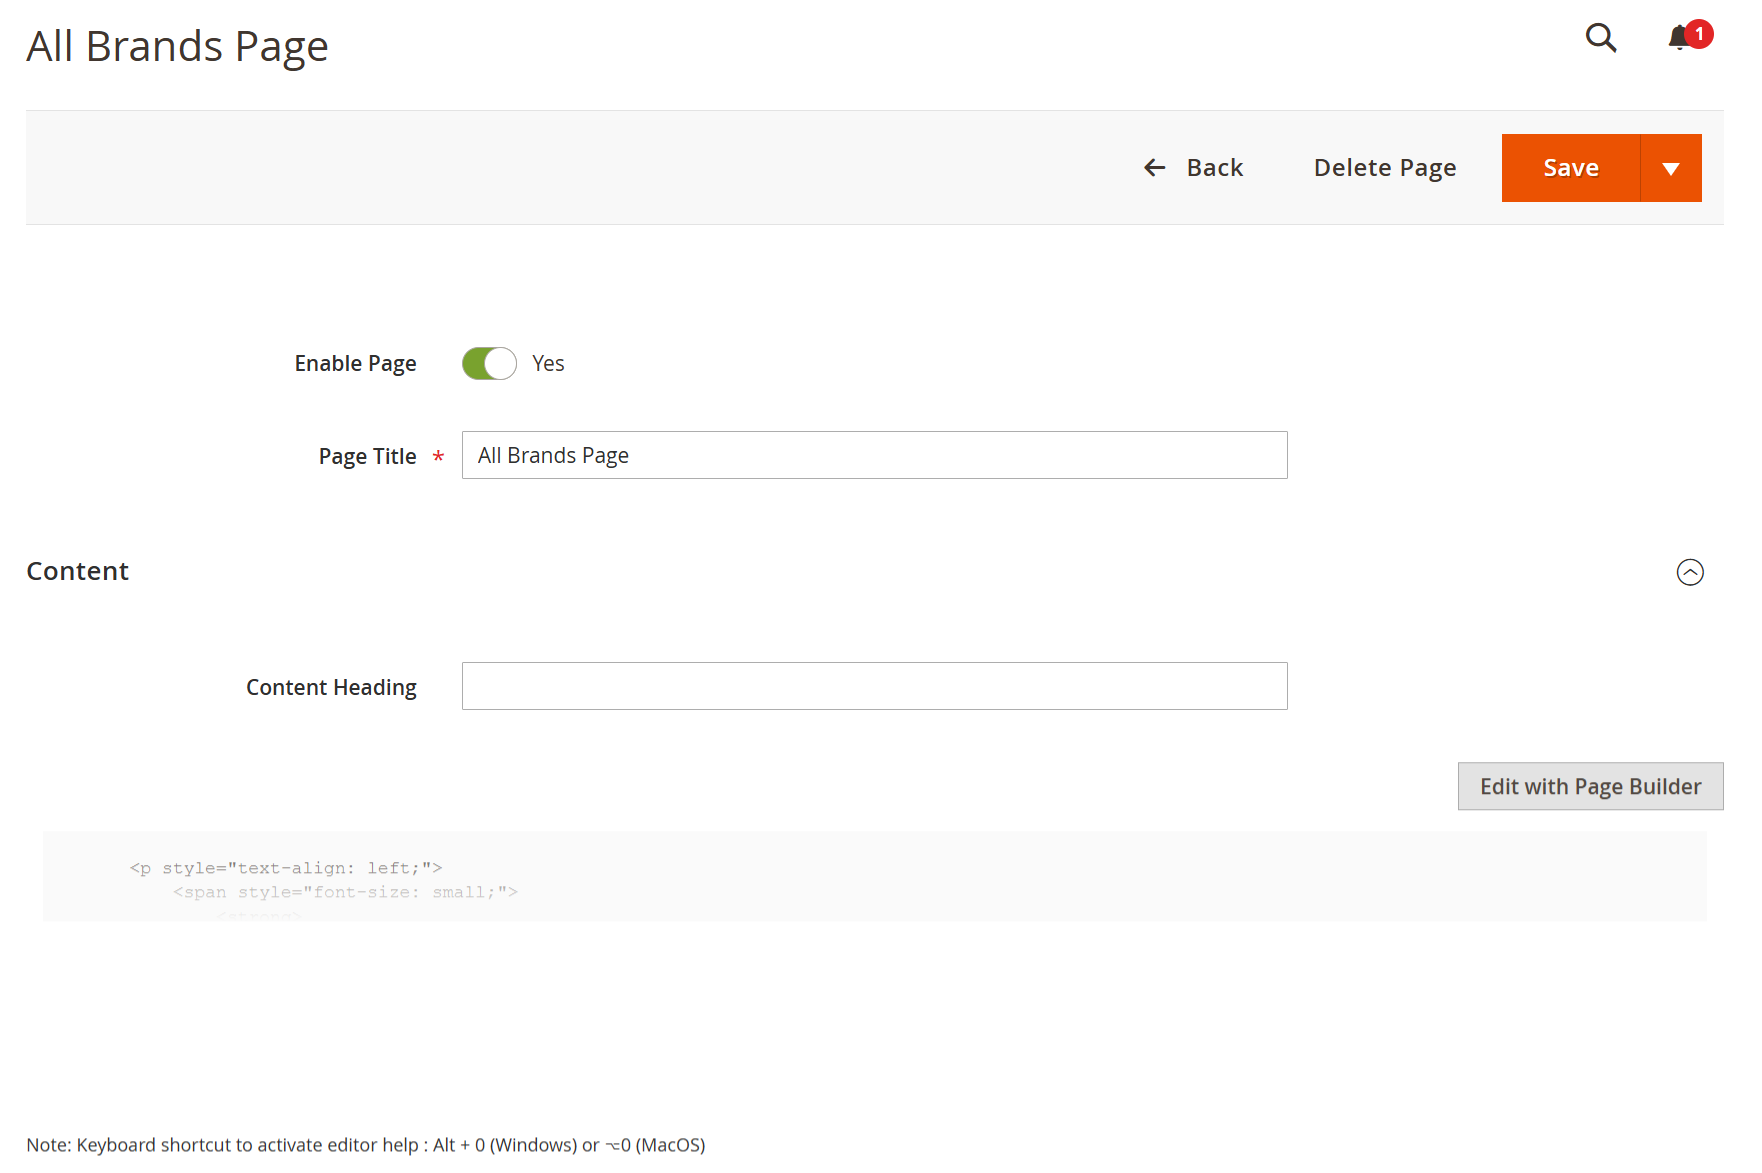
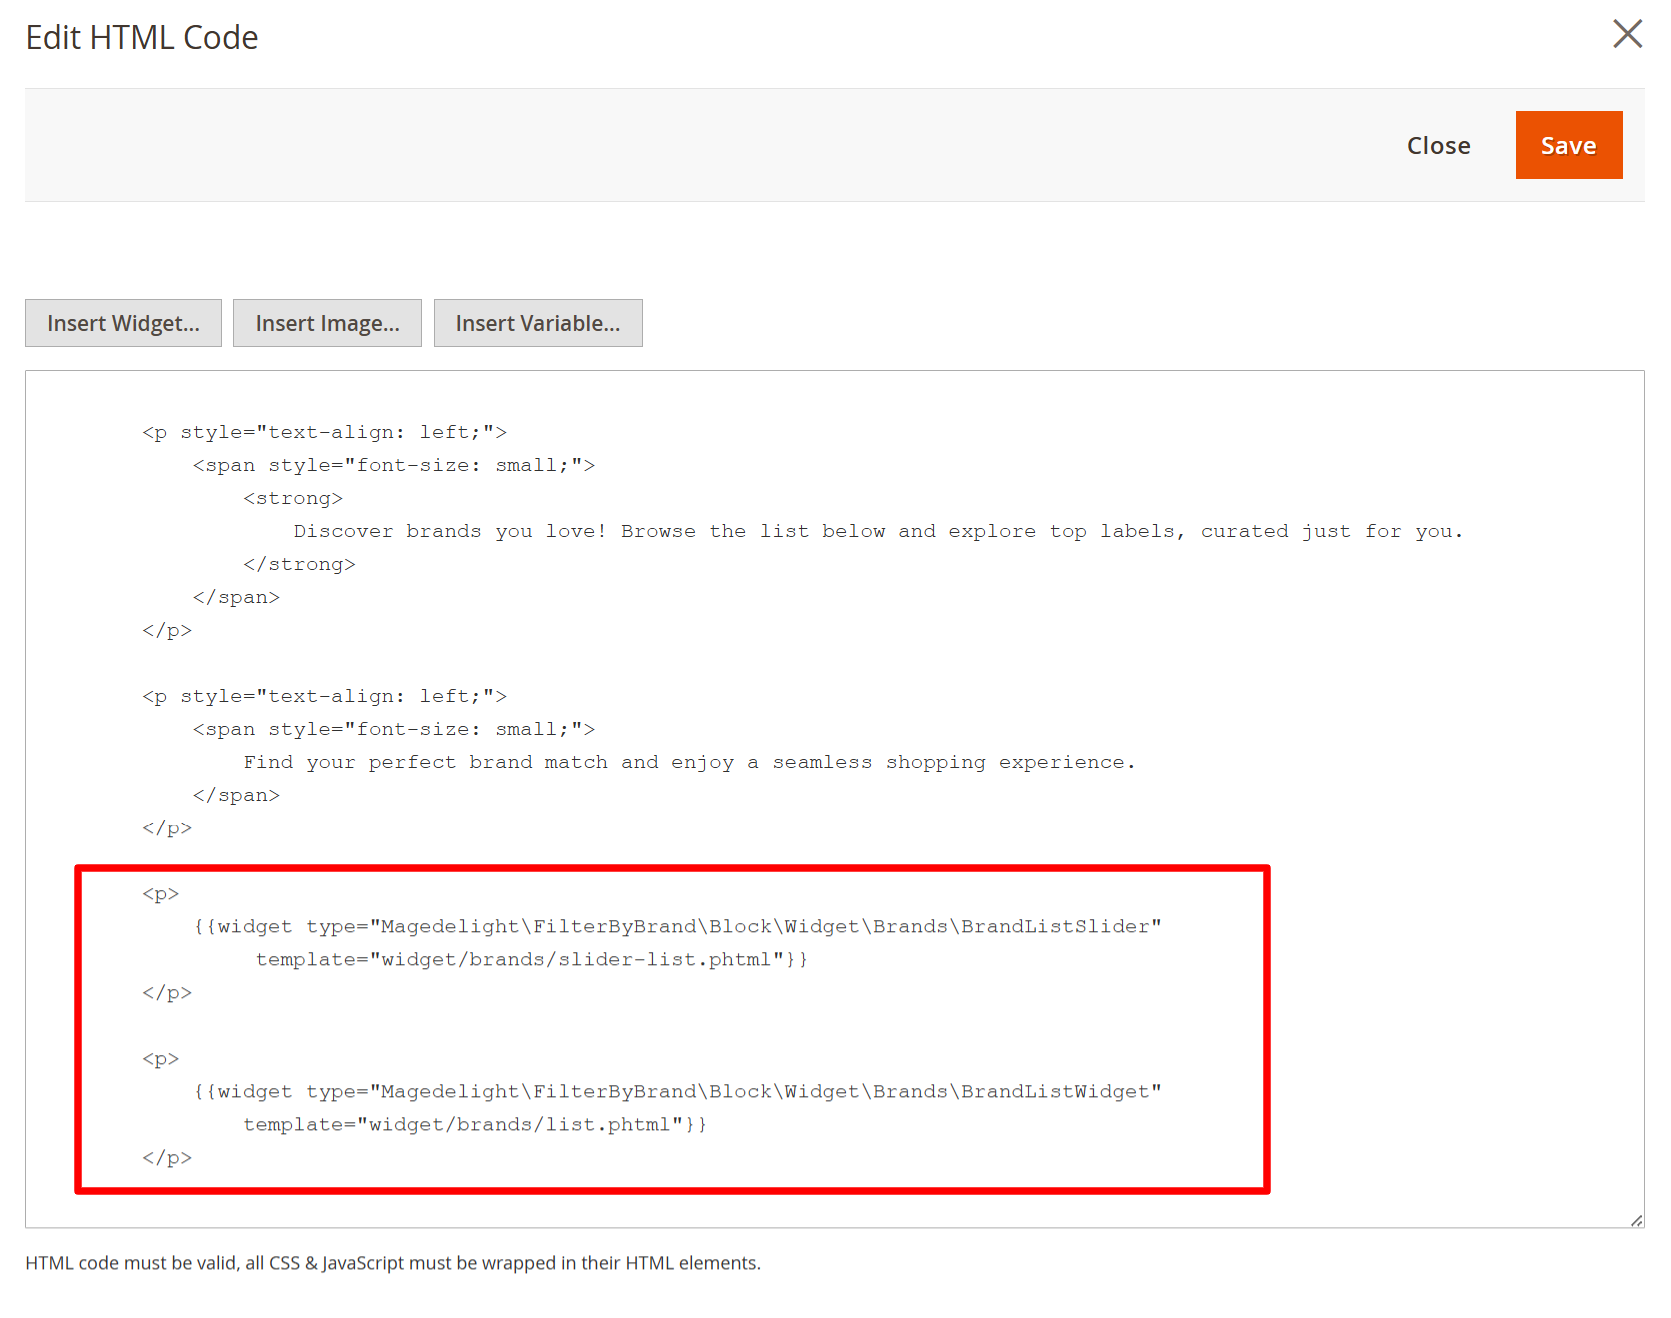
- This section explains how to add Brand Slider and Brand List widgets to the All Brands Page using CMS page content.
The Brand Slider Widget is ideal for showcasing featured, premium, or popular brands.
The Brand List Widget is recommended for displaying the complete brand catalog in alphabetical order.
Widget output respects all global and per-brand configuration settings (visibility, featured status, sort order, etc.).
Ensure the page is Enabled and assigned to the correct Store View.
| Field | Description |
|---|---|
| Enable Page | Set to Yes to make the All Brands Page visible on the storefront. |
| Page Title | Enter the page title, for example All Brands Page. This title appears as the main heading on the storefront. |
| Content Heading | Optional heading text displayed above the page content. |
| Content | Use Page Builder or HTML editor to add introductory text and Brand widgets. |
Adding Brand Slider Widgets (HTML Code)
{{widget type="Magedelight\FilterByBrand\Block\Widget\Brands\BrandListWidget"
template="widget/brands/list.phtml"}}
- Displays brands in a slider/carousel format.
Adding Brand List Widgets (HTML Code)
{{widget type="Magedelight\FilterByBrand\Block\Widget\Brands\BrandListWidget"
template="widget/brands/list.phtml"}}
- Displays brands in a list or grid format, usually in alphabetical order.
Adding a Widget to a CMS Page or CMS Block
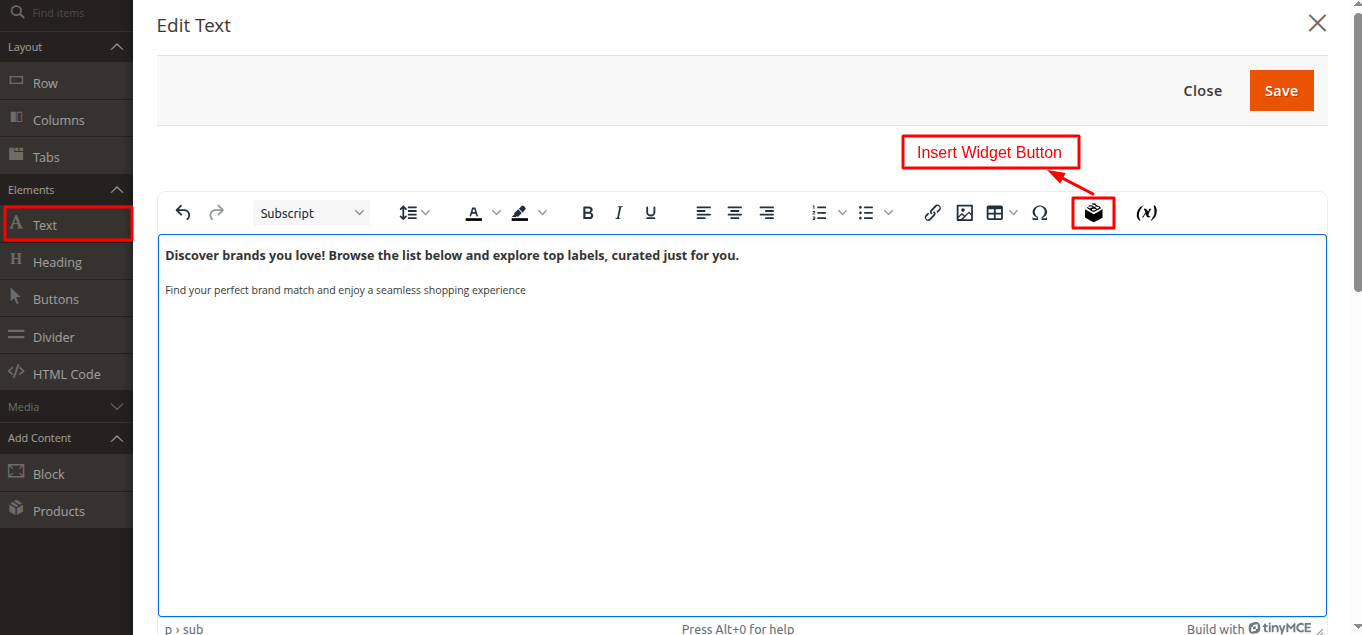
- This image illustrates how to insert a widget using the Page Builder text editor.
- To add a widget:
Open the CMS Page or CMS Block in edit mode.
Launch the Page Builder editor.
In the content area, select the Text element.
Inside the text editor toolbar, click the Insert Widget button (highlighted in the image).
Choose the required widget from the list and configure its settings.
Click Save to apply the changes.
- The selected widget will be inserted into the content area and displayed on the storefront according to the configured settings.
Adding a Widget Using the HTML Editor
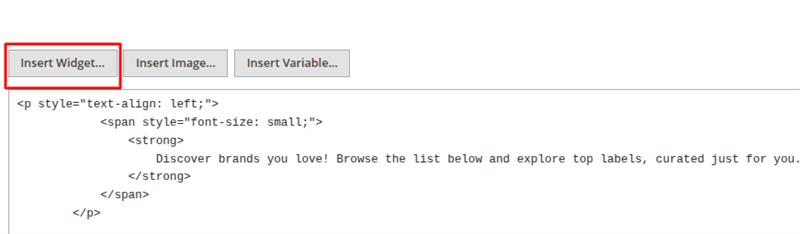
- This image shows how to insert a widget using the HTML editor on a CMS Page or CMS Block.
- To add a widget using the HTML editor:
Open the CMS Page or CMS Block in edit mode.
Switch the content editor to HTML mode.
In the editor toolbar, click the Insert Widget button located at the top-left corner (highlighted in the image).
Select the required widget from the list and configure its settings.
Save the page or block to apply the changes.
- The selected widget will be inserted into the HTML content and rendered on the storefront based on the configured widget settings.
Selecting Brand Widgets in the Insert Widget Popup
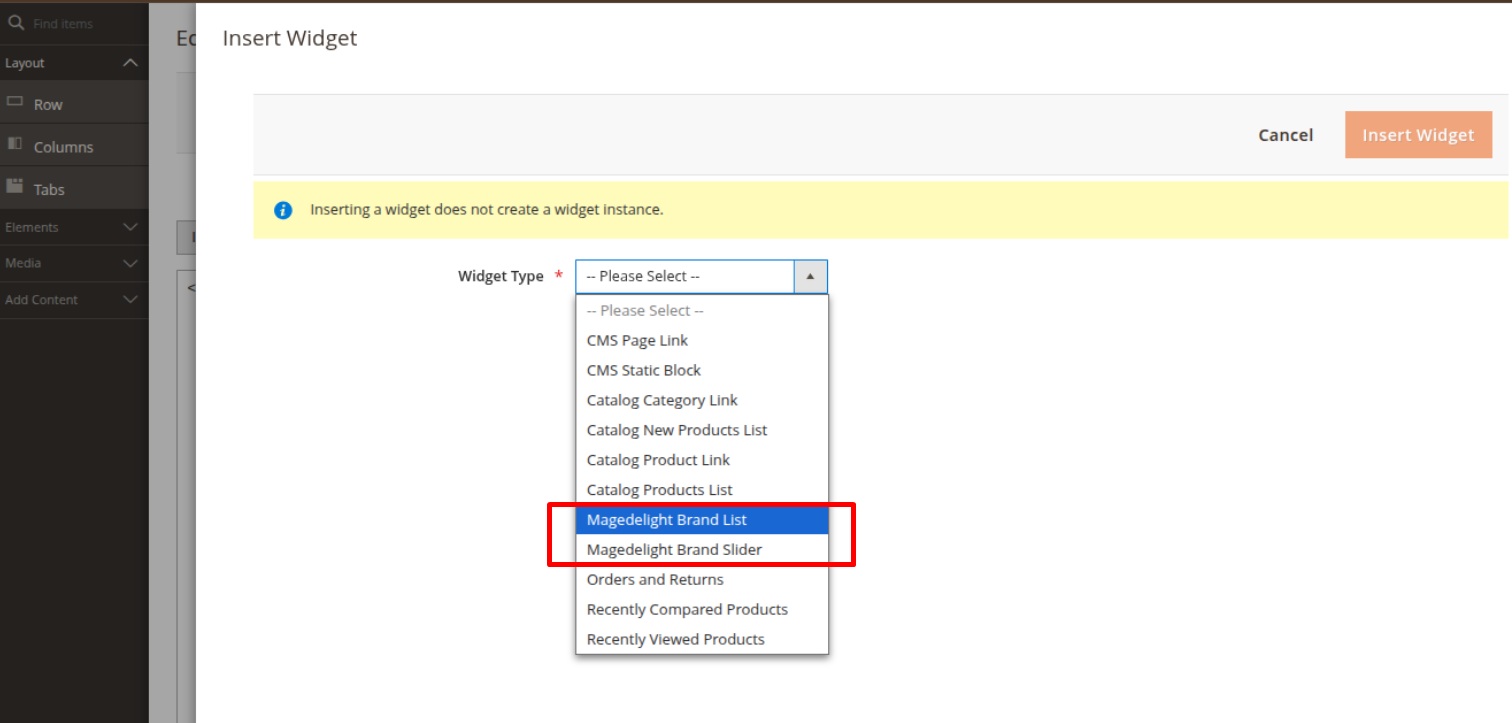
- This image shows the Insert Widget configuration window, where the administrator can choose the type of widget to add to a CMS Page or CMS Block.
- From the Widget Type dropdown, select one of the following options:
Magedelight Brand List – to display the complete list of brands.
Magedelight Brand Slider – to display brands in a horizontal slider format.
You may select either widget individually or both widgets together, depending on how you want brands to be displayed on the page.
After selecting the desired widget type, configure the widget settings as required and click Insert Widget to add it to the page content.
Frontend Functionality
Brands Top Menu Navigation
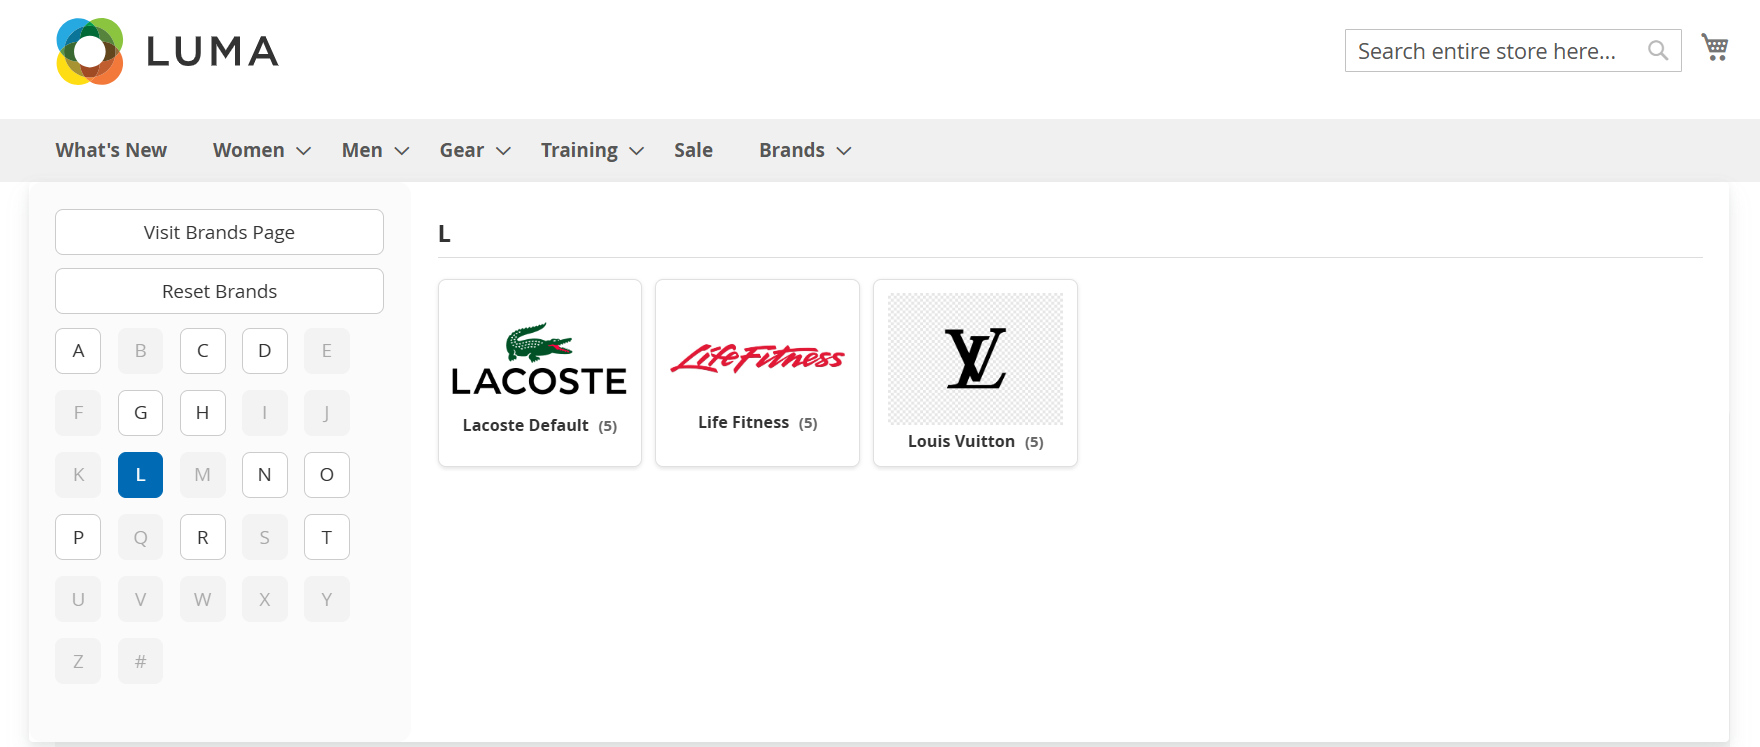
- This image demonstrates the Brands navigation menu displayed in the storefront header. When a customer clicks the Brands menu item in the top navigation, a dropdown submenu opens, showing all available brand attribute values.
- Brands are organized alphabetically (A–Z) to ensure easy navigation. Only letters with assigned brands are active. Each brand item includes the brand logo, brand name, and product count, providing clear context before selection.
- Selecting a brand redirects the customer to a dedicated brand landing page that displays all products associated with the chosen brand.
- This functionality enables customers to quickly browse products by brand directly from the top menu, improving usability and overall shopping experience.
Brand Listing Widget (All Brands View)
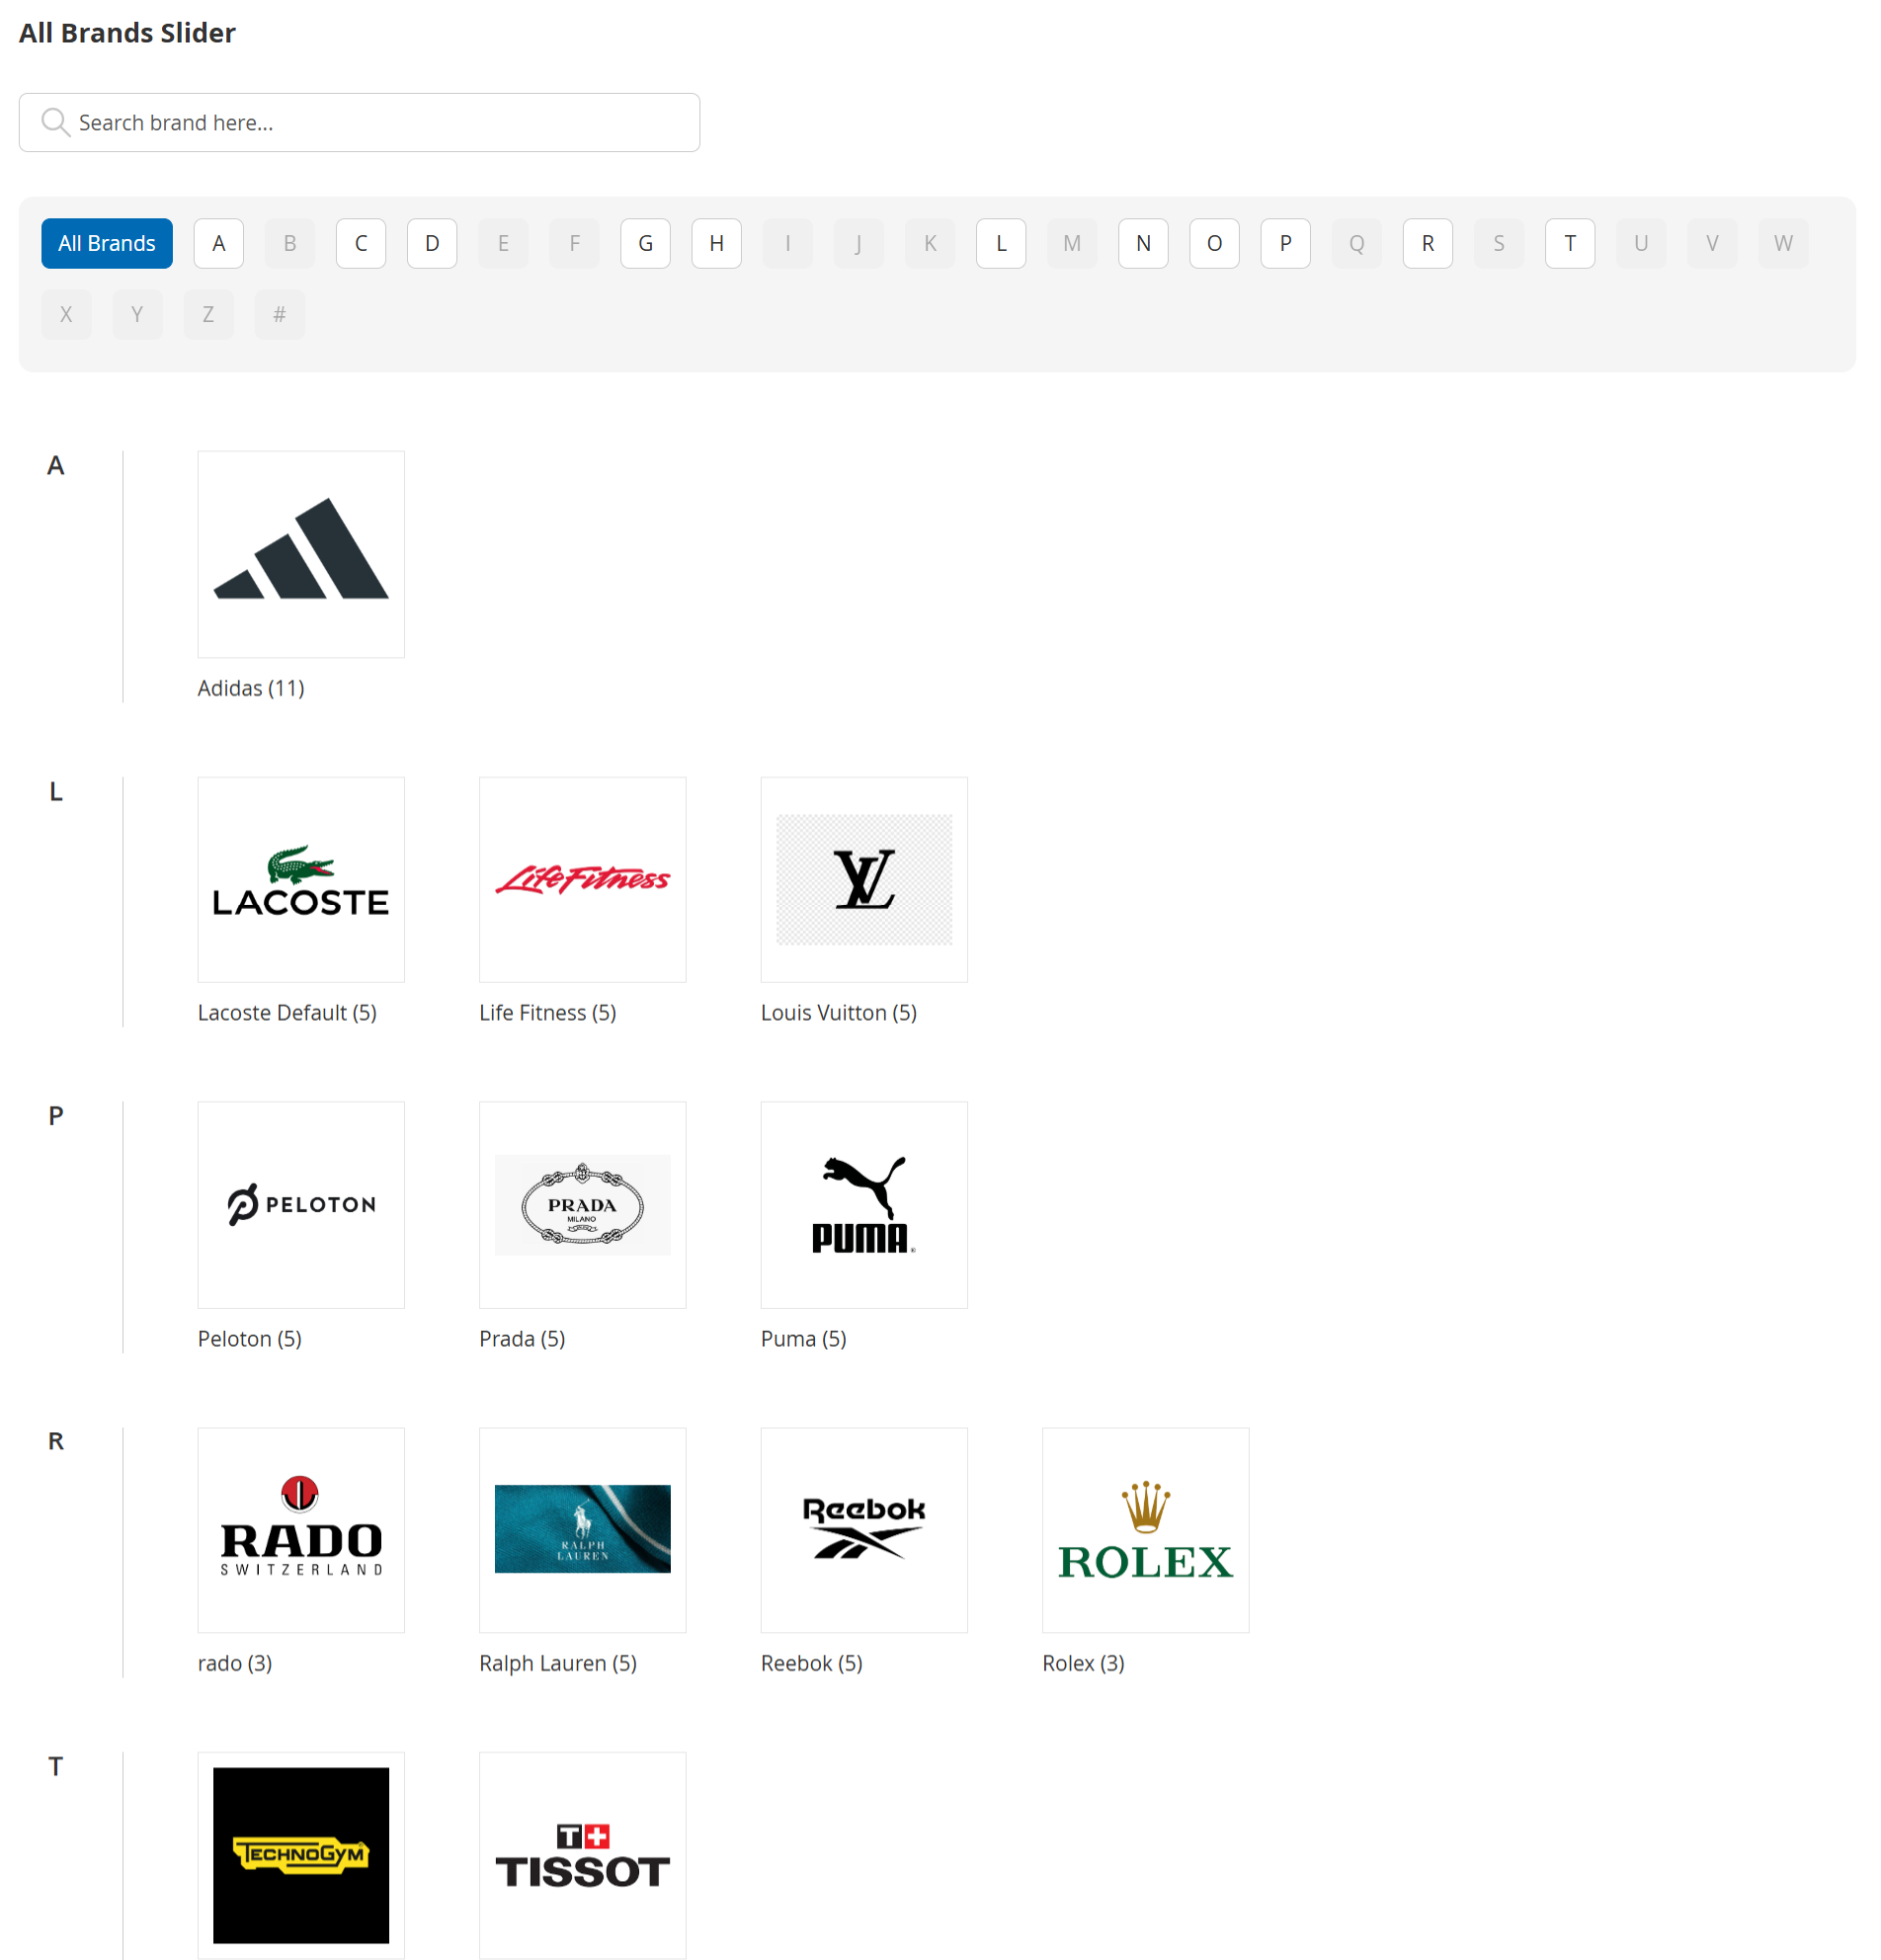
- This image shows the Brand Listing Widget displayed on the storefront. The widget presents all available brands in an alphabetical listing, making it easy for customers to browse brands across the entire catalog.
- A search field at the top allows customers to quickly find a specific brand by name. The alphabet filter (A–Z) enables instant navigation to brands starting with a selected letter, while inactive letters indicate that no brands are available for that character.
- Each brand is displayed with its logo, brand name, and associated product count, helping customers understand the size of the brand’s catalog before selecting it.
- Clicking on a brand redirects the customer to a dedicated brand page that lists all products assigned to that brand. This widget improves brand discoverability and provides a convenient shopping-by-brand experience.
Brand Tooltip (Hover Information)
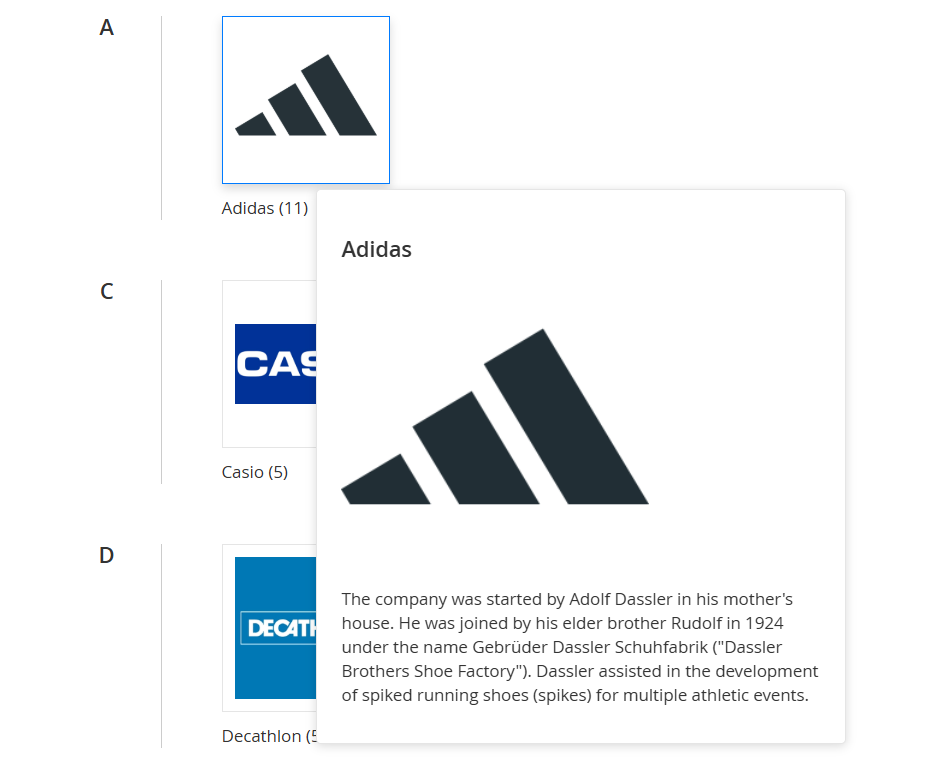
- This image demonstrates the Brand Tooltip functionality displayed on the storefront.
When a customer hovers over a brand logo or brand name, a tooltip appears showing additional brand information without leaving the current page. - The tooltip includes:
Brand title
Brand image (logo)
Short brand description
- This feature allows customers to quickly learn more about a brand before navigating to its dedicated brand page. By providing contextual information on hover, the tooltip improves usability and helps shoppers make informed browsing decisions.
- The tooltip can be enabled on supported pages, such as the All Brands page, product listing pages, and product detail pages, based on the extension configuration.
Brand Tooltip (Popup Mode)
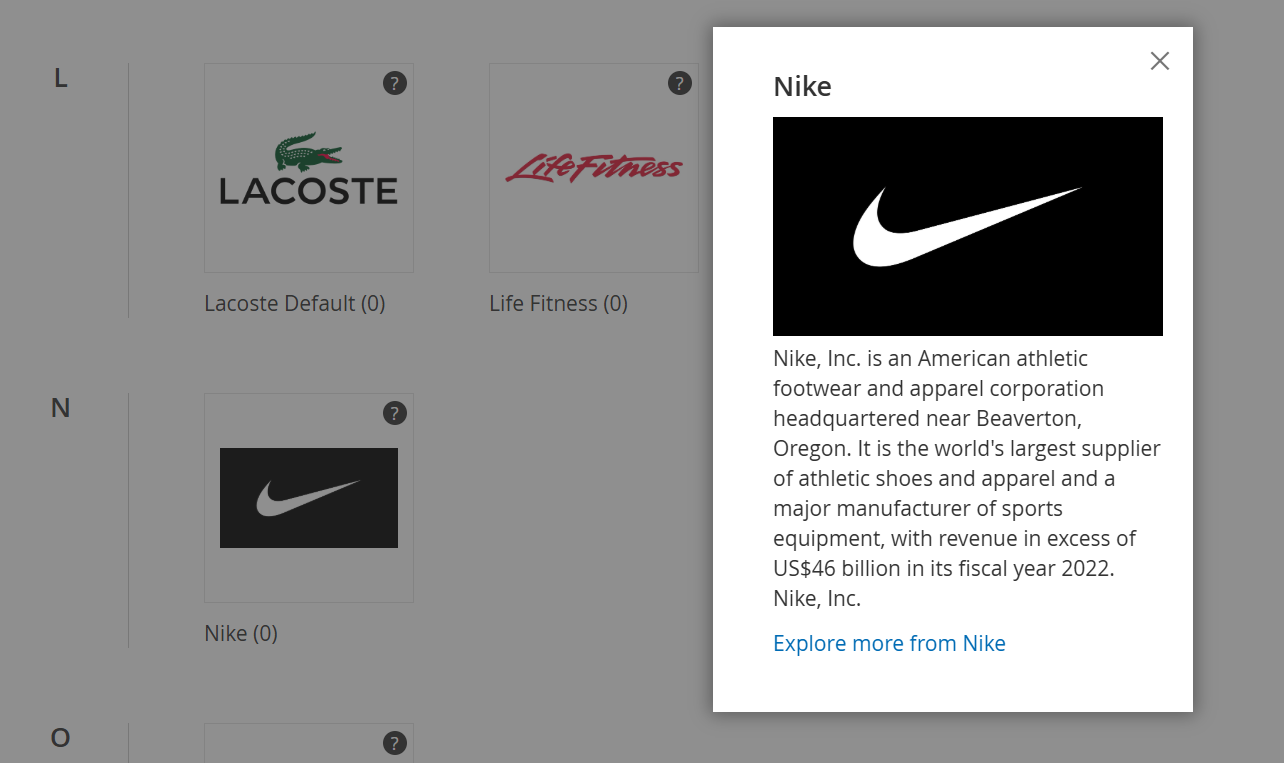
- When Brand Info Display Mode is set to Popup, customers can view brand details in a modal window without leaving the current page. How it works on the storefront
On supported pages (as configured in admin), the brand name/logo becomes interactive.
When the customer clicks the brand element, a pop-up (modal) opens on top of the page.
The pop-up displays the brand information, such as:
Brand Title
Brand Logo / Image
Short Description / Description
A call-to-action link (for example, “Explore more from [Brand]”) is shown in the pop-up.
Clicking this link redirects the customer to the Brand Landing Page, where all products for that brand are listed.
Brand Slider Widget (All Brands Slider)
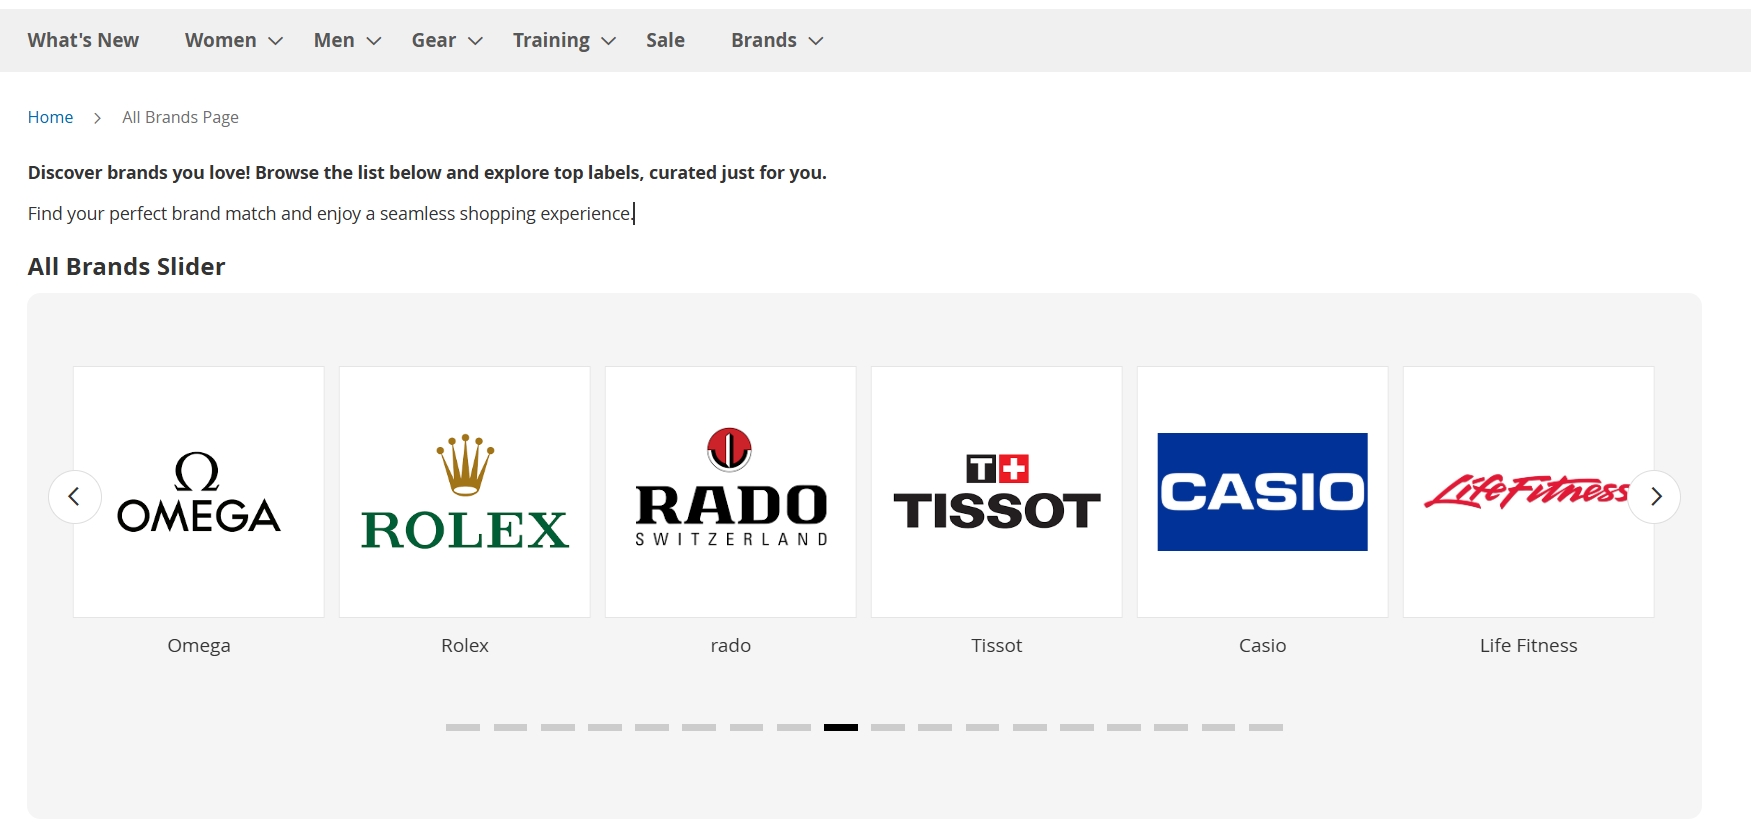
- This image displays the Brand Slider Widget on the storefront, showcasing selected brands in a horizontal, scrollable slider format.
- The slider presents brand logos with brand names, allowing customers to quickly recognize and navigate to their preferred brands. Navigation arrows and pagination indicators enable smooth browsing through the available brands without leaving the page.
- Clicking on any brand logo redirects the customer to the corresponding brand page, where all products associated with that brand are displayed.
- The Brand Slider Widget can be placed on CMS pages, category pages, or the All Brands page, making it an effective tool for highlighting featured or popular brands and improving brand visibility across the storefront.
Product Page Brand Information & Related Brand Products
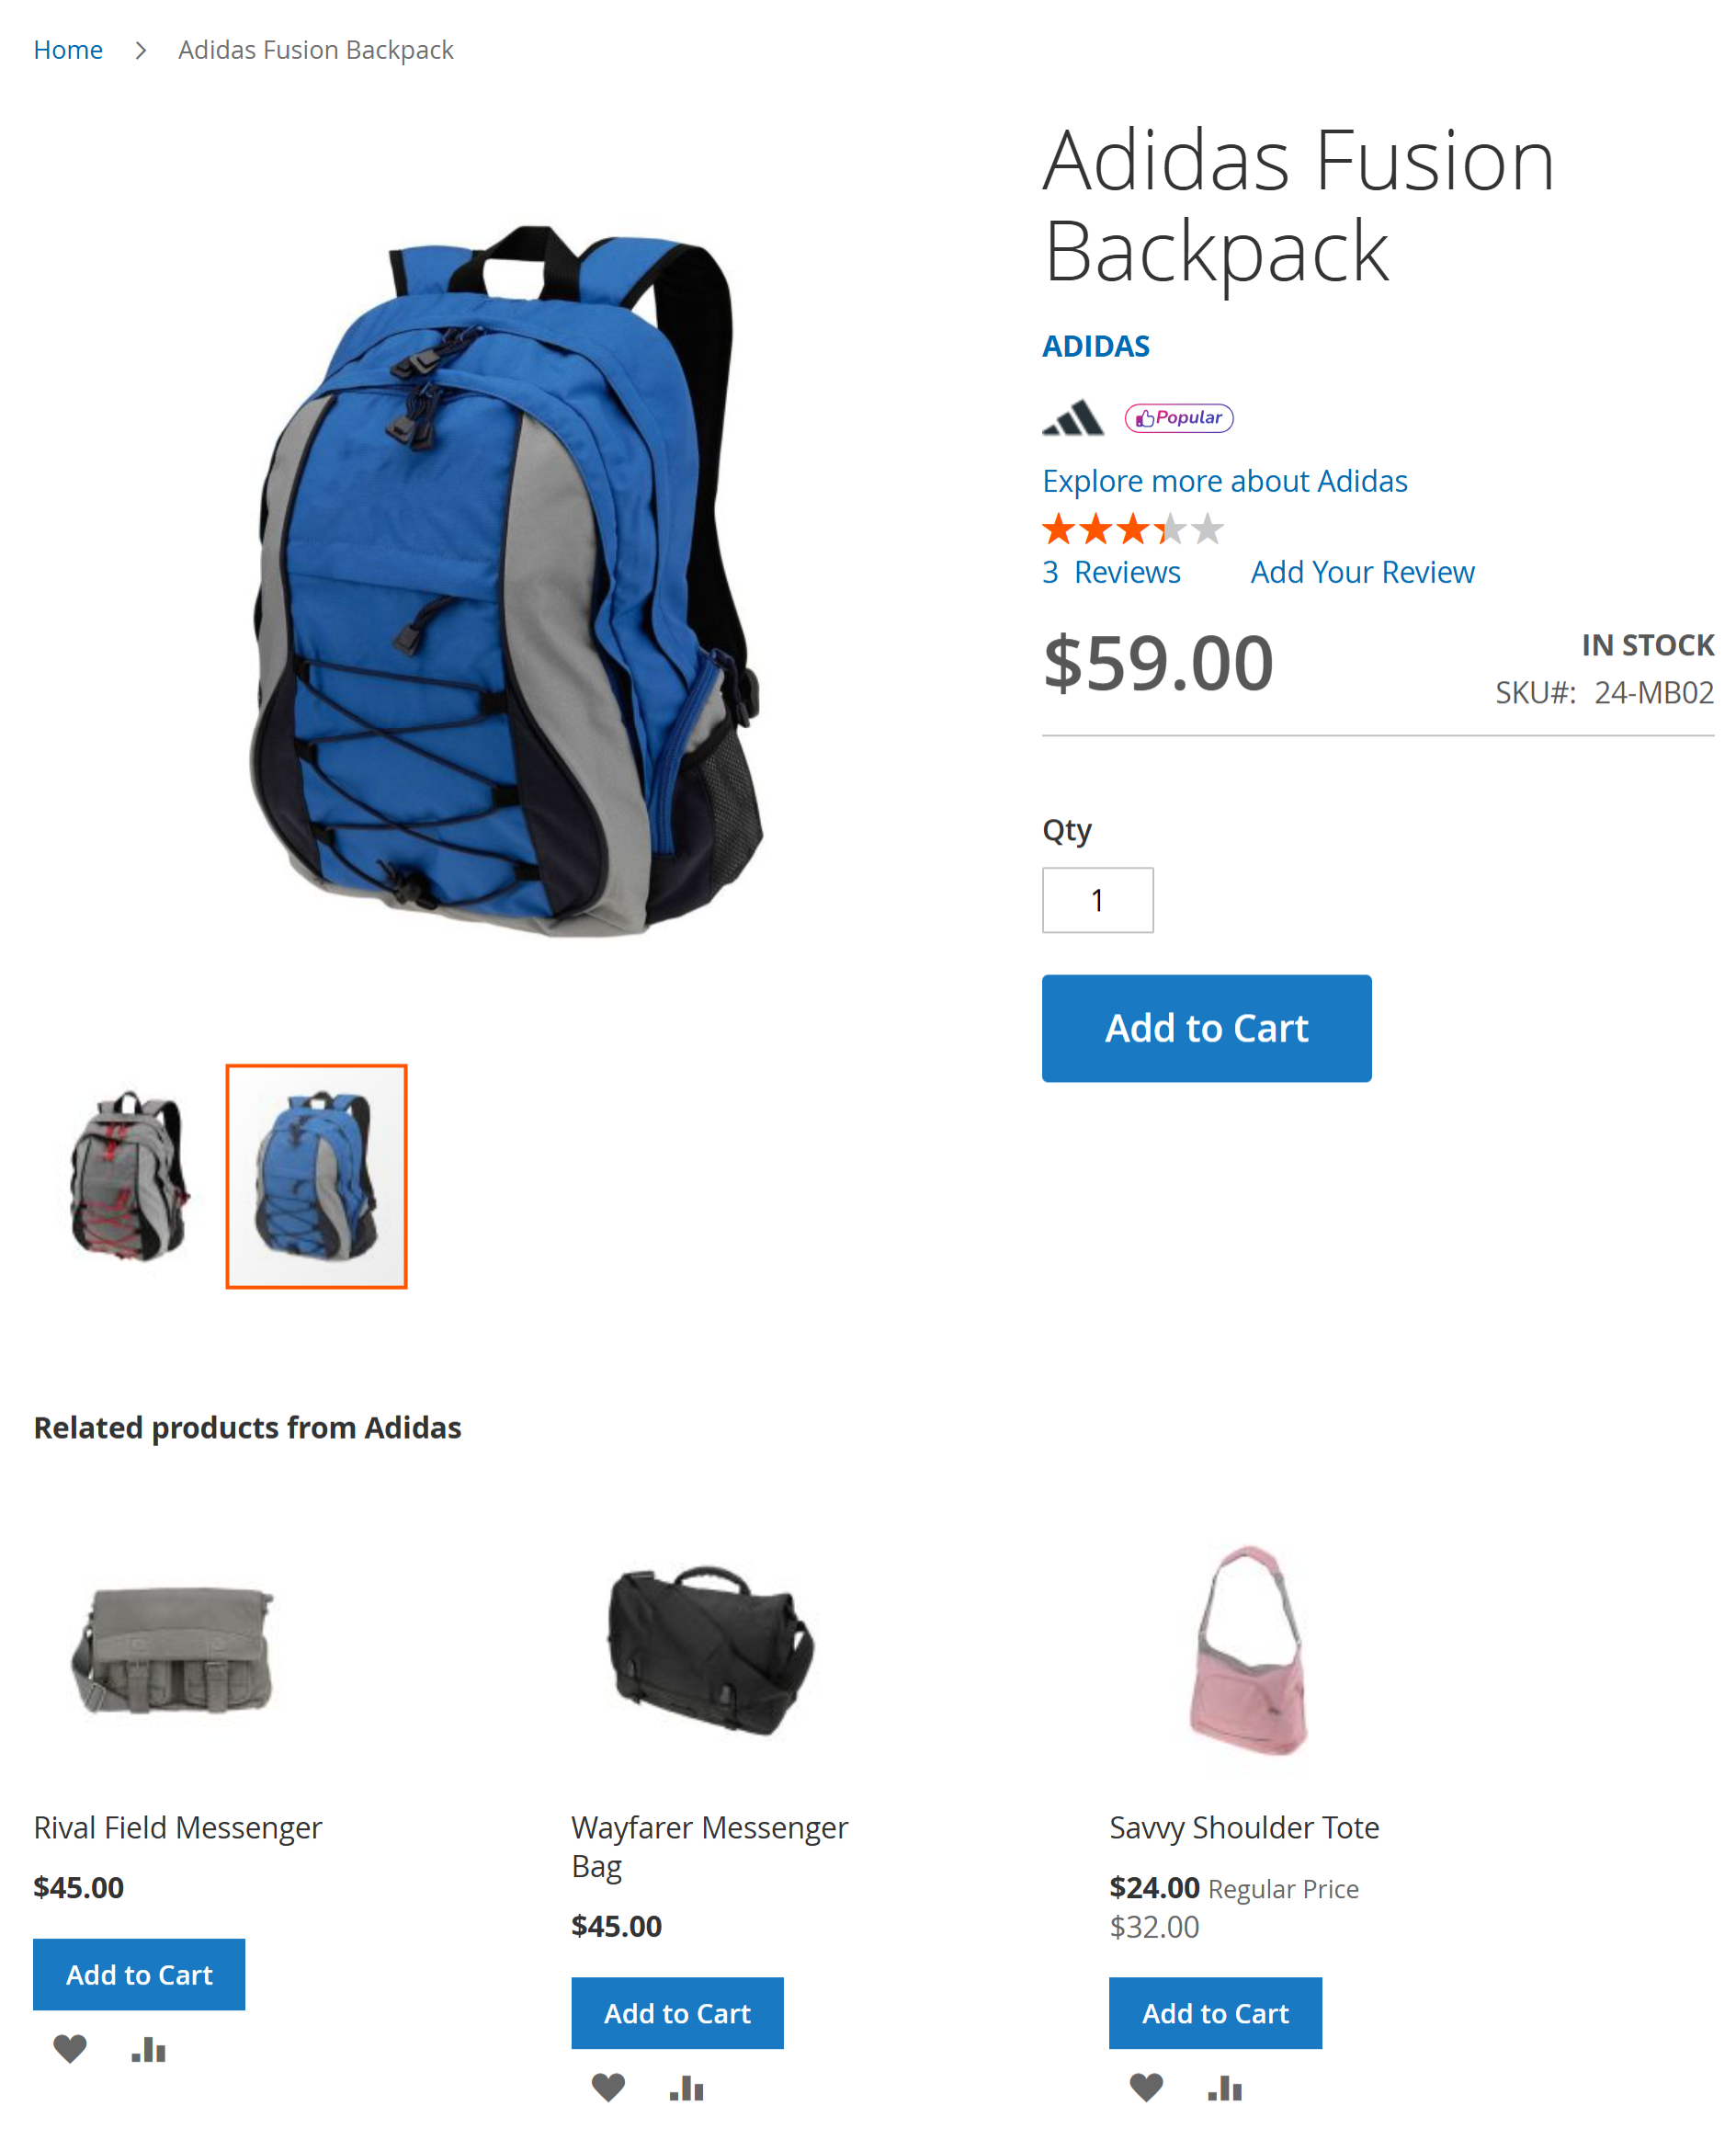
- This image illustrates the brand-related enhancements on the product detail page (PDP).
- When enabled, the product page displays a brand information label near the product title, including the brand name and brand logo. A clickable link such as “Explore more about [Brand]” allows customers to navigate directly to the brand’s dedicated landing page.
- Below the main product details, a Related Brand Products block is displayed, showcasing additional products from the same brand. The block title (for example, “Related products from Adidas”) can be customized from the admin configuration.
- Each product in the block includes key information such as product image, product name, price, and Add to Cart action, helping customers discover more items from the brand without leaving the product page.
- This functionality enhances cross-selling opportunities and improves brand-focused navigation within the storefront.
Brand Product Listing Page (Category View)
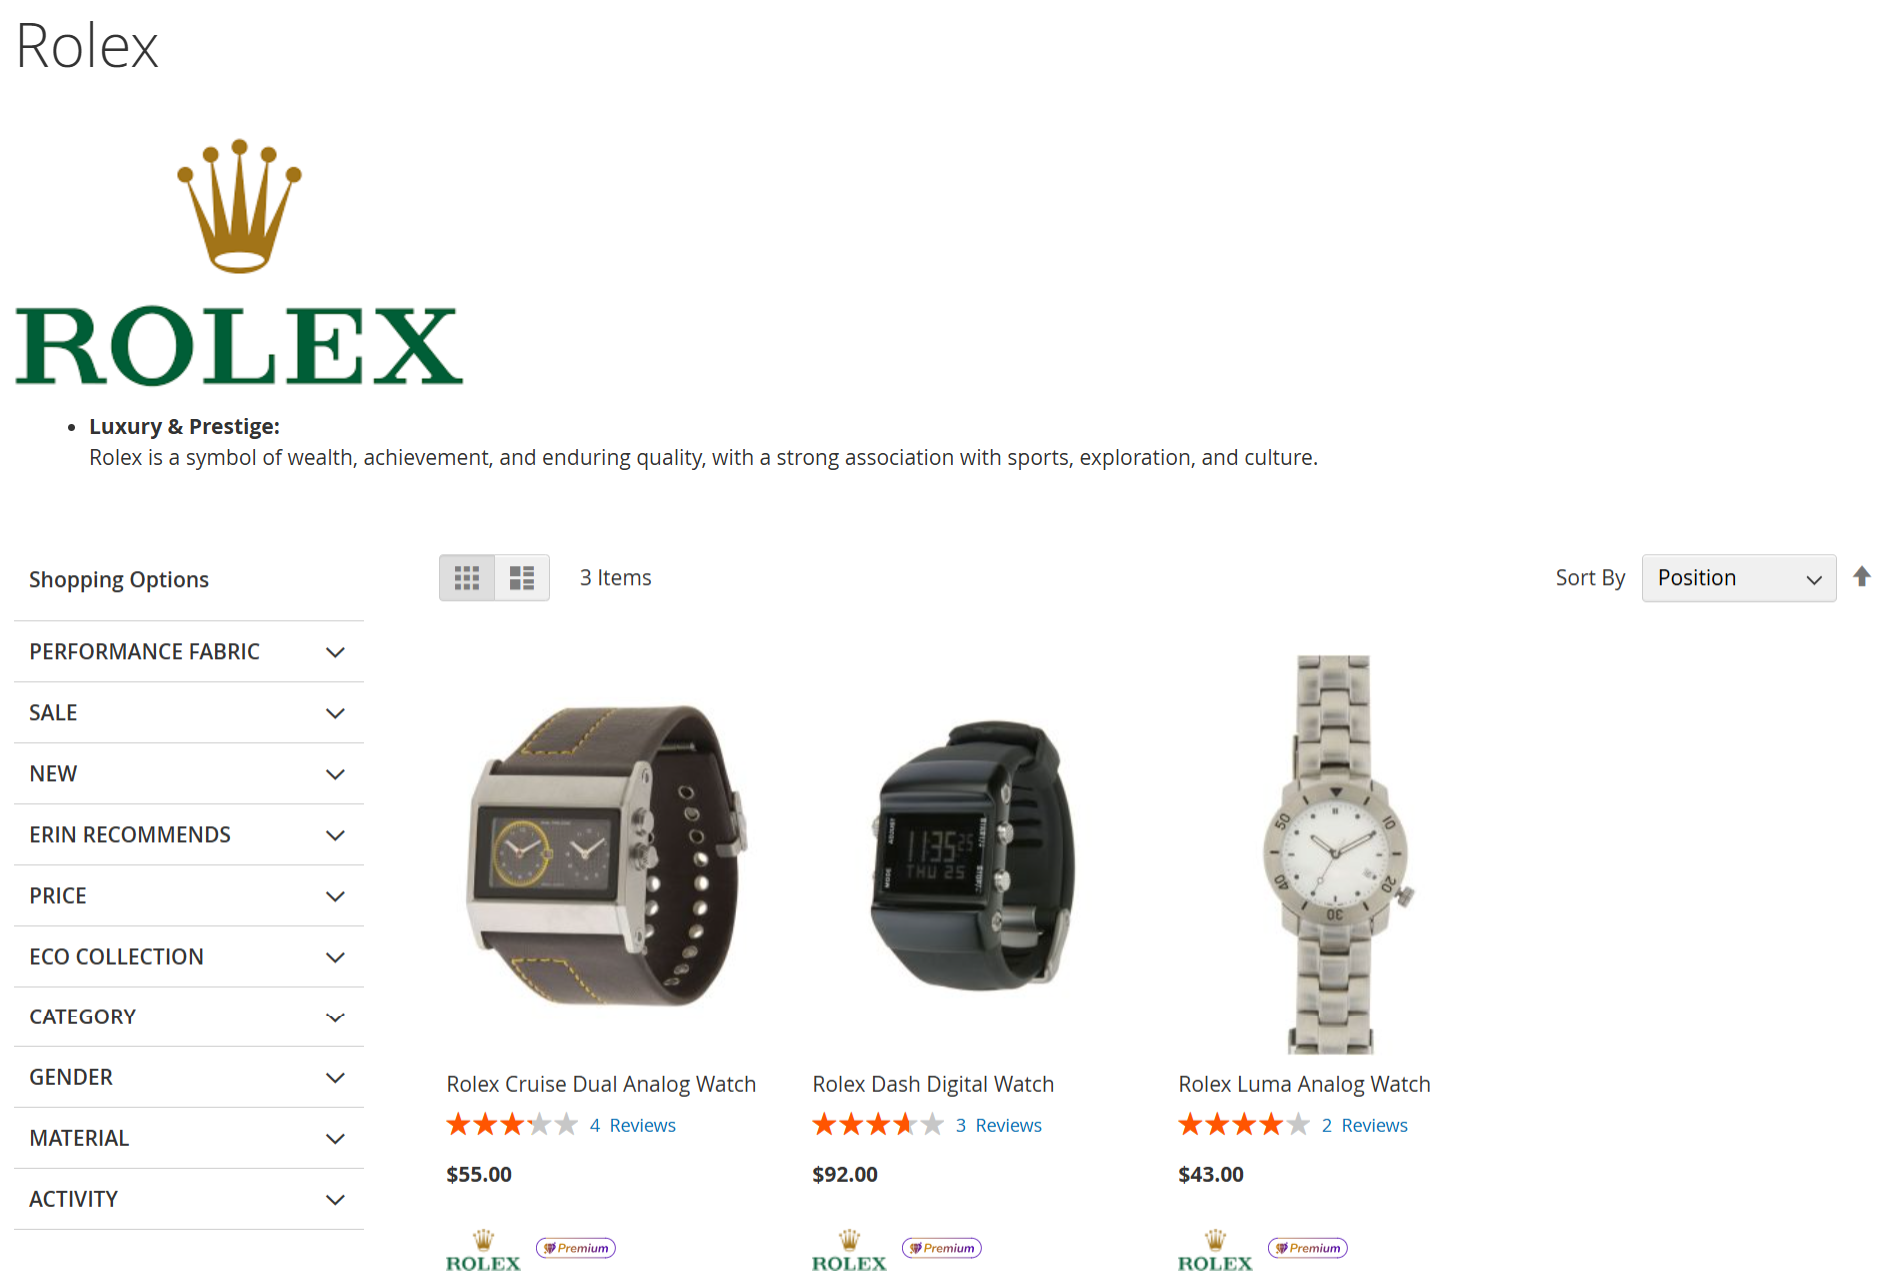
- This image illustrates the brand-specific product listing page, which is displayed when a customer selects a brand attribute value (for example, clicking a brand from the Brands menu, All Brands page, or brand listing widget).
- The page displays brand-related information at the top, including the brand name, brand logo, and brand description, followed by a standard product listing layout. All products assigned to the selected brand are shown in a grid or list view, with support for sorting and layered navigation filters, similar to native Magento category pages.
- Customers can further refine results using available filters such as price, category, attributes, and other catalog options.
- Only products that:
Have the selected brand attribute value assigned, and
Are enabled and visible in the catalog (Catalog or Catalog, Search)
are displayed on this page.
- This ensures accurate, SEO-friendly brand pages while maintaining consistency with Magento’s default product listing behavior.
Thank you for choosing MageDelight!