Installation
Before installing the extension, please make sure to Backup your web directory and store database
You will require to install MageDelight Base Extension first. If it is not installed then please download it from https://www.magedelight.com/pub/extensions/magedelight-base.zip and unzip the package file into the root folder of your Magento 2 installation.
Root Directory is - "app/code/magedelight/#YourExtensionName#"
- Unzip the extension package file into the root folder of your Magento 2 installation.
- Connect to SSH console of your server:
- Navigate to the root folder of your Magento 2 setup
Run command as per below sequence,
php bin/magento setup:upgrade
php bin/magento setup:di:compile
php bin/magento setup:static-content:deploy
php bin/magento cache:clean
- log out from the backend and log in again
If you are using Magento 2.3 or later then you do not need to activate license. Extension will be activated with silent activation mechanism and does not require activation keys to be entered manually.
Backend Configuration (Admin side)
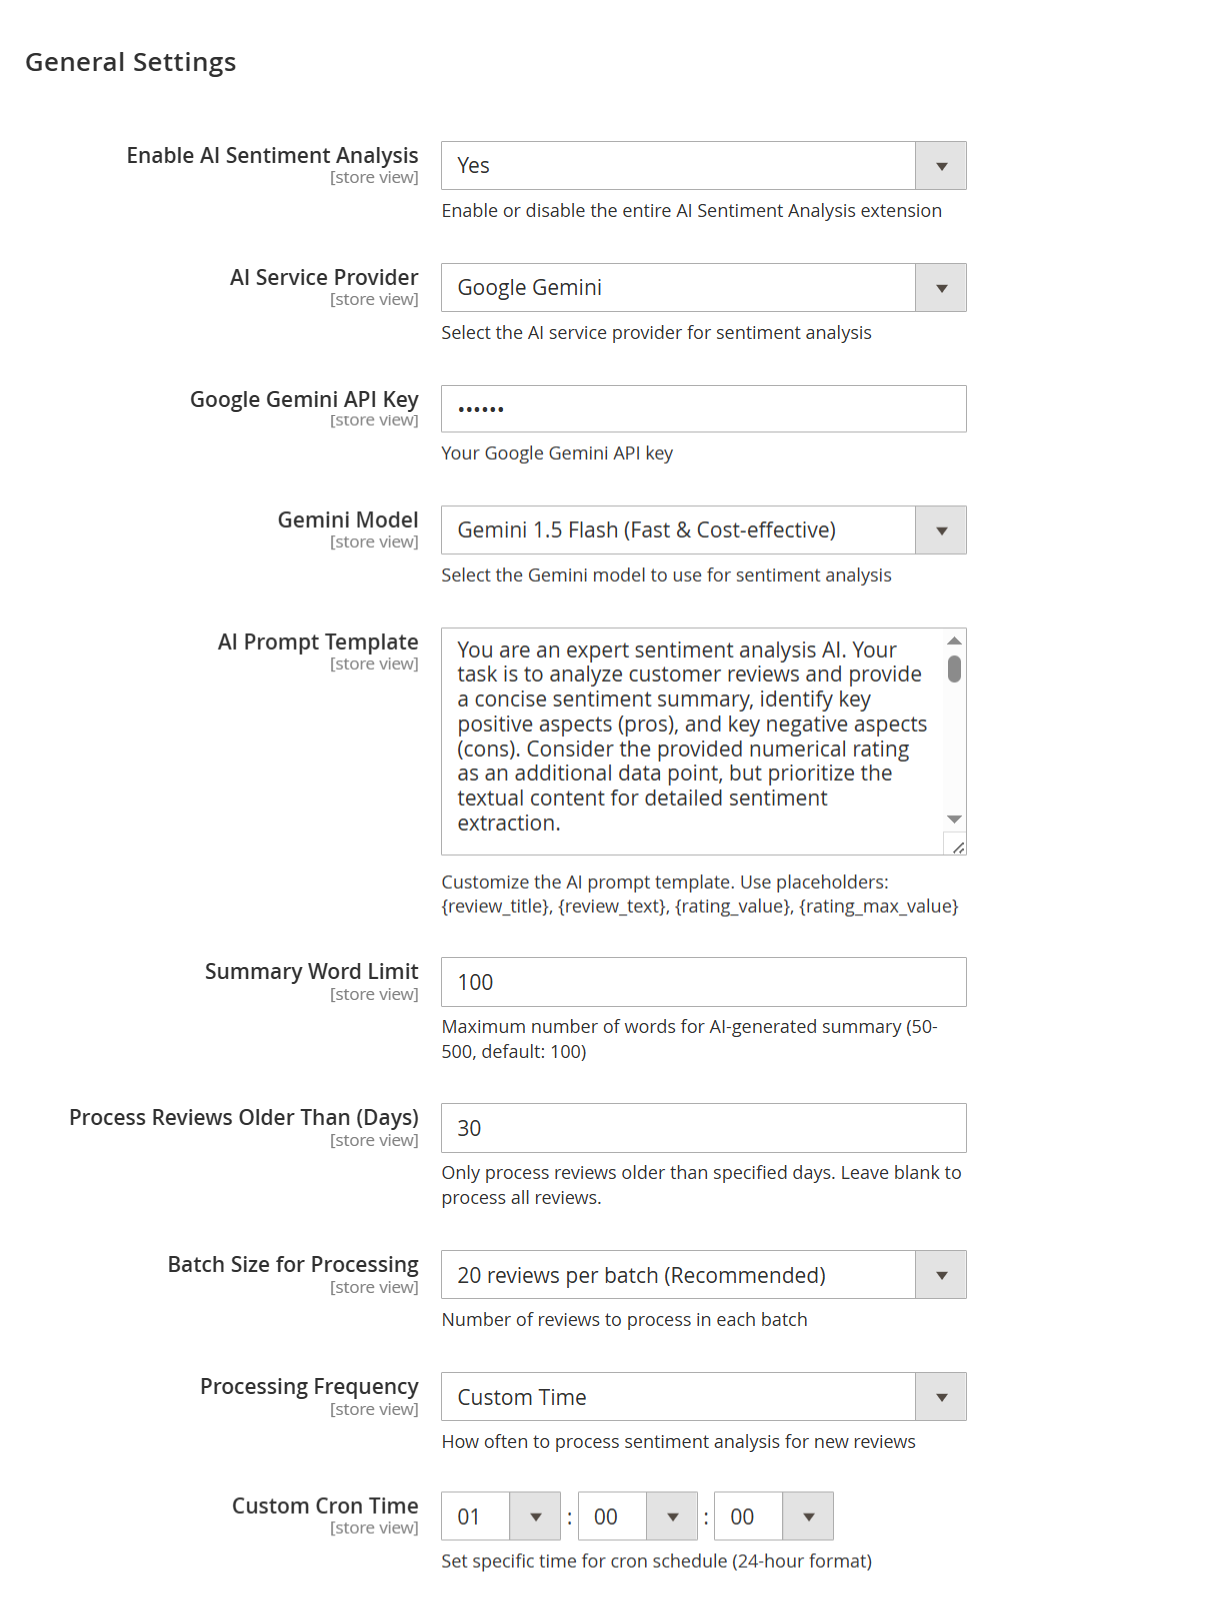
| Field | Description |
|---|---|
| Enable AI Sentiment Analysis | Select "Yes" to activate the AI Sentiment Analysis extension and start analyzing customer reviews automatically. |
| AI Service Provider | Choose your preferred AI provider for sentiment analysis. You can select either Google Gemini or OpenAI GPT based on your integration. |
| Google Gemini API Key | Enter your Google Gemini API key here to enable secure communication between your store and Gemini services. |
| Gemini Model | Select the specific Gemini model to use. We recommend Gemini 1.5 Flash for fast and cost-effective sentiment processing. |
| AI Prompt Template | Customize the instruction sent to the AI. You can include placeholders like {review_title}, {review_text}, {rating_value} to guide the AI. |
| Summary Word Limit | Set the maximum word count for the AI-generated summary. You can enter any number between 50 to 500 words. Default is 100. |
| Process Reviews Older Than (Days) | Define how old the reviews must be to be processed. For example, entering 30 will only analyze reviews older than 30 days. Leave blank to include all. |
| Batch Size for Processing | Select how many reviews you want the system to process in each batch. You can choose from 20, 30, 40, 100, 500, or 1000 reviews per batch. |
| Processing Frequency | Choose how often the sentiment analysis should run. Available options are: Every Hour, Daily, Weekly, Monthly, or Custom Time. |
| Custom Cron Time | If you selected Custom Time above, use this field to set the exact time (HH:MM:SS in 24-hour format) for the AI processing to run. |
Calendar view
- Show delivery schedule in: calendar view/time slot. If set to calendar, customer can select date from calendar. If select time slot, customer will get option to choose time slop option from available times.
- Enable Time in Calendar: If calendar view is enabled, you can show option to show time slot in calendar to choose for customer.
- Minimum interval of days between the order and delivery date: You can define number of day after customer can choose date for schedule delivery.
- Maximum interval of days between the order and delivery date: You can define number of day before customer can choose date for schedule delivery.
- Same Day Delivery: Yes/No. You can enable same day delivery.
- Same Day Delivery Charges: If same day delivery is enabled, you can define charges for same day delivery.
- Next Day Delivery: Yes/No. You can enable next day delivery.
Next Day Delivery charges: If next day delivery is enabled, you can define charges for same day delivery.
Time Slot View
- Show Delivery Schedule in: select TimeSlot View to allow customers to select the time slot of the day.
- Maximum Quota Per Time Interval: Set the maximum number of deliveries that can be sent per time slot. Once the delivery quota exceeds, customers will not be able to select that particular delivery time slot.
Time slot setting
- Add Number of delivery days: Define number of days to show time slots for next days.
- Minimum interval hours between order placing time and delivery time: you can set time gap, after delivery slot can be chosen to schedule delivery.
- Add Time slot: you can define multiple number of slots and price for delivery date. This time slots will be common for all days. However, you can disable selected slots for particular days and dates.
- Disable time slot for day: Disable particular time slots for particular week days. I.e. 4 PM to 8 PM time slot wouldn’t be available for Sundays.
- Disable time slot for date: Disable particular time slots for particular date. I.e. 4 PM to 8 PM time slot wouldn’t be available on 1st January.
Holiday Management
- Day Off: You can select days from week day for day off. That particular day will not be available for customer to choose schedule delivery.
- Single Day Off: You can choose specific date for holiday or day off. That will skip from schedule delivery calendar.
- From-to period off: Manage vacation period for multiple leave together. You can define start date and end date to define vacation period. Customer will not able to choose those days for schedule delivery.
Backend Functionality
Schedule Delivery summary in order/invoice/credit memo
Schedule delivery summary will be available for each order, invoice and credit memo. Kindly refer below images for each with detail.
Frontend Functionality
Once you configured the extension and create time slots to schedule delivery date, customer will have option at checkout to schedule delivery dates.
Checkout Page
Customer will get option on checkout for scheduling delivery based on admin configuration. If admin has set calendar view, customer will able to choose date for delivery day. Kindly refer below image,
Time slot option for customer to schedule delivery date, customer can view all available time slot for enable days, refer below image,
Customer will also have option to add comment for delivery schedule, if have any specific comment and have option to mark call me before delivery.
Based on the time selected slot customer can be charge for schedule delivery. Delivery charges will added to order summary with separate line item,
Gift wrapper at My Order Section:
The customer will be able to see the schedule delivery details, on order summary page.
Edit delivery date from frontend after order placement
Customers can change the delivery date after the order has been placed. Go to customer My Account > My orders > View Order.
At the end, find the option to edit the delivery date.
Admin will be notified for the change in delivery date.
As per standard Magento functionality once the order generated, order amount / delivery charges cannot be changed/modified from admin panel.
Thank you for choosing MageDelight!