Backend Configuration (Admin side)
| Section |
|---|
| Panel |
|---|

|
- Enable: Set "Yes" to enable the GA4 with GTM module.
- Associated Google Account: Enter your Google email to identify the associated GA4 account.
- GA4 API Keys: Enter the AI key that you generated from the Google Analytics 4 Panel
- Cookie Consent Based Tracking: Enable/disable GA4 tracking for customers.
- Strict Domain Tracking: Option to enable/disable strict domain tracking.
- Domain: You can add the domain name for the Ga4 tracking.
|
| Section |
|---|
| Panel |
|---|

|
- GTM JavaScript Head Code: Provide GTM JavaScript Code here with your unique GTM tracking ID.
- GTM Non-JS Body Code: Provide GTM Non-Javascript Code here with your unique GTM tracking ID.
|
| Section |
|---|
| Panel |
|---|

|
- Account ID: Provide the Google Tag Manager (GTM) Account ID associated with your setup.
- Container ID: Provide the GTM Container ID for the specific container you wish to use.
- Measurement ID: Provide the Google Analytics 4 (GA4) Measurement ID to link your data stream.
- Export Triggers and Tags: Click on "Generate" button to get the JSON file for the GTM.
|
| Section |
|---|
| Panel |
|---|

|
- Promotion Tracking: Set to "Yes" to enable promotion tracking in GA4.
- Event List: Select the event from the provided list that you wish to track for the promotional event.
|
| Section |
|---|
| Panel |
|---|

|
- Account ID: Provide GTM Account ID.
| | Section |
|---|
| Panel |
|---|
- Account ID: Provide GTM Account ID.
| Section |
|---|
| Panel |
|---|
- Account ID: Provide GTM Account ID.
| Section |
|---|
| Panel |
|---|
 Image Removed Image Removed
|
panelProduct Identifier: Select either SKU or ID to share with Google Analytics : - : Shares the Magento Product SKU
- : Shares the Magento Product ID
Currency: Choose between Base Currency or Store Currency for GA4: - Shares the store's base currency (e.g., USD).
- Store Currency:
- Example:
- Magento Store Base Currency is USD, and Store Currency is GBP. If your GA4 Panel shows USD currency, then select Base Currency, but if your GA4 Panel is configured to show data in GBP, then select Store Currency in MageDelight GA4 currency configurations. We assume that you have multi-currency enabled in Magento as USD and GBP (Store View).
Enable Brand: - Shares the store's local currency (e.g., GBP).
- For multi-currency setups, select based on your GA4 panel configuration.
Enable Brand: Select "Yes" to enable brand tracking, which shares brand values with GA4 APIs. Brand Attribute: Specify the Magento attribute (e.g., "brand") to share brand values with Google Analytics. Enable Product Variant: Select "Yes" to enable sharing of product variant information (e.g., size, color) with GA4 APIs. Child vs Parent: - is selected, GA4 APIs will receive Child Product information.
- If Parent is selected, only Parent Product information will be shared
- .
- This is useful for tracking configurable products (e.g., Parent SKU "MT11"
- shares "MT11," while Child SKU "MT11-S-Blue"
| | Section |
|---|
| 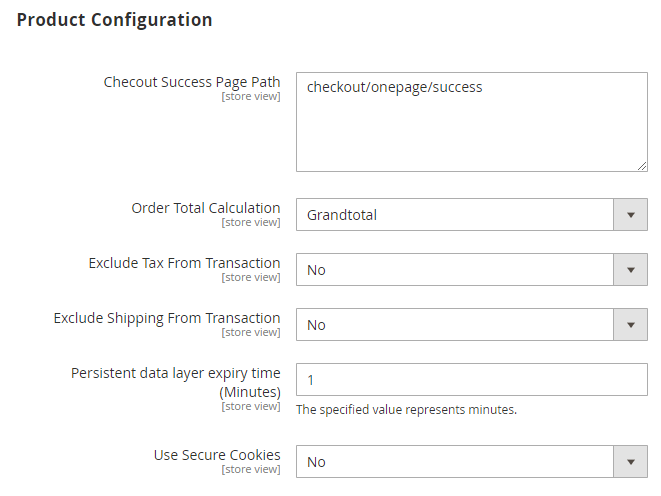 Image Removed Image Removed
| | Panel |
|---|
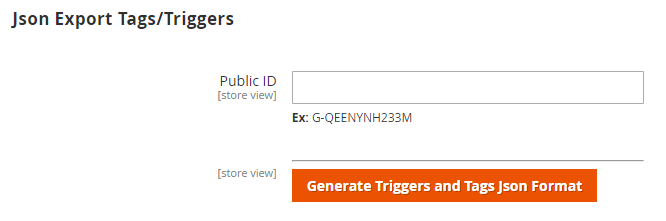 Image Removed Image Removed
|
- Provide "Public ID" (it can be found in your GTM account) to generate tags, triggers, and variables for GA4. It will be helpful to import the same to Google Analytics Panel.
| Expand |
|---|
| title | Steps to Import Container using JSON file |
|---|
| Go to your Google Tag Manager Dashboard and access the Admin section and choose Import ContainerClick the Choose container file option and navigate to the JSON file you previously prepared and downloaded. Then, select a workspace (existing or new) and an import option.When you import your container, you will be given the option of merging the imported content with the selected workspace or completely overwriting it. Overwriting the specified workspace will delete all of the workspace's current tags, triggers, and variables and replace them with the imported container.After importing the generated JSON, a preview will appear, informing you of the number of modifications made to the container. Tags, Triggers, and Variables should be added or altered in varying quantities based on your Magento Admin settings. After you click Confirm, you should be finished importing your preferences. Checkout Success Page Path: Specify the URL path for the checkout success page to track successful transactions. Order Total Calculation: Select the appropriate option from the dropdown list: - Subtotal: Includes only the subtotal of the order.
- Grand Total: Includes the subtotal, taxes, and shipping costs for the entire order.
Exclude Tax From Transaction: Select "Yes" to exclude tax from the transaction total when sending data to GA4. Exclude Shipping From Transaction: Select "Yes" to exclude shipping costs from the transaction - Persistent data layer expiry time: Provide values in minutes to persist (cookie) data layer.
- Use Secure Cookies: Set "Yes" to share the cookie as a secure cookie. Your website must be with HTTPS to use secure cookies.
- Is Allow Not Logged In customer: Set "Yes" to allow secure cookie for not logged in customers.
| Section |
|---|
|
| Section |
|---|
| Panel |
|---|
 Image Added Image Added
|
- Custom Attribute 1: Select Yes or No to define a custom attribute for tracking or categorizing specific data.
- Product Attribute 1: Select the product-specific attribute from the dropdown list for categorization or tracking purposes.
- Custom Attribute 2: Select Yes or No to define a second custom attribute for additional tracking or categorization.
- Product Attribute 2: Select a second product-specific attribute from the dropdown list for further categorization.
- Custom Attribute 3: Define a third custom attribute for enhanced data tracking.
- Custom Attribute 4: Define a fourth custom attribute for further data categorization.
- Custom Attribute 5: Define a fifth custom attribute for additional data tracking or segmentation
|
| Section |
|---|
| Panel |
|---|
 Image Added Image Added
|
- Enable AdWords: Set to 'Yes' to enable functionality of Google Adwords conversions tracking.
- Google Ads Code GA4: Enter the GA4 Google Ads tracking code to integrate with Google Ads for conversion tracking.
- Google Adword Remarketing: Enable remarketing by providing the Conversion ID and Label ID from your Google Ads account and enter the script.
- Container ID: Enterthe Google Conversion ID from your Google Ads account.
- Label ID: Enterthe Google Conversion ID from your Google Ads account.
|
| Section |
|---|
| Panel |
|---|
 Image Added Image Added
|
|
| Section |
|---|
| Panel |
|---|
 Image Added Image Added
|
- Enable: Set to Yes to activate the related functionality.
- Measurement ID: Enter the GA4 Measurement ID to track events.
- API Secret: Enter the API Secret for secure integration with Google Analytics.
- Event List: Specify the list of events you wish to track.
- Send User-ID: Set to Yes to send the User-ID to Google Analytics for user tracking.
- Automatically Disable Data Layer for Enabled Measurement Protocol Events: Set to Yes to disable the data layer when measurement protocol events are enabled.
- Enable Debug Collect: Set to Yes to enable debug mode for event collection and troubleshooting.
|
| Section |
|---|
| Panel |
|---|
 Image Added Image Added
|
- Enable Cron: Set to Yes to activate cron job functionality for scheduled tasks.
- Auto-Delete Logs After Days: Specify the number of days after which logs will be automatically deleted.
- Frequency: Set the frequency for cron job execution (e.g., daily, weekly, and monthly).
- Time: Specify the time at which the cron job will run.
|
|