Versions Compared

Key

  • This line was added.
  • This line was removed.
  • Formatting was changed.

...

Section


Column
width60%

Table of Contents
maxLevel3


Column
width30%


Image Removed
Section

Installation


Info

Md base module
NameBase Module


Warning

Before installing the extension, please make sure to Backup your web directory and store database

  • Unzip the extension package file into the root folder of your Magento 2 installation.
  • Connect to SSH console of your server:
    • Navigate to the root folder of your Magento 2 setup
    • Run command as per below sequence,

      Panel

      php -f bin/magento setup:upgrade


      Panel

      php -f bin/magento module:enable Magedelight_SEOPro


      Panel

      php -f bin/magento setup:static-content:deploy


  • Flush store cache
  • log out from the backend and log in again
Section

License Configuration

Note

License activation is not required for extension purchased from Magento Marketplace.

After successful installation of SEO Pro Extension extension, you are now required to configure the license key in the admin configuration section. You can set it from:

Step 1: Go to, Admin Control Panel > Stores Configuration > SEO Pro > SEO Pro Configuration > License Configuration. 

You will find two text boxes asking for Serial Key and Activation Key, which you received on email upon the purchase of extension. See screenshot below:

Panel

Image Removed

  • Serial Key: Enter Serial Key
  • Activation Key: Enter Activation Key

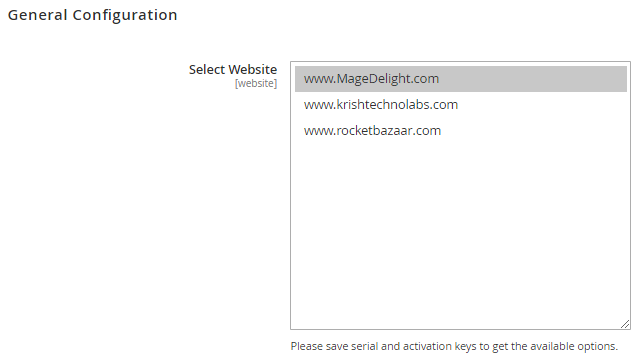
Step 2: Expand “General Configuration” tab, you will find a list of domains for which license is purchased and configured, now select the domain you are going to use, you can select multiple domains by clicking “Ctrl + Select”.

Panel

Image Removed

Step 3: Now, select “Yes” from “Enable Module” to enable extension and again click on “Save Config” button on the top right.

Panel


Section

Backend Configuration (Admin side)


Section

SEO Pro Configuration

Search Settings

Panel

  • Custom URL Key for Search Page: Select "Yes" to enable custom URL key for search page

  • Search Page URL Key: Provide custom search page key

404 Settings

Panel

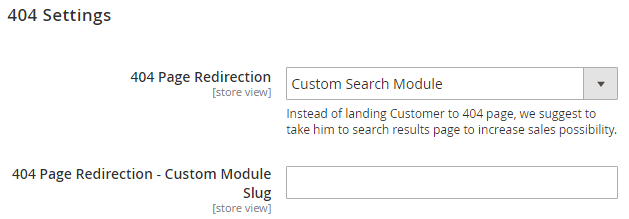
  • 404 Page Redirection: Enable search for 404 page redirection when user comes to wrong URL of the store. You can select No (not redirect to search, default search or custom search redirection options)

  • 404 Page Redirection - Custom Module Slug: Provide custom search page slug if any third party search installed.

Canonical URL Settings

Panel

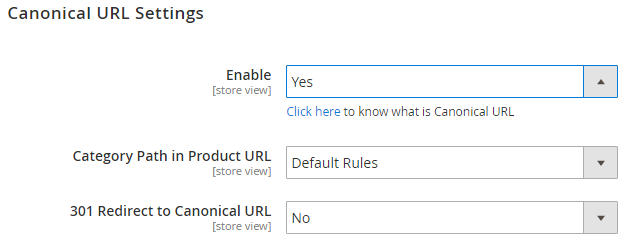
  • Enable: Select "Yes" to enable canonical URL.

  • Category Path in Product URL: Select category path to generate canonical URLs. You can select shortest path, longest path or URL without categories from the options.

  • 301 Redirect to Canonical URL: Select "Yes" to 301 redirection using canonical URLs.

Pagination Settings

Panel

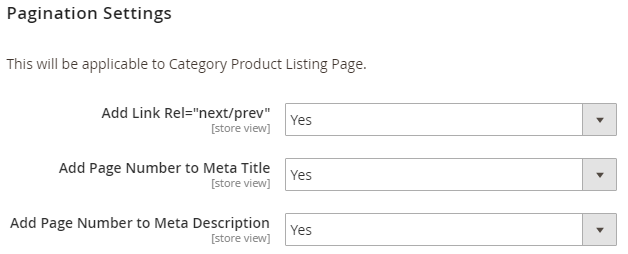
  • Add Link Rel="next/prev": Select "Yes" to enable next and previous links to page source.

  • Add Page Number to Meta Title: Select "Yes" to add page number to meta title.

  • Add Page Number to Meta Description: Select "Yes" to add page number to meta description.

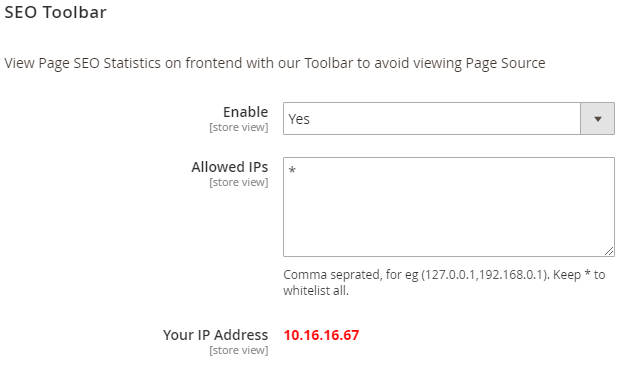
SEO Toolbar


Panel

  • Enable: Select "Yes" to enable SEO toolbar to display on frontend.
  • Allowed IPs: Provide comma separated IPs to display SEO toolbar.
  • Your IP Address: You can see your own IP here.


Section

Google XML Sitemap

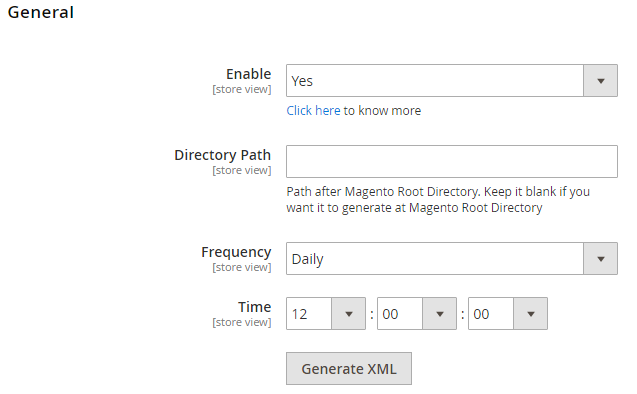
General


Panel

  • Enable: Select "Yes" to enable Google XML sitemap generation.
  • Directory Path: Provide directory path to save XML sitemap.
  • Frequency: Select frequency to generate XML sitemap. You can select either daily, weekly or monthly from given options.
  • Time: Select time to generate XML sitemap automatically.
  • Generate XML: Click to generate XML sitemap manually.

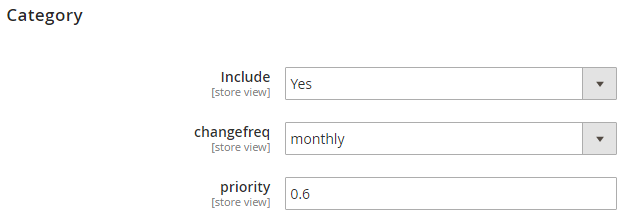
Category


Panel

  • Include: Select "Yes" to include category for XML sitemap.
  • changefreq: Select frequency to refresh category for sitemap. You can select options from below,
    • Always
    • Hourly
    • Daily
    • Weekly
    • Monthly
    • Yearly
    • Never
    • System defined
  • priority: Provide manual priority for category for XML sitemap.

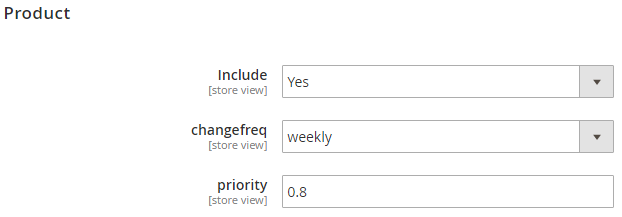
Product


Panel

  • Include: Select "Yes" to include products for XML sitemap.
  • changefreq: Select frequency to refresh products for sitemap.
  • priority: Provide manual priority for product for XML sitemap.

CMS


Panel

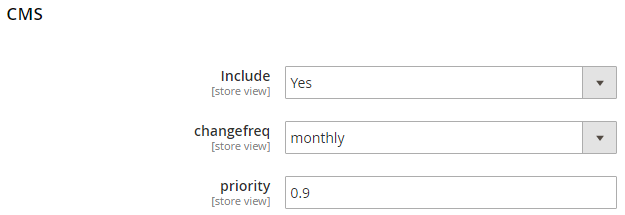
  • Include: Select "Yes" to include CMS page for XML sitemap.
  • changefreq:Select frequency to refresh CMS pages for sitemap.
  • priority:Provide priority for CMS page for XML sitemap.
Panel

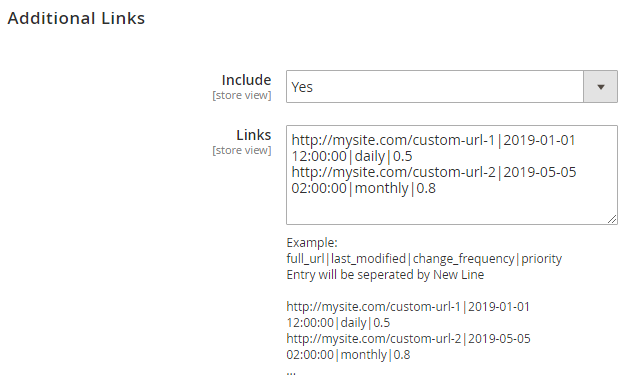
  • Include: Select "Yes" to include additional URLs to XML sitemap.
  • Links: Provide links in to specific given format for the XML sitemap.

Schema.org

Breadcrumb

Panel

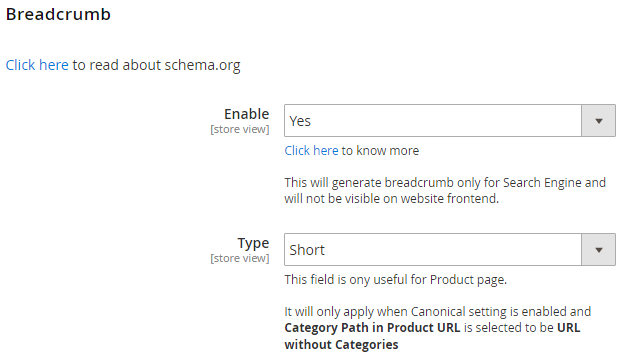
  • Enable: Select "Yes" to enable schema breadcrumb for schema.org.
  • Type: Select breadcrumb type for schema.org.

Google Search Results

Panel

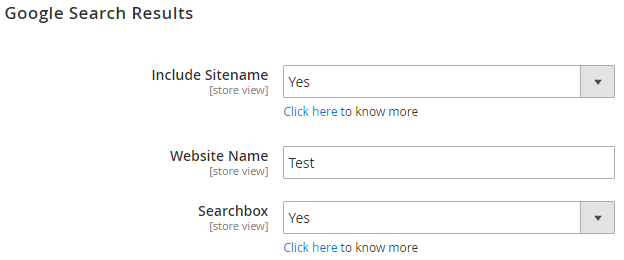
  • Include Sitename: Select "Yes" to include site name into Google search results.
  • Website Name: Provide website name for Google search result.
  • Searchbox: Select "Yes" to enable search box for Google search result.

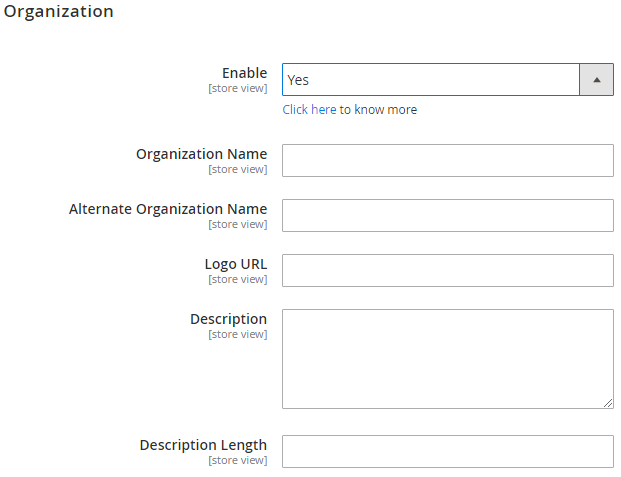
Organization

Panel

  • Enable: Select "Yes" to enable organization for schema.org file.
  • Organization Name: Provide organization name for schema.org file.
  • Alternate Organization Name: Provide alternative organization name for schema.org file.
  • Logo URL: Provide logo URL of organization for schema.org file.
  • Description: Provide description of organization for schema.org file.
  • Description Length: Provide description length for schema.org file.
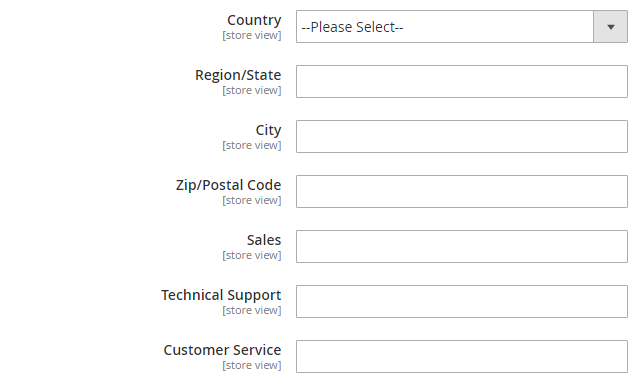
  • Country: Select country of organization for schema.org file.
  • Region/State: Provide State or Region of the organization for schema.org file.
  • City: Provide city of the organization for schema.org file.
  • Zip/Postal Code: Provide postal code of the organization for schema.org file.
  • Sales: Provide sales contact details of organization for schema.org file.
  • Technical Support: Provide technical support contact details of organization for schema.org file.
  • Customer Service: Provide customer service contact details of organization for schema.org file.

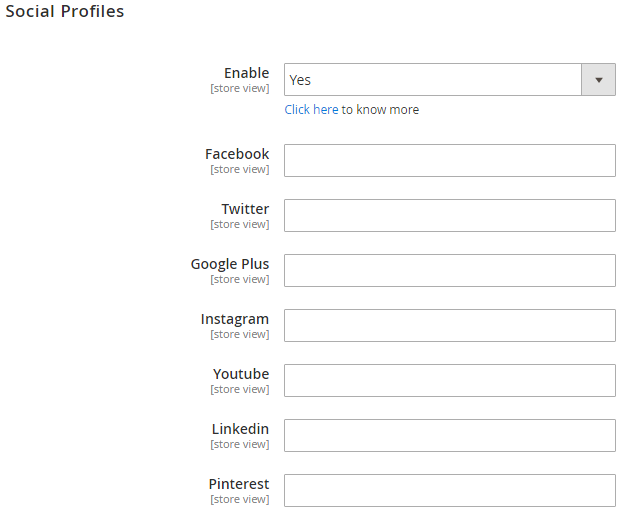
Social Profile

Panel

  • Enable: Select "Yes" to enable social profiles for schema.org.
  • Facebook: Provide Facebook profile URL.
  • Twitter: Provide Twitter profile URL.
  • Google Plus: Provide Google Plus profile URL.
  • Instagram: Provide Instagram profile URL.
  • Youtube: Provide Youtube profile URL.
  • Linkedin: Provide LinkedIn profile URL.
  • Pinterest: Provide Pinterest profile URL.
  • Myspace: Provide MySpace profile URL.
  • Sound Cloud: Provide Sound Cloud profile URL.
  • Tumbler: Provide Tumbler profile URL.

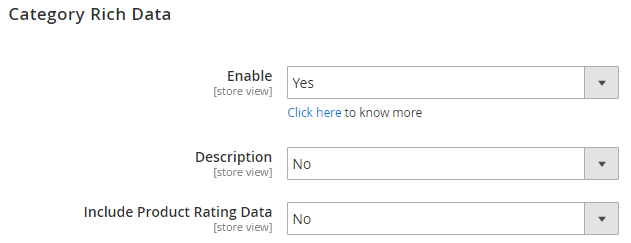
Category Rich Data

Panel

  • Enable: Select "Yes" to enable category rich data.
  • Description: Select "Yes" to add description for category rich data.
  • Include Product Rating Data: Select "Yes" to enable product rich data.

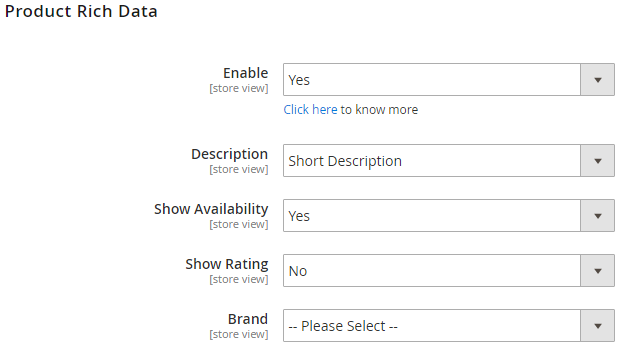
Product Rich Data

Panel

  • Enable: Select "Yes" to enable product rich data.
  • Description: Select either short or long description for product rich data.
  • Show Availability: Select "Yes" to include availability of the product.
  • Show Rating: Select "Yes" to include rating of the product.
  • Brand: Select brand to include in schema.org.


Section

HTML Sitemap

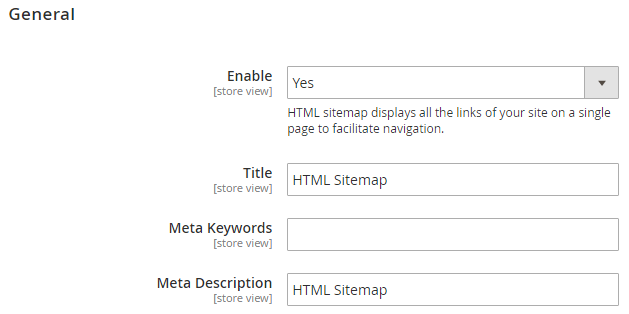
General

Panel

  • Enable: Select "Yes" to enable HTML sitemap.
  • Title: Provide title for HTML sitemap.
  • Meta Keywords: Provide meta keywords for HTML sitemap.
  • Meta Description: Provide meta description for HTML sitemap.
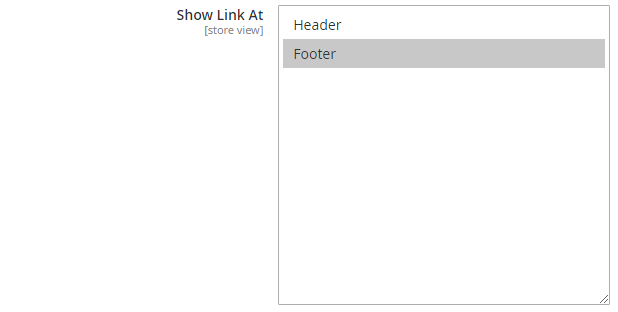
  • Show Link At: Select options to display sitemap links of HTML sitemap.
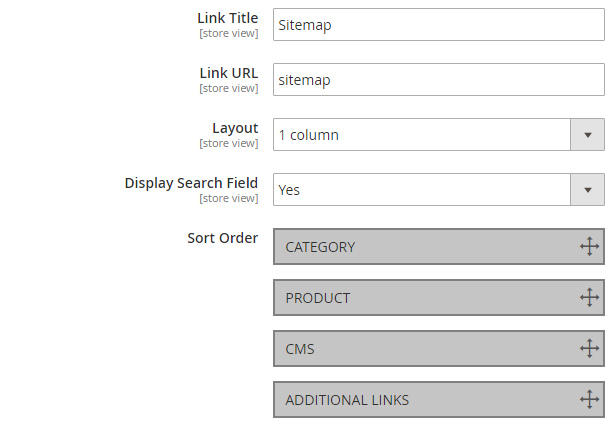
  • Link Title: Provide link title for the HTML sitemap.
  • Link URL: Provide URL for the HTML sitemap.
  • Layout: Select page layout of the HTML sitemap.
  • Display Search Field: Select "Yes" to enable search on the sitemap page.
  • Sort Order: Select sorting order of the category, products, CMS pages and additional links. You can drag and drop the sorting items.

Category

Panel

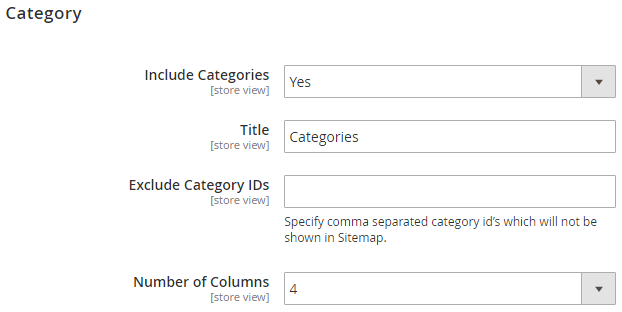
  • Include Categories: Select "Yes" to enable category to include into HTML sitemap.
  • Title: Provide title of the category section.
  • Exclude Category IDs: Provide comma separated category IDs to exclude for the list.
  • Number of Columns: Select number of columns for the category section.

Products

Panel

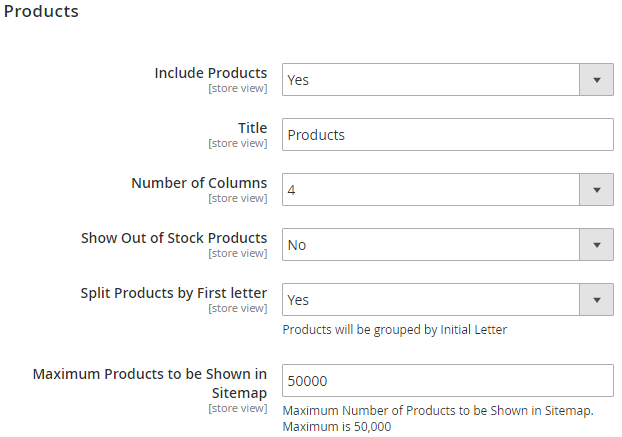
  • Include Products: Select "Yes" to enable product section for the HTML sitemap page.
  • Title: Provide title of the product section.
  • Number of Columns: Provide number of columns for the product section.
  • Show Out of Stock Products: Select "Yes" to include our of stock products.
  • Split Products by First letter: Select "Yes" to split products by first letter.
  • Maximum Products to be Shown in Sitemap: Select maximum number of products to display on product section of sitemap.

CMS Pages

Panel

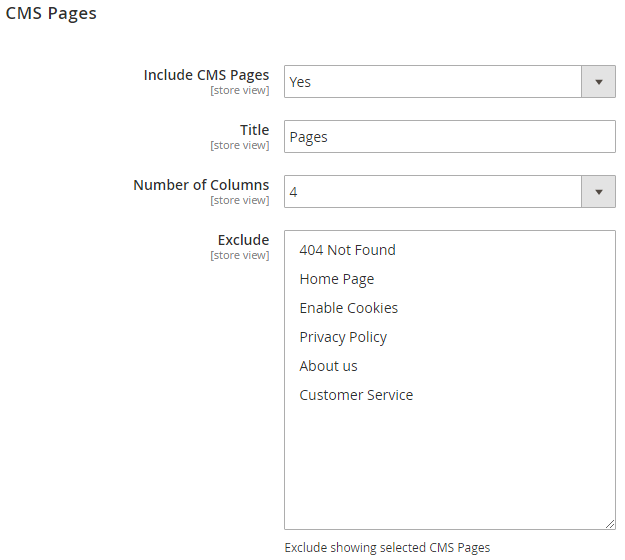
  • Include CMS Pages: Select "Yes" to include CMS pages to HTML sitemap page.
  • Title: Provide title of the CMS page section.
  • Number of Columns: Select number of column for the CMS page section.
  • Exclude: Select page to exclude from the sitemap page.

Additional Links

Panel

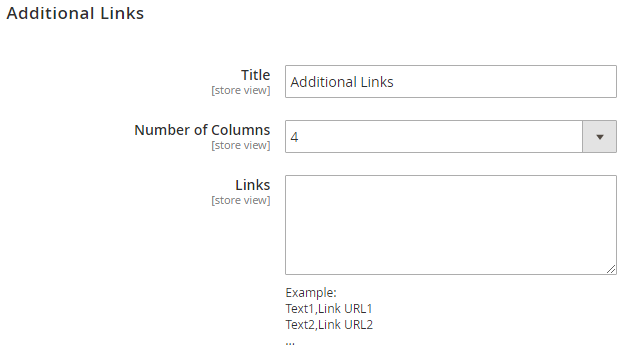
  • Title: Provide title for additional links section of the sitemap page.
  • Number of Columns: Select number of columns for the sitemap section.
  • Links: Provide comma separated additional links in said format.


Section

Facebook Pixel

General

Panel

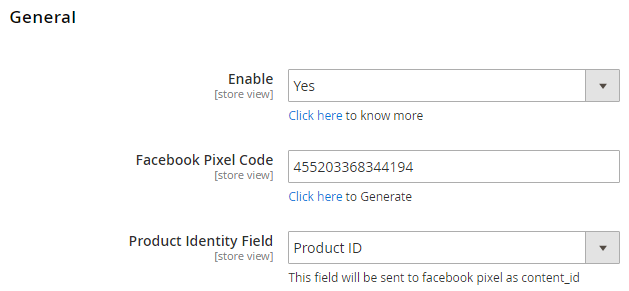
  • Enable: Select "Yes" to enable Facebook Pixel feature for your store.
  • Facebook Pixel Code: Provide Facebook Pixel code.
  • Product Identity Field: Select unique fields to identify visited product.


Section

Cross linking

General

Panel

  • Enable: Select "Yes" to enable cross linking for the store.

Category

Panel

  • Crosslinks Replacement Limit: Provide replacement limit for the cross linking for the store. It will replace keywords into link from the category description.

Product

Panel

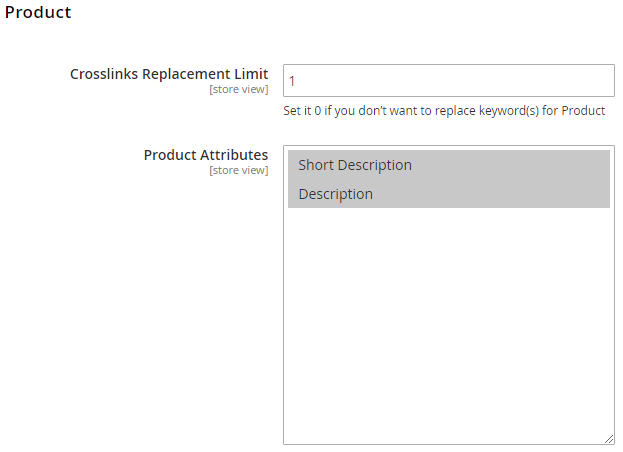
  • Crosslinks Replacement Limit: Provide replacement limit for the cross linking for the store. It will replace keywords into link from the product description.
  • Product Attributes: Select product attributes to replace keywords with links using cross linking feature.

CMS

Panel

  • Crosslinks Replacement Limit: Provide replacement limit for the cross linking for the store. It will replace keywords into link from the CMS page description.


Section

Meta Tags

Category

Panel

  • Enable: Select "Yes" to enable meta tags for the category.
  • Replace Existing Meta: Select "Yes" to replace existing meta of the category.

Product

Panel

  • Enable: Select "Yes" to enable meta tags for the product.


...